Talk to a F-150 Sales Tech
1-888-706-1096
M-F 8:30A-11P, Sat-Sun 8:30A-9P
$20K Sweeps! 10 Chances to Win! Enter Daily >

ReadyLIFT 3.50-Inch SST Suspension Lift Kit (21-24 4WD F-150, Excluding Raptor & Tremor)

Item T569370
Verify parts fit and get product recommendations.
F-150 Sales Techs: Connect Now M-F 8:30A-11P, Sat-Sun 8:30A-9P
$0.00
Our Price

$899.95

FREE Shipping Market Price $1,034.99 You Save 13% ($135.04) Up to 10% off for Military & First Responders! See Details

Will this fit your Vehicle?

Select a different vehicle Help?
Update or Change Vehicle
Ship to: Ashburn - 20149
Sorry, please enter a valid US or CA postal code
We're sorry, zip can't be updated at this time.
    Create a list
    Add to New List

    Saved - View your saved items

    We're sorry. We couldn't save this product at this time.

    or use

      Product Videos

      Merideth: If you're looking to mount up those larger wheels and tires, and need a solid kit that's gonna get the job done, this ReadyLIFT 3.50-inch SST Suspension Lift Kit will be a great pick for all 2021 and newer 4-wheel drive F-150s, excluding the Raptor and the Tremor models. Now, this kit will be a great addition to your truck if you're looking for an easy way to gain some better performance for your F-150, whether that's more ground clearance, or fitting a bigger tire, for better capability off-road. This will also be a great pick if you're looking to correct the factory rake, creating a more defined stance, and leveling out the appearance through the truck.This kit will feature 3.50 inches of lift for the front and 1.25-inch spacers for the rear, getting that additional ground clearance, and leveling out the stance if you're not in need of the additional rake for towing. This will also raise the nose and the rear end, allowing you to get over obstacles a little bit easier, and fit a larger tire comfortably inside the wheel well. Now, ReadyLIFT does state that this will fit up to a 295/60R20, with a positive 18-millimeter offset, or a 35 by 12.50 with a wheel that has 0 millimeters of offset, with minimal plastic trimming, so I would just keep that in mind. The kit will also come with control arms that will accommodate for that additional angle change, and also preload spacers, to maintain good yet responsive drivability.The front strut spacers, the preload spacers, and the shock extensions will be made of a billet aluminum material, being incredibly strong. Now, the rear lift blocks will be made of a fabricated steel, and you can ensure that these will hold up for the long run, especially with the zinc-plated hardware. Now, I would like to mention that the front strut spacers will measure out to roughly 1.50 inches. However, the suspension geometry combined with the spring compression will achieve that 3.50 inches of lift in the front. The rear blocks will be true to size because they are mounted up to a solid axle.Now, getting into the control arms, these are gonna be made of a steel tube construction, being a lot more durable than the factory ones. They're also gonna come with a pretty heavy-duty ball joint that you will be able to grease and maintenance for the lifetime of the control arm. Now, these are also just going to kind of flatten out that angle, and give you the best drivability when it comes to correcting those angles with the addition of the 3.50 inches of lift in the front. Not to mention, the kit will come with everything that you need in order to get this installed on your truck, with no drilling or modification required.When it comes to lift kits, this will be more on the affordable side when it comes to size, coming in at roughly $1,000. When shopping around for lift kits, usually, kind of what you see is that the more components that the lift comes with usually means that the pricier that they will be. Now, this kit will be right in the middle, being pretty inclusive, but it's not gonna include every single bell and whistle, like the more expensive choices, like complete struts, shocks, or coil-over setups. Then, on the other hand, some less expensive solutions may not come with all the correcting components that you see here, like the shock extensions or the control arms, making this a great choice if you're looking for a quality yet middle-of-the-road lift that's not going to completely break the bank.When it comes to install, this will be a 2 out of 3 wrenches on the difficulty meter. You will need a little bit of mechanical know-how in order to tackle this job, and it'll probably take you about six hours to get the job done. At this point, we can head over to the shop, and we can show you a full breakdown of the install, and what it looks like step-by-step. So, that's gonna wrap it up for me. Let's go ahead and get into it.Man: Tools required for this install include a 1/2-inch impact gun, a 3/8 impact gun, a 1/2-inch air gun, a pry bar, a bungee cord, 18, 19, and 27-millimeter wrenches, 14, 15, and 21-millimeter ratcheting wrenches, a hammer, a clip remover tool, a 10, 14, 15, 18, 19, and 21-millimeter sockets, a couple extensions, a 3/8 and 1/2-inch swivel adapter, as well as some pole jacks.What's up, guys? Today we're gonna be installing a lift kit on our F-150. So, our first step is to remove our bracket that's holding our brake lines in, as well as our sway bar end link. Now, the nut on our sway bar end link's gonna be a 21-millimeter, and our bolt holding our bracket to our knuckle is gonna be a 10-millimeter. So, now we can grab a 10-millimeter socket to remove the bolt holding our brake line bracket into place, and we'll move our bracket off to the side, and throw our bolt back there so that we don't lose it. And then we can grab our 21-millimeter socket to disconnect our sway bar end link. And then we can pop our end link out of our knuckle, throw our nut back on there, so that we don't lose it.Now we can come over to the other side and disconnect our tie rod. We have a 21-millimeter nut here, so I'll grab a 21-millimeter socket to remove this nut. And then we can pop out our tie rod, and we'll throw our nut back on so that we don't lose that. Next, we can come underneath of our lower control arm and remove our two 18-millimeter nuts at the bottom of our strut. So, we'll grab an 18-millimeter socket to pop these off. And we will be reusing these nuts, so make sure you keep them in a safe place. Next, we can remove the clips that are holding our lines in up here. So, we'll grab a clip remover tool, get behind there, and then we'll remove our two up here, by the upper control arm. So now, coming up to the top of our strut here, we can loosen up our three 15-millimeter nuts. We're not gonna remove them quite yet until we're ready to remove our strut. And I'm using a 15-millimeter ratcheting wrench for these three.So, our next step is to drop our lower control arm from the pivot points on the frame. Now, we have two bolts, one on each side. That'll be 21 millimeters. And then two 27-millimeter nuts, again, one on each side. I've got a couple pole jacks here, just to apply some upward pressure to our lower control arm. That way, once we get our nuts off, we can pull our bolts out really easy, and then we can drop our lower control arm, and work on getting our strut removed. So, now we can grab a 21-millimeter socket for our bolt side, and a 27-millimeter wrench on our nut side, and remove our nut. And then once we have both of our bolts removed, we can remove our pole jacks, and then we can drop our lower control arm, and that'll separate our lower control arm from our lower strut mounts. So, now we can go back to the top of our strut and finish removing our nuts. Now, two of them should be pretty loose, and only one should be really supporting the weight of it at this point. Now, once we have our strut removed, we can come back underneath the truck, and we're gonna lift our lower control arm back up into place and thread our bolts back through.Then we'll just put our nuts just a couple threads on on each side. This way, this'll hold the lower control arm into place while we start to remove our upper control arm. So, now we can come back up to the top of our knuckle and disconnect our upper control arm ball joint. This is gonna be an 18-millimeter nut. I've got an 18-millimeter socket that we can remove this with. And then with our nut still threaded on a few threads, we can tap the side of the knuckle to pop the knuckle out from the upper control arm ball joint. And then once we get that pop, we can finish removing our nut. I've got the bottom of our knuckle supported with a pole jack, and then we can just finish popping our upper control arm out. So, next, we can remove our upper control arm. Now, we have two bolts on the inside of our strut tower that are gonna be 18 millimeters. And then we have two nuts on the outside, that are 21 millimeters. So, I'm gonna grab a 21-millimeter wrench for our nut, an 18-millimeter socket for our bolt.And now we can just finish removing our nuts by hand, and then we can pull our bolts through. And finally, remove our upper control arm. So, now our first step is to install our new upper control arm. Now, you're gonna wanna make sure you match up your old one to the new one. One of them, our ball joint is offset to the right, and one of them, our ball joint's offset to the left. Now, the one with the offset to the right is gonna be for our driver's side. So, then we can raise that up into place, we'll put our factory hardware back through, and then we can get a 21-millimeter wrench on our nut side, an 18-millimeter socket on our bolt side, to tighten everything down. So now, with our upper control arm installed and tightened down, we can reconnect our upper control arm ball joint to the knuckle. So, we'll pop our nut off our upper control arm. And then once we have our nut threaded on, we can take our 18-millimeter socket to tighten that up.So, our next step is to mount our spacer to our factory strut. Now, we have our three holes that mount up with our studs. There's only one way that it can go on, so you don't have to worry about getting it sideways. Won't go on that way. Won't go on that way. There's only one possible way for it to go on. And then we'll be reinstalling our three factory strut nuts onto our factory studs. And then we can take our 15-millimeter socket on an impact gun to tighten these down. And now we're ready to get our strut back into the truck.So now, with our upper control arm ball joint reconnected and our strut ready to go back into the truck, we can come back to our lower control arm pivot points and remove our hardware. So now, I've got a pry bar here that's wedged between the top of our frame and under the upper control arm, so that we can lift the upper control arm to get the clearance we need to slide our strut through. And then we can grab the nuts that are included in our kit for the top of our strut tower, and we can just install these hand-tight for the time being. And now, one more thing, important to note, I've got a bungee cord here on our tie rod, just so that it pulled it out of the way so I had more room to get our strut in here.Now, once we have our nuts at the top of our strut tower installed, we can get our lower studs into our lower control arm. So, you might have to push the lower control arm towards the outside of the car a little bit, to get everything to line up. But then once we have some stud poking through, we can reinstall our factory nuts. So, now we can raise our lower control arm back up to our frame and get our hardware through. Now, I've got a pole jack on each side to help me do this. We'll crank up a little bit on each side at a time, keeping it pretty even. And then once we have our opening where we can get our bolt through, we'll put that through. And now, on this side, we need to come out towards the outside of the car a little bit. So, we'll get a pry bar in here, just to help us push forward a little bit. And then once we have our bolts through, we're gonna be replacing our nuts. So we won't put them on. We can lower our pole jacks just a little bit now.So now, instead of replacing our factory nuts on this end, this kit includes camber adjustment. So, we have a plate, and then a nut. And as you spin the nut, it'll change the angle of your camber. Now, on the backside, there's this little tab that goes into this hole here. So, we'll press that into place, and then we can start to thread on our nut. And now, once we have the camber adjustment installed on this pivot point, we can do the same thing on the other side of our lower control arm. And then, now, once we have our camber adjustment installed on both sides, we can grab a 27-millimeter wrench for our nut side and a 21-millimeter socket for our bolt side, and tighten these down. So now, how you use these nuts is once everything's tight, you can get your wrench on there. And as you turn this to the right, it's gonna push our lower control arm out, and if you turn it to the left, it'll pull it back in.Next, we can come to our lower strut bolts, and tighten up our nuts. So, we'll grab our 18-millimeter socket to zip these down. Next, we can come back up to the top of our strut tower and fully tighten down all of our nuts. Now, the nuts that are included in the kit for the top of the spacer studs is a 14-millimeter nut instead of a 15-millimeter nut. So, I'll get a 14-millimeter ratcheting wrench to tighten these down. Next, then we can reconnect our tie rod to our knuckle. Then we can reinstall our 21-millimeter nut, and we'll tighten that down with a 21-millimeter socket. Now we can go back and reinstall all of the clips on our wires here. So now, the last two things we have to do is reconnect our sway bar end link and reconnect our bracket. So, I'm gonna grab a pry bar, so that we can pry down on our sway bar. We'll pop that through, reinstall our 21-millimeter nut, and we'll tighten that up with a 21-millimeter socket. And then we can pop our bracket back into place, thread in our 10-millimeter bolt, and then tighten that down with a 10-millimeter socket. And then once you're done with this side, you're gonna repeat that same process on the other side.So now, moving on to the rear, we have to drop our axle a little bit to get our factory block spacer out and put in our new one. So, the first step to doing that is to remove our shocks. Up top, we have a 15-millimeter bolt, with a nut with a tab on the back, so we don't need to get a wrench on the backside. But on our bottom mount, we have a 15-millimeter bolt with a 18-millimeter nut that we have to remove to get our shock out. So, now I've got a pole jack on the axle, just to give this some support while we start unbolting everything. So, we'll start with our lower shock mount. Once again, we have an 18-millimeter nut and a 15-millimeter bolt. Now, at the top, we can grab a 15-millimeter socket to remove our bolt. We have this tab here. That's gonna lock it in place. Once we start removing this, the tab will flip to the other side, lock against the metal, so we don't need to get a wrench on the backside.So, our next step is to swap out our block spacer. So, to do that, we have four 21-millimeter nuts here that we have to remove. Make sure you have your axle supported. And then we can take out our old block and install our new one. And then we have new U-bolts that'll go up top, and new nuts on the bottom as well. So now, with our axle supported by a pole jack, we can remove our four 21-millimeter nuts. We'll do this with a 21-millimeter socket on an impact gun. And then once we have those removed, we can start to lower our axle with the pole jack until we get enough room to get our block out and get our new one in. And then we'll raise it back up, put in our hardware, and tighten it all up. So now, with our nuts removed, we can start to lower down our axle until we can get our spacer out. And then we can remove our factory U-bolts. Then we still need to come down a little more, to fit our new spacer in there. And we can start going back up, close the gap, making sure everything lines up properly.So now, once we have our spacer lined up with our top and our bottom holes, we can start to put our U-bolts in, get our bracket on the bottom, and start tightening everything up. Now, you might have a little gap on the top or bottom where your holes haven't properly seated yet, but once we start tightening everything down, it'll take care of that. So, we'll grab those new U-bolts that were included in the kit, and slide them down. And then we can reinstall our factory bracket. And we'll start installing our new 19-millimeter nuts that are included in our kit. Then we're gonna push our bracket up into place, and take a 19-millimeter socket to start tightening down our nuts. And now you can see, as our bolts, or as our nuts start to get tighter on our bolts, it's pushing everything down into place where it should be.So, our next step is to install our shock extension. Now, this is gonna slide right over the top here, and then we have a bolt, we have a washer for each side, and our locking nut. So, we'll grab our bolt, throw our washer on there, get everything lined up, thread our bolt through, put another washer on the other side, and then our locking nut. And then we can tighten these down with a 19-millimeter socket and a 19-millimeter wrench. And now we're ready to get this back installed on the truck.So now, once we have our shock extension on, we can reinstall it onto the truck, reusing our factory hardware. And we'll put that nut with the tab on the back. And then we'll leave that loose for right now until we get our bottom shock mount in place. Now we can install our shock into our lower mount. Now, it's a little farther down now because of our extension, so we're gonna have to push up on the bottom to compress it while we try to get our bolt through. And then we can get our nut on the other side. And then we'll take our 18-millimeter wrench for our nut side, 15-millimeter socket for our bolt side, and tighten that down. So, now we can go back up top to our upper shock mount and tighten down our 15-millimeter bolt. Once again, the nut on the backside has a tab. It's gonna flip to this side when we go to tighten it, to lock it in place, so we don't have to get a wrench on that side. And then once we're done with this side, we can repeat that same process on the other side.So, that'll wrap up this review and install of the ReadyLIFT 3.5-inch SST Suspension Lift Kit for your 2021 and newer 4-wheel drive F-150. Thank you for watching, and for all things F-150, keep it right here at americantrucks.com.

      Product Information

      Features, Description, Reviews, Q&A, Specs & Installation

      Features & Specs

      • Premium Lift Kit
      • 3.50-Inch Front Lift
      • 1.25-Inch Rear Lift
      • Includes Heavy-Duty Tubular Upper Control Arms
      • Billet Aluminum Lift and Preload Spacers
      • Fabricated Steel Rear Lift Blocks
      • Maintains Comfortable Factory Ride
      • Limited Lifetime Warranty
      • Fits 2021-2024 Ford F-150 Models, Excluding Raptor and Tremor

      Description

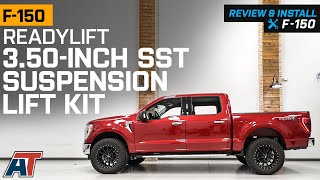
      Elevate Your F-150’s Ride Height. In stock form, even 4WD F-150s roll off the assembly line with a low, unattractive ride height and undersized tires. However, a rugged, tough pickup deserves a rugged stance, like what’s offered with this ReadyLIFT 3.50-Inch SST Suspension Lift Kit. This kit elevates your F-150’s ride height by 3.50-Inches in the front and 1.25-Inches in the rear, providing a tough stance that sits slightly taller in the rear. This kit allows the installation of up to 295/60r20 tires on a +18-offset wheel or 35x12.50 tires on a 0-offset with minimal plastic trimming. 

      Heavy-Duty Steel Control Arms. This kit includes new heavy-duty tubular steel upper control arms with a corrected upper ball joint cup, preventing the factory ball joints from overextending and incurring premature wear and tear/damage. 

      Durable Construction. In addition to these durable tubular steel control arms, this kit includes only the most durable alloy components for maximum strength and durability. These components include billet aluminum front strut, preload spacers, and rear shock extensions, fabricated steel rear lift blocks, and zinc-plated steel hardware. 

      Simple Bolt-On Installation. No one likes drilling holes in their brand new pickup; luckily, this kit features a simple bolt-on installation, requiring no cutting, drilling, or trimming.  

      Warranty. A limited lifetime warranty covers this product against manufacturing defects. 

      Application. This ReadyLIFT 3.50-Inch SST Suspension Lift Kit fits 2021-2024 Ford F-150 models, excluding Raptor and Tremor packages.

      Fitment:

      Details

      ReadyLIFT 69-21350

      CA Residents: WARNING: Cancer and Reproductive Harm - www.P65Warnings.ca.gov

      Installation & What's in the Box

      Installation Info

      What's in the Box

      • (2) Front Strut Spacers
      • (2) Front Preload Spacers
      • (2) Shock Extenders
      • (2) Fabricated Rear Lift Blocks
      • (2) Tubular Upper Control Arms
      • (4) U-Bolts
      • Hardware
      4.9

      Customer Reviews (65)

        Questions & Answers

        10 More Questions

        Will It Fit My F-150

        • 2.7L V6 EcoBoost - 21, 22, 23, 24
        • 3.0L V6 Power-Stroke - 21, 22
        • 3.3L V6 - 21, 22, 23
        • 3.5L V6 EcoBoost - 21, 22, 23, 24
        • 3.5L V6 EcoBoost Limited - 21, 22, 23
        • 3.5L V6 EcoBoost Raptor - 21, 22, 23
        • 3.5L V6 PowerBoost - 21, 22, 23, 24
        • 5.0L V8 - 21, 22, 23, 24
        • 5.2L V8 Supercharged Raptor - 23