Talk to a F-150 Sales Tech
1-888-706-1096
M-F 8:30A-11P, Sat-Sun 8:30A-9P
$20K Sweeps! 10 Chances to Win! Enter Daily >

Rough Country 3-Inch Bolt-On Upper Control Arm Suspension Lift Kit with Vertex Adjustable Coil-Overs and Vertex Reservoir Shocks (14-20 4WD F-150 SuperCab, SuperCrew, Excluding Raptor)

Item T551355
Verify parts fit and get product recommendations.
F-150 Sales Techs: Connect Now M-F 8:30A-11P, Sat-Sun 8:30A-9P
$0.00
Our Price

$2,549.95 (kit)

FREE Shipping Market Price $2,932.99 You Save 13% ($383.04) Up to 10% off for Military & First Responders! See Details

Will this fit your Vehicle?

Select a different vehicle Help?
Update or Change Vehicle
Ship to: Ashburn - 20149
Sorry, please enter a valid US or CA postal code
We're sorry, zip can't be updated at this time.
    Create a list
    Add to New List

    Saved - View your saved items

    We're sorry. We couldn't save this product at this time.

      Product Videos

      Jake: Jake here for American Trucks, and today I'm taking a look at this Rough Country 3-inch bolt-on upper control arm suspension lift kit with the adjustable Vertex Coilovers, and Vertex Reservoir Shocks for 2014 to 2020 four-wheel drive F-150 SuperCabs and SuperCrews, excluding the Raptor. If you're looking for a high-performance lift kit for your F-150 that's not going to completely blow out your budget, then look no further than this one from Rough Country. Not only is this going to give you more height and more clearance for larger wheels and tires, and even some new components to replace worn-out suspension pieces in your F-150, but you also get Rough Country's highest-performing shocks with these awesome remote reservoirs.This is an all-inclusive kit that's going to give you everything you need to make a significant upgrade and a refresh to your F-150 suspension. It's going to give you an aggressive stance while maintaining superb ride quality, so it's a great setup for the F-150 owner who wants a little bit of everything. Now before we get into all the details because there is a lot to talk about here, I do want to take a moment to specify again that this kit is only for 2014 to 2020 four-wheel drive F-150 SuperCabs and SuperCrews. So, if you've got a two-wheel drive truck, a regular cab, or a Raptor, unfortunately, this one is not going to fit your truck. Also worth noting that trucks with the FX4, the Snow Prep, or other off-road packages from the factory, and any that comes stock with a ride height of more than 22 inches, measured from the center of the wheel to the bottom of the front fender, may need to look into a different kit.But onto the good stuff. Since this is a three-inch lift, this is going to give you some extra clearance to run larger wheels and tires. And as you can see on our truck, 33s will absolutely fit with no issues. And 35s will fit. You can squeeze them on, but you're probably going to get some rubbing at full lock. So, if it were me, I would recommend going with 33s for this setup. If you want to have the peace of mind to have those bigger wheels and tires without issues. And because 33s will also give you a lot of good options for tires. Starting out upfront, you get a set of these new upper control arms. Now these are heavy-duty arms, and as you can see, they include new Clevite rubber bushings and new ball joints, so it's going to refresh the front end quite a bit. It's going to make a big difference when it comes to absorption of impact out on the road. Now these are forged aluminum, so they're pretty lightweight, but they still have a lot of structural integrity. It's going to be enough to hold up to whatever abuse you can throw at them out on the street or on the trail.Now you might have noticed by now that the ball joints are also angled to accommodate for the added lift. So, despite adding quite a bit of height, these are going to keep things pretty close to your factory suspension geometry. And that means it's going to help maintain that close-to-factory ride quality and provide for a full range of motion in addition to making everything really easy to keep aligned. Now in the rear, you've got a standard type of block-style lift, and there's also new U-bolts to keep everything secured and help accommodate this extra height. Now this is one of the rare instances where the blocks actually measure up to exactly the amount of lift you're going to get. So, as you can see, these blocks are about two and a half inches exactly in height, and you're going to get a two-and-a-half-inch lift overall in the rear.So, despite this being labeled as a three-inch kit, this is actually going to be a three-inch lift and leveling kit. This two-and-a-half inches in the rear is going to even out the stance of your truck, and eliminate that forward-facing break that these trucks come with from the factory. But the big story here are the shocks. Now this kit features Rough Country's top-of-the-line Vertex Series Shocks. These are a heavy-duty high-end remote reservoir setup that provides stellar off-road performance and excellent on-road mannerisms. Now for the front, these come as pre-assembled struts, so they're going to bolt in right in the place of your factory units. Now the front and rear are both a monotube design, and they're nitrogen charged with eight different preset damping settings.So, you can make adjustments, and dial in the damping based on what you're going to be doing with your truck that day. They also feature 22-millimeter chrome hardened piston rods and a huge two-and-a-half-inch piston, and a three-stage sealing system for durability. But of course, the coolest feature are these remote reservoirs. So, on the front, as you can see, these are connected via a stainless steel braided line with banjo bolts and the rears just have them mounted as a part of the shock on the side here. And on the reservoir is where you're going to find the adjustments for the damping.So, as you can see, it's this little red dial here, and you can just turn it to one of the eight settings. It really feels nice to do that, and it gives you some good resistance. Now remote reservoir shocks are pretty trick-pieces, and they bring a lot of that off-road racing tech to your truck. But the same type of benefits apply here. These offer a ton of control, really fast response, and the additional damping power. So, these are great for heat dissipation, meaning that you're not going to have any issues with fade if you're out on the trail or hitting some really intense terrain. And again, that means you can use them to the full extent without worrying about fading or losing control of the truck, which is really, really important. But unlike a lot of aftermarket shocks, these are not going to ruin the ride of your truck. In fact, they're going to maintain close-to-factory ride quality. So, you're going to get the lift, the damping performance and your truck is still going to ride nice and smooth. You can really get the best of both worlds here.Now the bodies of the shocks also feature a heat-treated alloy bearing and a hone steel body. So, they're going to be durable and stand up to the elements. And whatever else you can throw at them. Now as far as pricing goes, a kit like this doesn't exactly come cheap. This one is going to come in around $3,000, so it is going to cost you. However, again, this is a really inclusive kit that has nearly everything. Not only is it a lift, but it's a good portion of the way to a complete suspension refresh too, especially with these new U-bolts and these upper control arms. So, you're getting that added height, the really, really nice high-quality remote reservoir shocks, and struts. And when you look at it from that perspective, I do think you're getting a lot for your money.Now, as far as complete kits go, this one will certainly undercut some other comparable ones out there on the market. So, if you want to have it all without completely blowing out your budget, this is going to be just what you're looking for. When it comes to the install, this is going to get a 3 out of 3 on the difficulty meter, and you should plan on it taking upwards of 6 hours to get everything completed. Now, you can certainly do this at home in your driveway, especially since everything you need to get it installed is included in the kit, but it is a bit of an involved job. So, if you aren't necessarily comfortable disassembling suspension components, professional installation is always an option. But good news is that this is pretty much a bolt-in install, and since these front struts come already assembled, you don't even need a spring compressor. One quick reminder though, make sure you get your truck aligned once you've got everything buttoned up. With that, let's head over to the install bay now, where we'll show you how to get this installed on your F-150.Man: Tools required for this install include an air gun, an impact gun, a ratchet, a hammer, 15, 18, and 27-millimeter wrenches, 15, 17, 18, and 21-millimeter ratcheting wrenches, a 10-millimeter Allen wrench, a marker, a swivel adapter, a Phillips head screwdriver, an 8, 10, 15, 17, 18, 21, and 22-millimeter sockets, a pry bar, as well as some pole jacks. What's up, guys? Today, we're installing a lift kit on our F-150, so let's get started.So, to remove our front struts, the first thing we're going to do is remove our two brake line brackets from the knuckle and the frame, as well as our ABS bracket. So, to remove our brake line brackets, we can grab a 10-millimeter socket to remove our bolt. And we'll pop our bracket out of the way. And throw our bolt back in the hole, so we don't lose it. We can do the same thing for the one on our knuckle. And then we can switch to our 8-millimeter socket for the bolt holding our ABS line in. Next, we can disconnect our tie rod end. We have a 21-millimeter nut. So, we'll grab a 21-millimeter socket to loosen that up. And then we can take a hammer and strike the side of the knuckle here to pop our ball joint loose.And then we can finish removing the nut, and pop our tie rod out of the way. Next, we can come down below our lower control arm. We have two 18-millimeter nuts holding on our strut. And then on the other side, we have another 18-millimeter nut that's holding our sway bar end link. So, we'll take an 18-millimeter socket to get these off. And now we can get the other nut for our strut removed. As well as the nut for a sway bar end link. Now at this point, you want to remove the nut for a sway bar end link on the other side, so that you can raise your sway bar to get this out of the lower control arm.So, now once you have your sway bar end link unbolted on both sides, you can take a pry bar to raise the end link out of the lower control arm. Next, we can come to the top of our strut and loosen up the three 15-millimeter nuts. So, I've got a 15-millimeter ratcheting wrench that we'll use to loosen these up. Next, we're going to remove the bolts from our lower control arm pivot points. Now these can slide back and forth, so to make sure that you get your alignment where it was before, you might want to take a marker and just make a mark where it's centered on the metal. So, once you do that, we'll take a 21-millimeter socket on our bolt side, and a 27-millimeter wrench on our nut side to loosen this up. And then we'll do that same thing on the other side. And now we can remove our two bolts, and drop our lower control arm down and out of our studs in the strut.So, now we can go back up to the top of our strut tower and finish loosening up those nuts. Just be careful with that back nut not to drop it into the pit of no return. And then once our nuts are removed, we can slide the strut out of place. So, now with our strut removed, we can raise our lower control arm back up into place, and put our bolts through. Next, we can loosen up the nut on our upper control arm ball joint. So, we'll take an 18-millimeter socket to do that. And then with our nut loosened up, we can take a hammer and hit the knuckle to pop our ball joint free. And then once our ball joint pops, we can remove our nut the rest of the way.So, now with the pole jack on our lower control arm, we can raise that up, and then remove our nut. So, now to remove our upper control arm, we can take an 18-millimeter ratcheting wrench on our bolt side, and a 21-millimeter ratcheting wrench on our nut side to work these loose. And then we can do that same thing on the other side. Now with both of our bolts loosened up, we can slide those out. And then with those removed, we can wiggle our upper control arm out of place. Now we're ready to install our new upper control arm. So, we're gonna slide that into our mounting locations, and then we can get our bolts through and then tighten it down.And after some gentle persuasion, you can get your bolts in. And then once you have your bolts through, you can install your nuts onto the other side. And then we can grab our 18-millimeter ratcheting wrench and our 21-millimeter ratcheting wrench to tighten that down. And then we'll do that same thing on the other side. Next, we can reconnect our upper control arm to our knuckle, and then we'll install our new nut included in the kit. And now we can take an 18-millimeter socket to tighten down our upper control arm nut. Now that we have our new upper control arm installed, we can come back to our lower control arm pivot points and remove our bolts. That way we can drop our lower control arm down and get our strut into place. So, now we're ready to install our strut. Now we have the mounting bracket for our reservoir that's going to go on the top of the strut tower, and then we have bolts that are going to come through the top that will have to line up into these three holes.Now the 90-degree fitting is going to be pointed towards the front of the truck. So, now would be a good time to grab yourself a buddy to help you lift it up into place. And then we can slide our bracket into place, and grab our bolts. Now once you have your two longer bolts installed, the shorter one is going to go towards the front of the truck, and then we can come back and tighten these down.Next, we can mount our reservoir. So, we're going to take one of our band clamps and get that into place. And then we can slide our reservoir through that clamp. And then we'll get our other clamp on the other side. We can rotate that, so our logo is nice and centered, and tighten that down the rest of the way. Next, we can connect the bottom of our strut to our lower control arm. So, we're going to be using our included Allen bolt, raise our lower control arm up, and get that through the hole, and then we can take our flat washer and nut, and slide that onto the bottom, and then do that same thing on the other side, and get our washer and our nut. And now we can take a 10-millimeter Allen wrench and a 17-millimeter socket to tighten these down.So, now we can grab a couple of pole jacks on our lower control arm and raise that back up into our mounts. Now you can use a pry bar to get some leverage to get your bolt through. We'll get our nuts on the other side. And we can lower our pole jack. And now we can take our 21-millimeter socket and 27-millimeter wrench to tighten these down. You can use the wrench to pull forward to align the center of your bolt with the mark you made. And then we can tighten it down. And then we can do that same thing on the other side.Next, we can reconnect our tie rod end. Slide that into the knuckle, and then reinstall our 21-millimeter nut. And then we'll tighten that down with a 21-millimeter socket. And now we can come back up to the top of our strut tower and take a 17-millimeter ratcheting wrench to tighten down our three bolts. I like to tighten the front two first just so that we can finish tightening the back by hand since it's harder to get to. Now we can hand tighten the back the rest of the way by hand. And now at this point, you're going to repeat the whole install process on the other side, and then we can reconnect our sway bar on both sides at the same time.So, now once you've gotten to this point in the install on one side, you're going to repeat that entire process on the other side. And then once we have both sides together, we can reconnect our sway bar end links into the lower control arms at the same time, just to make it a little bit easier. So, now once we have our sway bar end links lined up on both sides, we can pull down on the sway bar to get those through the lower control arm. And then we'll just thread our 18-millimeter nut back on and tighten that down with our 18-millimeter socket. And then we'll do that same thing on the other side.So, now the only thing we have left to do is reconnect our ABS line and our two brake line brackets. So, we'll pull these bolts out of their holes. And then we can switch to our 10-millimeter socket for our brake line bolts. And then we'll do the same thing on our upper brake line bracket. And then we can do that same thing on the other side. So, to remove our shock in the rear, we have a 15-millimeter bolt with an 18-millimeter nut on the bottom mount. On the top, we have a 15-millimeter bolt and a nut with a tab on it. So, we don't have to get a wrench on the backside on this side. However, on the passenger side, there's an 18-millimeter nut that you'll need an 18-millimeter wrench for.So, now for our bottom mount, we can take a 15-millimeter wrench on our bolt side, an 18-millimeter socket on our nut side to take this off. Now coming to our upper mount, we have a 15-millimeter bolt that will grab the 15-millimeter socket to remove. And then we can do that same thing on the other side. So, now with our shocks removed and our axle supported by pole jacks, we can remove the four 21-millimeter nuts for our U-bolts. So, we'll take a 21-millimeter socket to do so. And then we'll do that same thing on the other side. So, now with our nuts on our U-bolt removed, we can lower down our pole jack to lower our axle. And then we can remove our U-bolts, as well as our factory spacer. And then we'll do that same thing on the other side.So, now with our factory components removed, we can install our new lift block. Now these two pegs are gonna go towards the axle side. Can lift up on our leaf spring a little bit to get that into place. And then we can raise our axle back up to meet our leaf spring. And then we can take our two new U-bolts, put them into place, and then we can get our nuts on the bottom. So, now we'll slide our bottom bracket onto our U-bolts, and then we'll be using our new flat washers and locking nuts that are included in our kit. Now our new nuts are going to be 22 millimeters, so we'll switch out for a 22-millimeter socket, and we'll tighten these down in a crisscross pattern to tighten it evenly. And then we can do that same thing on the other side.Next, we can install our new rear shock. Now our reservoir is going to be pointed towards the front of the car on the driver's side. So, we'll slide it into our mount, and put our factory bolt back through the hole as well as our nut. Next, we can install our shock into our lower mount. So, we're gonna have to push up on the shock to compress it, and then we can put it into our mount and get our bolts through. And then we'll get our nut on the other side. And then we can grab our 15-millimeter wrench and 18-millimeter socket to tighten this down. And then we can go back up top and grab a 15-millimeter socket to tighten down our bolt. And then we can do that same thing on the other side.So, that'll wrap up this review and install of the Rough Country 3-inch Bolt-on Upper Control Arm Suspension Lift Kit with adjustable Vertex Coilovers and Vertex Reservoir Shocks for your 2014 to 2020 four-wheel drive F-150 Super Cab, SuperCrew Cab, and excluding the Raptor. Thank you for watching. And for all things F-150, keep it right here at americantrucks.com.

      Product Information

      Features, Description, Reviews, Q&A, Specs & Installation

      Features & Specs

      • Suspension Lift Kit
      • Provides a 3-Inch Lift Height
      • Offers Improved Handling, Traction, and High-Performance Driving
      • With Adjustable Vertex Coil-Overs and Vertex Reservoir Shocks
      • Uses Heavy-Duty Control Arms
      • Includes Rear Lift Blocks and U-Bolts
      • Accommodates Up to 34-Inch Tires
      • Professional Bolt-On Installation
      • Backed by a Limited Lifetime Warranty
      • Made in the USA
      • Designed for All 2014 to 2020 4WD Ford F-150 SuperCab, SuperCrew, Excluding Raptor Models

      Description

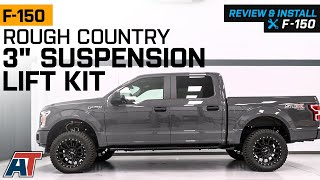
      Reinforced Off-Roading Capacity. Boost your Ford F-150’s performance and stance by upgrading your suspension system to this Rough Country 3-Inch Bolt-On Arm Suspension Lift Kit with Adjustable Vertex Coil-Overs and Vertex Reservoir Shocks. This kit is engineered to increase your truck’s ground clearance, as well as ensure smoother off-roading and better handling. Using this kit allows you to accommodate larger tires for bolder off-roading capabilities.

      Enhanced Damping Capacity. Rough Country included Adjustable Vertex Coil-Overs and Vertex Reservoir Shocks in this 3-inch lift kit. These components are specifically designed to provide you with precise control and stability in the toughest off-roading conditions. Built with durability and adjustability, these shock absorbers feature massive, 2.50-inch pistons and 22mm high-flow chrome-hardened piston rods. The 8-stage adjustable damping system lets you conveniently dial-in your ride application, whether you want a smooth ride for city streets or the ultimate damping for the rugged trails.

      Improved Steering and Fierce Stance. This 3-Inch Bolt-On Arm Suspension Lift Kit comes with heavy-duty upper control arms. These forged aluminum upper control arms are engineered to make alignment adjustments easier. Each piece is furnished with Clevite rubber bushings for enhanced durability. It also maintains the factory-like geometry by keeping the ball joint at optimum angles after lifting.

      Professional Installation Recommended. Installing this 3-Inch Suspension Lift Kit is a bolt-on process. The components use the vehicle’s factory mounting locations and include all the necessary hardware for a straightforward installation.

      Limited Lifetime Warranty. Rough Country offers a limited lifetime warranty for this Lift Kit covering factory defects in materials and workmanship under normal use. Please see the full warranty policy for exclusions and full details.

      Application. This Rough Country 3-Inch Bolt-On Arm Suspension Lift Kit with Adjustable Vertex Coil-Overs and Vertex Reservoir Shocks is designed to fit all 2014-2020 4WD Ford F-150 SuperCab and SuperCrew models, excluding Raptors.

      Fitment:

      Details

      Rough Country 54550

      CA Residents: WARNING: Cancer and Reproductive Harm - www.P65Warnings.ca.gov

      Installation & What's in the Box

      Installation Info

      What's in the Box

      • (2) Vertex Coil-Overs
      • (2) Vertex Reservoir Shocks
      • (2) Rear Lift Blocks
      • (4) U-Bolts
      • Installation Hardware
      4.8

      Customer Reviews (418)

        Questions & Answers

        10 More Questions

        Will It Fit My F-150

        • 2.7L V6 EcoBoost - 15, 16, 17, 18, 19, 20
        • 3.0L V6 Power-Stroke - 18, 19, 20
        • 3.3L V6 - 18, 19, 20
        • 3.5L V6 - 15, 16, 17
        • 3.5L V6 EcoBoost - 14, 15, 16, 17, 18, 19, 20
        • 3.5L V6 EcoBoost Limited - 19, 20
        • 3.5L V6 EcoBoost Raptor - 17, 18, 19, 20
        • 3.7L V6 - 14
        • 5.0L V8 - 14, 15, 16, 17, 18, 19, 20
        • 6.2L V8 - 14
        • 6.2L V8 Raptor - 14