Installation Time
(approx) 2 Hours
Difficulty Level:
Mechanical expertise or professional installation required.
Installation Guides
FREE 1 to 3-Day Delivery on Orders $119+ Details
$127.99 (kit)
FREE Shipping Market Price $156.99 You Save 18% ($29.00) Up to 10% off for Military & First Responders! See DetailsSaved - View your saved items
We're sorry. We couldn't save this product at this time.
or use
Bilstein B8 5100 Series Front Shock for 0 to 2-Inch Lift (15-20 4WD F-150, Excluding Raptor)
Freedom Offroad Front Upper Control Arms for 2 to 4-Inch Lift (04-20 F-150, Excluding Raptor)
Rough Country Premium N3 Rear Shocks for 0 to 3.50-Inch Lift (09-24 2WD/4WD F-150; 10-18 F-150 Raptor)
Hey, guys. It's Sara with americantrucks.com, and today we have a review and install of the Mammoth 3-Inch Rear Lift Kit, fitting your '04 and newer two-wheel drive and four-wheel drive F-150s, excluding the Raptor. This kit will work well for the F-150 owner who wants to lift the rear of their truck to aid in towing or hauling, especially useful if you have a leveling kit already installed on the front of your truck and you want to bring the rear up as well. This kit provides a 3-inch rear lift block to bring up the rear of your truck and aid in towing or hauling, especially if you have a front leveling kit already installed. So keep in mind, because this kit alone only lifts the rear of the vehicle and doesn't provide any lift to the front, the recommended tire size for this kit will be your stock tires. Stock tire sizes may vary, but on our truck, we have a 31-inch tire stock, which is what you will see in this video.These lift blocks feature cast steel construction with a black finish as well as the longer U-bolts and all the necessary mounting hardware. And as far as price goes, this kit comes in at around $150, making it a budget-friendly way to lift the rear of your truck to aid in towing or hauling. And as far as the install goes, I'm giving this one a three out of three wrenches on the difficulty meter. It does feature a direct bolt-up installation with no modification required and can be done within two hours. So with that said, let's check out the install. For this install, you will need an impact gun, or a ratchet will work just fine. You'll also need an 18-millimeter wrench, 21-millimeter and 15-millimeter sockets, and an optional but helpful tool includes a rubber mallet.All right. So we have our truck up on the lift here, and we're supporting the axle. If you aren't on a lift, make sure you are still supporting your axle with some jack stands if you are working in your driveway. Next up, we're gonna remove the bolt from the bottom of the shock. Grab a 15-millimeter socket and an 18-millimeter wrench and get this removed. Now using a 21-millimeter socket, we're gonna remove the 4 nuts on the bottom of the U-bolts. Go ahead and get these removed. Now we can remove the U-bolts. If this line is attached to one of your U-bolts still, just pop the clip off. You can do it by hand, and then remove both of your U-bolts. At this point, we can lower the axle down slowly until we can remove the factory block. Go ahead and lower it down, pull your block up, and remove it.All right. So now that we have our factory spacer out, we can check it out side by side with our new lift block here. Now, as you can see, the biggest difference, this one is a ton bigger. It's 3 inches when compared to the 1 inch of your factory. In addition, it is tapered, so they are directional. They'll be on one side or the other, and you can't swap them. Also, it features a bump stop extension, which we'll see off the side here. Also comes with longer U-bolts to accommodate the larger spacer and new hardware, which is a nice feature because your factory components are getting up there in age. So, with that said, let's finish up the install. All right. Now, because of the size of the spacer and because it's a straight-axle truck, it may be easier to do each side simultaneously. So, with that said, get that other side caught up to the point this side is, everything uninstalled, and now we can drop our axle evenly and install the spacers. So very carefully lower your axle. Now we can install the spacer. I do wanna point out, these are side-specific as I said before. You should always have this bump stop facing inwards. There's an arrow facing forward because it is tapered, and there is an "L" here, so we're working on the left side of the truck. So we're gonna slide it in.Now, there are two posts on the bottom that line up with openings in the axle, and there are two posts up top. Line those up as well. Now, once this is in place, we're gonna raise the axle back up as we line up those posts up top. Again, do this very carefully as your whole axle should be disconnected at this point. With the block seated, we can now install the U-bolts. We're using the new ones in this kit because they are long enough to accommodate the new size, and we are gonna reuse the factory bracket. So go ahead and slide that over all four U-bolts and line it up. Now we can thread on the included nuts. Now, with a 21-millimeter socket, we're gonna tighten these down. You wanna try to be as even as possible with the U-bolts front to back as well as side to side. So to accomplish that, we're gonna be tightening these bolts. Try to tighten them evenly. With your 21-millimeter socket, tighten them down.All right. Now with our U-bolts in place, we can replace these clips for your line. Just press them over your new U-bolts. Now we can line up the shock and slide the factory bolt back in. All right. Since we did raise up our axle quite a bit with the spacer, the shock may need to come down quite a bit in order to get this through. If you can't pull it down by hand, and we're just beginning to line it up, you can also lightly tap it in with a rubber mallet and get your nut installed on the other side. Now, with your 15-millimeter socket and 18-millimeter wrench, tighten it down. All right. So now that this side is complete, you're gonna repeat all of those steps to install your opposite side. Make sure everything is torqued to spec, and then that is gonna do it for the review and install of this rear lift block kit. And remember, for all things F-150, keep it at americantrucks.com.
Features, Description, Reviews, Q&A, Specs & Installation
Brand | Mammoth |
Lift Height | 3.00 Inch |
Lift Kit Type | Lift Blocks |
Lift Kit Max Tire Size | 33 Inch |
Lift Kit Includes Shocks | Shocks Not Included |
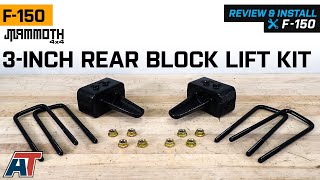
Adds 2 Inches of Rear Lift. A Mammoth 3-Inch Rear Block Lift Kit will raise the rear of your 2014-2020 4WD Ford F-150 by 2-inches to increase ground clearance and for better weight distribution when towing. With 2 inches of lift, this kit can accommodate larger wheel and tire combinations allowing you to conquer any trail.
Rugged Construction. These Rear Lift Blocks have been cast from high grade steel for superior strength and extra rigidity. The components are then completed in a durable black finish for long lasting corrosion resistance, regardless of the elements they are exposed to.
Bolt-On Installation. All the hardware necessary for installing the lift blocks is included. The Blocks are designed to bolt into the stock mounting locations, which means that there will be no need for cutting or drilling. Removal of the factory blocks is required for installation.
Application. This Mammoth 3-Inch Rear Block Lift Kit is specifically designed for use on 2004–2020 4WD Ford F-150 models equipped with a 4-wheel drivetrain (4WD) excluding Raptors.
Shop All 3 to 5 Inch Truck Lift Kits
Shop All Truck Parts And Accessories
Shop All Truck Lift Kits
Fitment:
Mammoth T539297
CA Residents: WARNING: Cancer and Reproductive Harm - www.P65Warnings.ca.gov
Installation Info
Installation Time
(approx) 2 Hours
Difficulty Level:
Mechanical expertise or professional installation required.
Installation Guides
What's in the Box
10 More Questions