Talk to a F-150 Sales Tech
1-888-706-1096
M-F 8:30A-11P, Sat-Sun 8:30A-9P
$20K Sweeps! 10 Chances to Win! Enter Daily >

Aeroskin Hood Protector; Dark Smoke (21-24 F-150, Excluding Raptor & Tremor)

Item T552731
Verify parts fit and get product recommendations.
F-150 Sales Techs: Connect Now M-F 8:30A-11P, Sat-Sun 8:30A-9P
$0.00
Our Price

$109.99 (each)

FREE Shipping on orders over $119 Market Price $127.99 You Save 14% ($18.00) Up to 10% off for Military & First Responders! See Details

Open Box from $23.10

Will this fit your Vehicle?

Select a different vehicle Help?
Update or Change Vehicle
Ship to: Ashburn - 20149
Sorry, please enter a valid US or CA postal code
We're sorry, zip can't be updated at this time.
    Create a list
    Add to New List

    Saved - View your saved items

    We're sorry. We couldn't save this product at this time.

    or use

      Product Videos

      Justin: The Aeroskin Hood Protector for the 2021 and newer F150 here might just be one of the better-fitting options I've seen available at a very affordable price point. Now, the Aeroskin will combine that injection-molded acrylic build along with that dark smoked appearance, all for right around that low $100 price point.So the idea behind a hood protector like this is pretty simple, right? Reduce or help eliminate the unsightly paint chips caused by stones or other debris while on the road. Now, the reality is, if you spend a good amount of time on the highway or on the road, in general, your leading edge of that hood does get a little bit beat up from tiny rock chips or stones getting kicked up by other cars and trucks in front of you. But let's get into the Aeroskin option a bit more here. And what you're gonna find is that tough acrylic build that we talked about earlier finished in that dark smoked appearance. That's kind of a par for the course feature with a lot of these hood deflectors.Now, in my opinion, what separates this particular option is that acrylic material is gonna be a tad bit thinner than some of your other options in the category, but, at the same time, what that allows the company to do, in this case, AVS, is to really mold this thing perfectly to the lines of the factory hood. And they do it so well, that for my money, guys, this is easily one of the most low profile options or best-fitting options I have personally seen available for the 2021 and newer F150s once it's been installed.Now, the reason for that killer fitment here with the Aeroskin is all in the design. Now, unlike other hood deflectors or protectors that might just utilize this bottom edge here as your sole mounting location to your factory hood, that's not the case here with the Aeroskin. The Aeroskin actually comes equipped with 3M tape on both the top and the bottom of the deflector or protector, and so basically, that's going to allow this entire thing to basically mount flush to the leading edge of your factory hood. Now, I know some of you guys might be saying, "Well, I don't want to see 3M tape through this thing." Well, you're not gonna have to worry about that, guys, because honestly, it is so dark this tint job that looking through it here, even in our bright lights of our little room, you can't tell there's tape on this thing at all. So if you do have any concerns about that, I wouldn't let that be the case at all, and again, it is going to help lead to a very tight, very sleek fit.But now we wanna shift gears and show you what it takes to get the Aeroskin in place on your '21 and newer F150 at home. Site is gonna call this correctly a soft one out of three wrenches on the difficulty meter, about 15 minutes from start to finish. Again, it's pretty much a peel-and-stick job here, guys. But to give you a better idea of how this one will go down at home, here's an AT customer to walk you through the job now.Male: A few tools that we're gonna need for the job are including a bucket of sudsy water to clean the hood to make sure it's free of any oils, grease, or any bug matter. We want the best adhesion we can get. We're gonna want a damp and a dry towel to make sure that our hood is thoroughly dry and free of anything that might be a little extra hard to move. We're also going to need the hood protected or dry fit. We're going to need the alcohol pads to prep the area where we're gonna be sticking the adhesives, and also a surface prep pad, which we're gonna do the entire underpart of where the installation is gonna occur.I normally use the scissor to open up those packets instead of ripping them. I don't want to damage them. I want to make sure they are all in one piece. I've got my instructions handy. I've got gloves to apply the alcohol and the surface prep, and also masking tape. When we dry-fit the hood protector, we're gonna protect the area just above it to make sure we don't get any alcohol on the last finish.All right. So we're gonna take our sponge. We're gonna get it good and wet and soapy and make sure we get that carwash on there and we're gonna clean the surface area of the hood, just on and just beyond the area that we're going to [inaudible 00:04:09]. Now I'm gonna remove with the damp cloth the soap and water. Double-checking this to make sure that all my area is clear of any debris. If I see any little oil rainbows there, I know that we definitely got to redo it, but so far so good. And I'm gonna take my dry cloth or a microfiber cloth and make sure that's totally dry. If we have any spots or any possible problems [inaudible 00:04:51].Okay, now we have our hood protector. It comes in this plastic bag to protect it. And if you'll notice, it also comes with a protective clear coating on the front, and that's gonna come in handy when we press down on our adhesive, plus it also protects any scratches or any damage during shipping. On the back, we'll have two adhesive strips in the very center, the top, and on the bottom, on the center, and on the sides. That's gonna max out your sleek look and adhesion with this product.So let's give it a dry fit to see where we're actually coming out here. Okay. What I like to do is make sure I start on one side, press it into the position that I'd like it to be, and then make sure it's going down nice and flush and flat. As you can see on this side and on this side, they're exactly the same. So we know that we're dead center right where we are. What we don't want to do is when we treat the area that we're going to prep for the adhesive, we don't want to get on any areas that might be showing on our hood and damage the wax. So what we're gonna do, and I'm just gonna put a little pressure up against this, is we're gonna take the masking tape and I'm gonna go right on the leading top edge of the protector, making sure that we follow the line all around and hug that on top of that protector. Keep it in place with one hand, push it down or up as needed. Get that on there real good. This is only really gonna be a line for us to follow so we don't overdo it with that surface prep. We want it to stick real good and sometimes we tend to want it to stick too good.As you can see, I got about half of it off right there, you know, it slipped down so I pushed that up. Okay. Pushing this unit close, 'm gonna just put my tape down right on that edge knowing that's exactly where I want it, and again, taking the masking tape, making sure that I'm right on that edge. I don't want any dull spots on my finish. Okay. All right. We're golden. Now it's time for us to take our hood protector off and we're gonna be opening up and prepping the area to put the installation.Okay. Now we're gonna take our alcohol prep pad and we're gonna open them up and we're gonna have a good clean surface to prep. This is where the scissors come in handy because fingernails don't actually do the job. Okay. So the first thing we wanna do is we want to get our leading-edge. That's the main part, which is right here. This is our leading edge right across here, here, and across here. This is the leading edge for the sticky pad underneath this super adhesive underneath the hood protector. That's what's gonna hold it on for the most part. Now, what we want to do is use both sides and we get two of these pads. So we want to make sure that these are nice and protected. Get it up over on this side as well, and let that dry just a moment. And then I'm gonna take and I'm gonna do the top half as well. Knowing where the adhesive strips are on the hood protector are a huge help. I'm gonna do the top part here just to help with adhesion, come on down, and as you see, the masking tape really comes in handy. There's no guesswork here. We're getting the entire area where the adhesive is gonna go all prepped out. Cover again. And we'll make sure that we get everything that the adhesive is gonna stick to. Flip that over. And it's important to check that pad. If that pad is dirty, then you know you need to rewash, okay? So make sure the pad is clean and you know that you have all that invisible oil and/or grease that might be on there, but more importantly, you don't have any dirt.Okay. Got my protective glove on, so now I'm gonna open up the package of surface prep and I'm just gonna carefully make it a little wider here and have a nice surface area to use to cover the hood. So this is the hood protector. This is the packet. This is surface prep from the hood protective package. Now, as you see, I'm going through. This is stronger than the alcohol, so this is a really, really good surface prep. You do not want to get this above that masking tape line. So what this is doing is making a little bit of a porous surface. Just wanna cover up all the area with the surface prep. All right. Okay. We're good. Should no longer use that and we're gonna dispose off the masking tape.Okay. Now that our surface prep is thoroughly dried on the vehicle, now we're gonna check out the adhesive strips and prep them for installation. Now, as you'll notice, we have red adhesive strips. These are super adhesive, double-sided, one on top, one on the bottom. And what we want to do is we want on each strip to start a two-inch edge from the center, closest to the center working our way out. So we want the two center pieces of tape. We move back on the top and on the bottom so we can easily access them when we do our installation, okay? So that's the ideal way, okay? So now we want the same thing with this strip. Remember, once we start this, we can't lift it up because that...especially with that surface prep, it's gonna be a real good snug fit. So let's get this one backed up, and this one. Okay.Now is time for the fit. But before that, I just want you to notice if you're worried about these little areas in between, especially right up here, there's a little rubber protector here just to make sure that any vibration or wind does not have an area where you have plastic to metal. So that is a really good addition that they put onto this protector. So what I wanna do is I wanna make sure that I'm starting at the right location. So I'm gonna start on this edge, and I'm gonna get it to the very end. Now, remember that we don't have any adhesive exposed over here, so we're pretty safe. So what I'm gonna do, I'm gonna go around the front, making sure I can still access all of those tabs. I'm gonna make sure the leading edge of the protector is down up against the hood thoroughly because the way this hood goes it comes on a slant and then it goes down, so it fits really snug. Then I want to come around on this side. Now we're gonna check this side and the other side. We have a real good fit right here. Now, let's come around the other side and make sure that we have the same fit, and it's the same look while we hold it up in the center. That's perfect. Okay.Now, let's get ready to hook this guy. All right. So what we're gonna do is we're gonna start at the top. We're gonna pull six inches of adhesive up and we're gonna work our way out, pushing the adhesive to the hood of the truck, okay? Always push out. Do another six inches and hit it real good with a nice, firm downward motion. While you're doing that, just make sure that you're holding the bottom of the hood protector to the hood and make sure you got a good snug fit down there. So I'm gonna continue on. Once again, nice, good, firm motion. Now we got all that first piece off. That's awesome. And we're really good. Double-check our edge here. Okay. We're right where we want to be. Okay. So let's start with the next one. Remember, we're gonna do all the top first, okay? Get the rest of that guy out, and we got a real good fit on him. Nice and tight and snug. Now let's move to the other side of the top.Okay. So we're gonna do the same thing in the opposite direction. We're gonna go from the inside to the outside, making sure again that we're snug up against the bottom, and we got a good, good tight fit. Now, don't worry about these little pieces of plastic. This is the protector, remember. This is to make sure while we're rubbing it, we're not doing any scratching to the protector. So let's check this one out. Look at that. Couldn't be a better fit. These guys must have laser-measured this thing. This is amazing. Caught a little snag there, so I'm gonna have to pick that up. There we go. That's why it's always good to have that tab out there. Pull that up. Make sure we're snug and we're going to firmly attach it. Okay. No worry about the rubbing again. Coating is on here. Okay.Now we're going to complete this with removing the bottom tape. So we're gonna take that and we're gonna do this side here first. We're gonna come through six inches and we're going to firmly apply that leading-edge about six inches at a time. And the reason we were working our way out is because we don't want to buckle this. We don't want to see any place that there's going to be a buckle. So we always work from the inside out. Okay. That's all that. That's the first one. I'm gonna dispose of these responsibly. Okay. Now we're going to start the next one. It's down in place. A really super snug fit. That's amazing. Okay. There you go. And we're done there. That's on there nice and snug. Absolutely no movement. That surface prep is amazing. Do not ever cut that surface prep out of your preparation. There's amazing stuff.Okay. Now we're gonna start on the passenger side in about six inches at a time working our way out. Right there a little bit and a little more. And we're at the edge. Double-check one last time. Downward to the left motion here, making sure that it's snug and not binding up in any areas and all the way to the end. Okay.Okay. Now we're gonna see what this looks like without the protective cover on it. So we're gonna start peeling that up carefully from the driver's side over, very slow and careful. A little bit of protector under there. Get that out. This is just a little thin piece of protective plastic so no worries on taking that off. So don't get nervous when you open up the box. Keep on pulling that all the way across. All right.Justin: So if you are looking for one of the sleekest ways to help protect that hood on your '21 and newer F150 at home, then be sure to check out the Aeroskin option right here at americantrucks.com.

      Product Information

      Features, Description, Reviews, Q&A, Specs & Installation

      Features

      • Aeroskin Hood Protector
      • Protects Hood from Dents, Dings, and Chips
      • Made of Modified Acrylic Material
      • Dark Smoke Finish
      • Designed to Be 0.11 Inches Thick
      • Car Wash Safe
      • Custom-Molded and Precision Engineered
      • Quick 3M Tape Installation; No Drilling Is Required
      • Proudly Made in the USA
      • Tailored to Fit 2021-2024 Ford F-150 Models, Excluding Raptor and Tremors

      Description

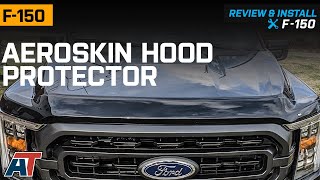
      Maintains Hood’s Pristine Condition. Let your truck’s hood maintain its pristine good looks by installing this Dark Smoke Aeroskin Hood Protector. With this accessory, your hood area will be protected from dents, dings, and chips, which are often caused by kicked-up road debris. What’s more, this hood protector helps improve your truck’s style with its custom-molded design and captivating dark smoke finish.

      Tough Construction. To resist the damaging impacts of road debris, this hood protector is built using a 0.11-inch-thick modified acrylic. This type of construction enables the hood protector to exhibit an extremely tough build while offering a skin-tight fit. Furthermore, it is completed with a dark smoke finish to fortify its protection against corrosion and early deterioration.

      Quick 3M Tape Installation. This hood protector offers an easy and quick installation. Thanks to its pre-applied 3M tape, you can simply attach it to your hood’s surface without doing any drilling or modifications.

      Application. This Dark Smoke Aeroskin Hood Protector is tailored to fit 2021-2024 Ford F-150 models, excluding Raptor and Tremors.

      Fitment:

      Details

      CA Residents: WARNING: Cancer and Reproductive Harm - www.P65Warnings.ca.gov

      Installation & What's in the Box

      Installation Info

      What's in the Box

      • (1) Aeroskin Hood Protector
      • (2) Alcohol Pads
      • (1) Surface Prep Pad
      4.7

      Customer Reviews (88)

        Questions & Answers

        10 More Questions

        Will It Fit My F-150

        • 2.7L V6 EcoBoost - 21, 22, 23, 24
        • 3.0L V6 Power-Stroke - 21, 22
        • 3.3L V6 - 21, 22, 23
        • 3.5L V6 EcoBoost - 21, 22, 23, 24
        • 3.5L V6 EcoBoost Limited - 21, 22, 23
        • 3.5L V6 EcoBoost Raptor - 21, 22, 23
        • 3.5L V6 PowerBoost - 21, 22, 23, 24
        • 5.0L V8 - 21, 22, 23, 24
        • 5.2L V8 Supercharged Raptor - 23