 FREE 1 to 3-Day Delivery on Orders $149+ Details
How to Install Auto Meter AirDrive Oil Temperature Gauge - Electrical on your Silverado

Shop Parts in this Guide
- Auto Meter AirDrive Series 2-1/16-Inch Oil Temperature Gauge; 100-300 Fahrenheit (Universal; Some Adaptation May Be Required)
- Auto Meter AirDrive Series 2-1/16-Inch Oil Pressure Gauge; 100-300 Fahrenheit (Universal; Some Adaptation May Be Required)
- Auto Meter AirDrive Series 2-1/16-Inch Water Temperature Gauge; 100-300 Fahrenheit (Universal; Some Adaptation May Be Required)
- Auto Meter AirDrive Series 2-1/16-Inch Boost/Vac Gauge; 30 inHG / 30 PSI (Universal; Some Adaptation May Be Required)

AIRDRIVE Gauge Installation
1. Check that you have all parts required for installation.
2. Disconnect the negative (-) battery cable.
3. Gauge mounts in a 2-1/16” hole. Use supplied brackets and nuts to secure gauge to dash.
4. Connect the white wire to dash lighting or switchable 12V light source, the red wire to switched 12V source and the black wire to ground. (see diagram for details)
6. Reconnect negative (-) battery cable.
AIRDRIVE Gauge Operation
Once powered your gauge will turn on and show an illumination code to indicate system status.
Pulsing Blue: The gauge is powered and connecting to the AIRDRIVE network.
Pulsing Green: The gauge is powered and connected to the AIRDRIVE network, but with no data input set yet.
Blinking White: The gauge is powered, connected, and being configured by the AIRDRIVE Mobil App.
Pulsing Yellow: A factory reset has been performed.
Pulsing Orange: The gauge is connected and waiting for a firmware update.
Blinking Orange: The gauge is applying a firmware update.
Once the gauge is connected to the AIRDRIVE network and is receiving valid data from the AIRDRIVE OBD dongle, the gauge will display the configured backlight color and the gauge pointer will indicate the configured PID value.
Once an AIRDRIVE gauge connects to an AIRDRIVE network, the gauge will remember the network details. Each time gauge is powered it will re-connect to the last known network.
In areas of high Wi-Fi activity or where other Wi-Fi sources are very strong, it may be necessary to remove the dongle, wait 10 seconds, and plug the dongle back in to re-connect with the gauges.
Network Re-Discovery:
While the gauge is powered, press and release the button located on the rear of the gauge case in a small hole to the right of the harness connector. The gauge will restart and discover the nearest AIRDRIVE network.
Factory Reset:
To perform a factory reset, turn your AIRDRIVE gauge off. Press and hold the button located in a small hole to the right of the harness connector while turning on the gauge power. The gauge will illuminate and pulse yellow indicating a factory reset has been performed. Release the button. Turn the gauge power off and back on. Following the rest, the gauge will discover the nearest AIRDRIVE network.
AIRDRIVE Dongle Installation
Plug the AIRDRIVE Dongle into your vehicle’s OBD Port under the dash. Turn ignition on. When powered on, the LEDs will light up for a half second. The blue Wi-Fi LED will illuminate solid when the Wi-Fi module is initialized. The green power LED will blink as it connects to the vehicle and will turn solid when successfully connected.
AIRDRIVE Mobile Application
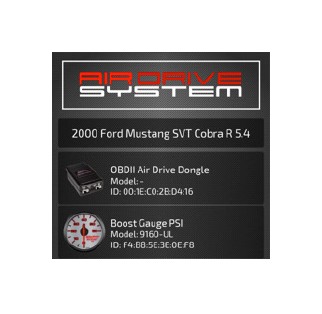
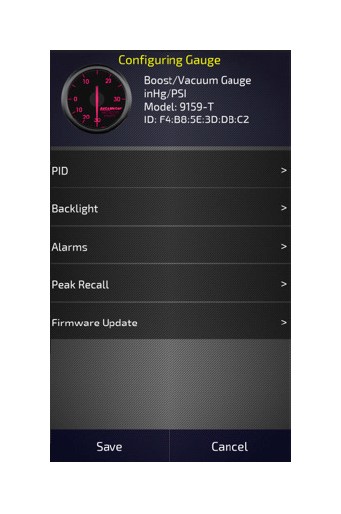
Download the AIRDRIVE System App from Apple iTunes or Google Play store. After you have downloaded the application, open your Wi-Fi settings and connect to the AutoMeterWiFi_xxxx network. The password for this network will be: “AutoMeter1957”, take note the entry is case sensitive. Open the application and begin by selecting your vehicle. Touch “No vehicle selected” to add your vehicle. After you have added your vehicle you are able to customize your gauges. You will see all of the gauges that are on the network identified by the data they display as well as model number. On the screen of the application, you will see
PID – Use to select the PID you would like the gauge to report
Backlight – Use to change the gauge backlight color and brightness
Alarms – Use to set an visual alert on the gauge for a PID value
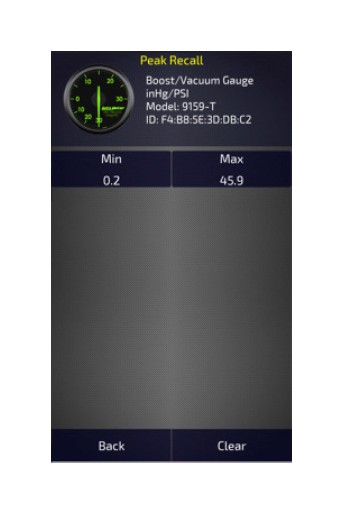
Peak Recall – Use to see minimum and maximum value reached on a gauge
Firmware Update – Use to update firmware on the device
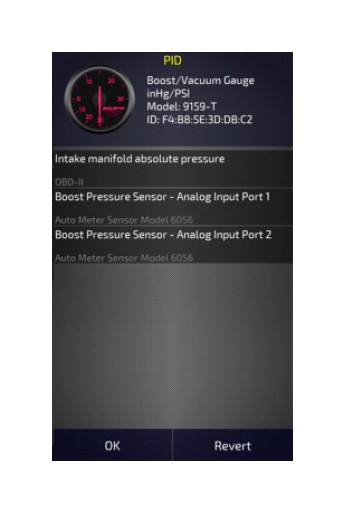
PID:
You will see the choices of PIDs available, select the PID you would like to be shown on the gauge and click ‘OK’. You must fully exit the app to see the gauge operate with your selected PID.
Backlight:
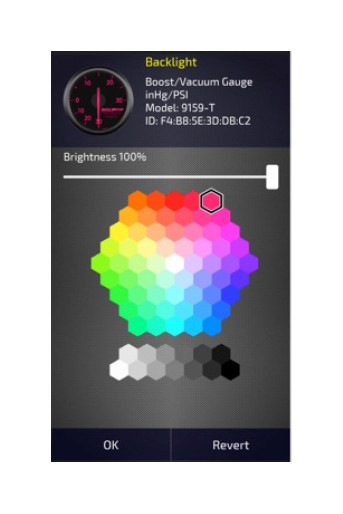
Allows you to change the backlight color of your gauge as well as the brightness. Use the on screen color picker to select the gauge face color you would like. You can also set the brightness you would like by using the brightness slider. All changes to backlight will update on your gauge face in real time. Press ‘OK’ if you are happy with the look of your gauge, or revert if you want it to go back to the color it was before you made any changes.
Alarms:
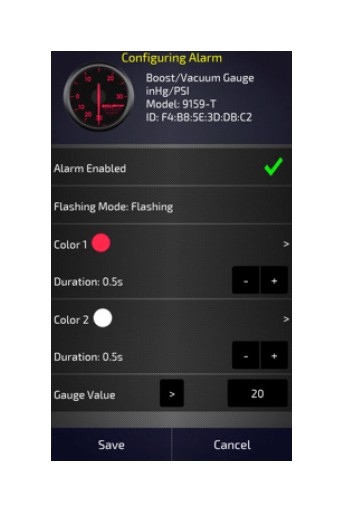
Touch to add an alarm, then select a solid or flashing alarm. A solid alarm will change the gauge face color to your selected color and remain that color until you are no longer in the alarm state. A flashing alarm will cycle between two colors and continue to flash those two colors until you are no longer in an alarm state. To set a solid alarm you will only need to choose your color, then greater than (>) or less than (<) symbol, and put in the number you would like as the alarm value. To set a flashing alarm, you will choose your two colors and also the amount of duration that color is active. You can press the plus or minus symbols to increase or decrease the amount of time that color will be active before cycling to the next color. After your color and time duration is chosen, select a greater than (>) or less than (<) symbol and put in the number you would like as the alarm value. Select ‘Save’ when you are finished or ‘Cancel’ if you do not want to save your alarm.
Peak Recall:
See the minimum and maximum value that was reported from the gauge. Press ‘Clear’ to reset the minimum and maximum values back to zero.
Remove Gauges:
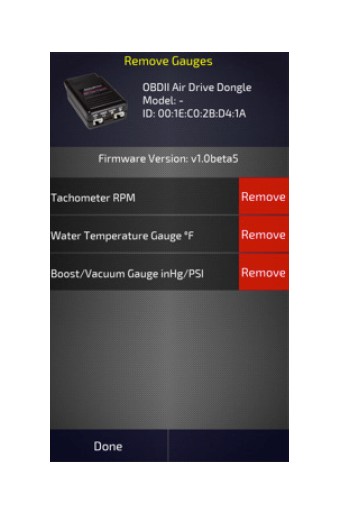
Touch the image of the AIRDRIVE dongle on the main menu to see the list of gauges saved to the dongle. Touch ‘Remove’ to remove an unused gauge from the network.


