Talk to a Silverado 1500 Sales Tech
1-888-706-1096
M-F 8:30A-11P, Sat-Sun 8:30A-9P
$20K Sweeps! 10 Chances to Win! Enter Daily >

Rough Country 3.50-Inch Suspension Lift Kit (07-13 2WD Silverado 1500)

Item S109946
Verify parts fit and get product recommendations.
Silverado 1500 Sales Techs: Connect Now M-F 8:30A-11P, Sat-Sun 8:30A-9P
$0.00
Our Price

$189.95 (kit)

FREE Shipping Market Price $218.99 You Save 13% ($29.04) Up to 10% off for Military & First Responders! See Details

Will this fit your Vehicle?

Select a different vehicle Help?
Update or Change Vehicle
Ship to: Ashburn - 20149
Sorry, please enter a valid US or CA postal code
We're sorry, zip can't be updated at this time.
    Create a list
    Add to New List

    Saved - View your saved items

    We're sorry. We couldn't save this product at this time.

    or use

      Product Videos

      What's going on ladies and gentlemen? Travis from americantrucks.com. And today, we're checking out the most affordable complete suspension lift kit that you can throw on your '07 to '13 two-wheel-drive Silverado or Sierra in the 3 to 4-inch category, this is Rough Country's 3.5-Inch Suspension Lift Kit. Comes in at around $170 price point which again makes it the most affordable complete suspension lift kit that you can throw on your two-wheel-drive truck. You've probably already seen them on the websites but anything that's gonna cost less than this is only gonna include spacers up front or new lift blocks outback and most likely you're not gonna be getting new shocks to accommodate those new lift blocks either, so those are kind of budget kits. More expensive options are gonna include things like new struts, new control arms and new coils, all kinds of crazy things. But honestly, those kits are kind of designed for four-wheel-drive trucks and it goes without saying they tend to cost of around the $500 price point. They can easily climb up to over $1,000 even close to $2,000.Now even though this is the most affordable kit that you can pick up in the 3-inch to 4-inch category, it's not to say that any of the components that you're getting on your truck are cheap by any means. We have nice high-quality steel spacers up front and we also have those really nice N2.0 shocks out back with those new lift blocks. The 2.0 shocks are really nice because they actually have velocitive sensitive valving. That's really cool because when you're driving around in the streets, just kind of cruising, you get a nice stock ride comfort. This thing is buttery smooth, by the way, I just took it out. But if you do end up going off-road, maybe you hit a light fire trail or you hit some debris on the road, large potholes, whatever, velocity sensitive valving is gonna tighten everything up and the rear end is not gonna feel like it's kind of bouncing all over the place, so the truck feels really nice and controlled. And again, because we're working with the two-wheel drive truck, we don't have to worry about the axle shafts up front coming out of that front diff, you don't have to worry about the CV angles wearing out on you anytime soon. We're also retaining all of our factory suspension components and we're not actually making any adjustments to the rebound or the compression on the strut up front. So again, nicest stock ride comfort all around even though you're getting this much of a lift.And you can also easily fit up to 33-inch tires with this kit. Rough Country advertises 32-inches. Well, we went ahead, we threw a wheel on here with a relatively neutral offset up front again with 33-inch proper on there, and again we had no rubbing or clearance issues. Unfortunately, guys, you will not be able to fit 35s on your truck, you will have clearance issues. If you want to spring for 35s you're gonna have to go for a lift kit that's actually almost probably like twice as big as this but you're probably not interested in that in any case.Now the install is also very straightforward thanks to how simple this kit is as well. Again, we're retaining all of our factory suspension components. All we're doing up front is throwning that space or in the strut. You actually have to make a few cuts but they're very simple. You actually have to cut out one of the bump stops for the upper control arm on either side. It's not a precise cut by any means, guys. If you've never put tool to steel before, this is something that you can tackle at home with something as simple as a Sawzall or a cutoff wheel. Total install is probably gonna take about five hours in the driveway with some basic hand tools. Obviously, impact guns are gonna make it go a lot quicker. As far as how difficult it is, I'm gonna go ahead and give this a modest two out of three wrenches on the difficulty meter. It's a technically simple job, you're just working with some relatively big hardware up front and obviously, out back you have to drop the axle a little bit with some jack stands. Nothing too crazy though. And again, definitely something you can do at home. I'm actually gonna help you guys out with that but we'll touch on that in just a second.So again, if you're looking for the most affordable lift kit that you can throw on your two-wheel drive Silverado or Sierra in the 3-inch to 4-inch category, Rough Country is got you covered with the 3.5-inch suspension lift kit. Check it out a little bit more on the site, you decide you like this option, you want to stick with this one, come back and I'll show you all the tools that you need to get the job done. I'm actually gonna show you how to get this thing bolted on step by step.Okay, before we get started installing our lift kit, you're gonna need a decent amount of tools out of the old toolbox. As you can see, you'll need a regular hammer for your ball joints. I recommend a flathead screwdriver for some plastic fittings, specifically your ABS line. Obviously, you'll need some standard drive ratchets and a bunch of metrics sockets. You'll also need a T30 Torx bit if you remove your rotor. You'll need a 10-mil shallow socket as well as a 15, 17, 18, 19, 21 and 22-mill socket. If you're using an impact gun, I recommend a swivel socket as well as an extension. You'll also need a pry bar in order to manipulate your lower control arm. Recommend having some hangers for your brake caliper hanging on the frame rail. You'll also need a decent amount of metric wrenches including a 15, 17, 18 as well as a 19 and a 21. Recommend having ratchet wrenches for those 18 and 19. You'll definitely need to cut the bump stop for your upper control arm, so you need a cutoff wheel or a Sawzall. Goes without saying, have some eyepro if you're doing any cutting. I would also recommend having a caliper compression tool, you can also use something like a D-clamp in a pinch. I also recommend having some basic spray paint, once you make that cut, you want to cover up that bare metal. And your truck probably have some rust and corrosion under there with some of this big hardware, so some spray lubricant, I like PB B'laster, that'll help kind of break up some of that stuff as well. And obviously, last but not least guys, I strongly recommend having a nice big impact gun for this job, lots of big hardware, lots of high torque specs.All right, guys, first thing you want to do, go ahead and grab that 19-millimeter socket. We have to get a little bit of weight off of our whole steering assembly here because we're gonna be manipulating the upper and lower control arms a little bit. So I'm gonna remove all of our brake stuff. First we're gonna start with our actual caliper, then we're gonna remove the bracket. Now you want to hang the caliper out of the way because you got this line on here, pretty helpful. Just grab yourself a wire hanger or something like this, we're gonna hang it on the frame rail.All right, now we're gonna remove the bracket for our caliper, it's secured using two bolts here on the back, you'll need an 18-millimeter socket to pull these out. Okay, now we're gonna remove our rotor, it's held in place with this little Torx head screw, you'll need a T30 Torx bit for this one. All right, we're almost ready to start tackling our suspension components, but before we do that, we're gonna get some slack in this ABS line. Again, because we're gonna be pushing up and down on our control arms and we don't want this thing to break or anything like that. So got a couple of plastic retainers right here, just grab yourself a flathead screwdriver. For this first one just above where the rotor sits, just want to press it on the little gray tab and kind of pull it off to the side and it should fall out like so. Now we're gonna go ahead and tackle this one here. This one's slightly different, you got to kind of push out on this little tab right here in order to pop this ring out. All right, now we're gonna do the same thing up here next to our brake line on this little bracket. This one has a small Christmas tree fitting, that's just held in place, just kind of pry up on this thing underneath till it unseats itself.Okay, so we we're about to tackle the sway bar end link but I actually noticed we can get even more slack on this brake line right here by removing this bracket on the upper control arm. Pretty simple, just grab a 10-mil socket. Okay, now we can tackle the sway bar end link, you have to remove this nut up top. But when you go to spin this nut, oftentimes the stud itself will spin. You can see we have this sleeve right here so we can't actually grab onto anything, but that's not a big deal. Just go ahead and grab a 15-millimeter wrench and you're actually we gonna spin the bottom of the end link with a 15-mil socket. So just go ahead and hold that nut stationary. Okay, now once you remove that nut, you want to pop this little rubber bushing off the top of the stud here. You can leave all the hardware on the bottom here, we just need the end link to be able to move up and down on the stud itself.Okay, now we're gonna tackle our tie rod end link, kind of same process as the sway bar so we don't really have to worry about this thing spinning on you too much. At any rate, you'll need a 21-millimeter deep socket to remove this nut. Just keep in mind if the stud somehow does manage to spin on you while you're removing the nut, it's gonna be a similar process as the sway bar end link. You're gonna actually be grabbing the bottom of the stud, you can see that how it's got some flat surfaces on it. This is actually sized up for I believe a 10-mil socket. So again, if you go to remove the nut and the whole thing starts spinning on you, switch over to a 21-millimeter wrench and spin the stud itself using a 10-mil socket. But at any rate, once you got the nut removed, you're gonna want to grab yourself a hammer. Take your time with this, be careful you want to smack the side of the mount here, that's gonna dislodge the stud.Okay. Now we're gonna tackle the upper ball joint here. This one is a little bit smaller, you'll need an 18-millimeter deep socket for him. You can come up underneath the lower control arm. It's kind of convenient especially with an extension. And once you remove that nut, it's gonna be the same process as the lower control arm, you're gonna smack the top of the knuckle there to dislodge it.Okay, now we're gonna remove the bottom bolts for our strut that's securing it to our lower control arm, you'll need a 15-millimeter socket for these. Okay, now we're gonna tackle the three nuts that are securing our strut to our frame rail here, you got one up front, one on the right side and the one is kind of obscured back here.You have this wiring harness, it's normally clamped onto the stud itself, so just pop that plastic fitting off of there. You need an 18-millimeter wrench for this, I highly recommend using a ratcheting wrench because it's a tight space. One thing to keep in mind too, if you don't have ratcheting wrenches like me, you can also open the hood especially if you're working on the ground with floor jacks, you can come in from the top with a deep socket as well, most likely.Okay, now we're ready to remove our strut. See we have lots of play here in our control arm, that's good. Large pry bar like this will definitely come in handy to try and get a little bit of leverage. Just place it in the pocket right there, maybe that's where you came in to do the upper ball joint. But go ahead and push down on him, pull the strut out, pretty simple. Make sure you clear the upper control arm as well.Okay. Our strut is removed. Before we throw the spacer on, I want to knock something out of the way first. This is probably the most time-consuming part of the install and that's cutting off this bump stop here for the upper control arm. So when you install the spacer on the strut, it's gonna change up your suspension geometry and it's gonna push your upper control arm and your lower control arm into a more downward angle. So once you actually start getting articulation and the strut begins to compress and decompress, your control arm might hit this bump stop, so we're gonna cut that off. Now the instructions tell you to remove the control arm completely. Honestly, guys, you don't necessarily have to. If you're gonna attack this with a Sawzall, then I'd recommend removing it just because Sawzalls like to jump around. But if you're gonna use something like a cutoff wheel with a grinder, you should be perfectly fine. You just have to find a good angle on this inside of the bump stop here, ake sure you're not cutting the bracket itself, you also don't want to hit the control arm as you're cutting, but it's not too bad as long as you're using a relatively decent size cutoff wheel or something smaller.Okay, so we cut off our bump stop. We went ahead and we cleaned up all the rough edges, don't want anybody to get hurt over here especially if you have to get an alignment done. Just grab yourself some basic spray paint with some primer in it preferably, make sure you spray this down that way you don't have any rust starting off here immediately.We can now throw the spacer onto our strut then we can reinstall our struts. But before we do that, we have to set up the hardware that are gonna act as the studs for the top nuts for us to secure the strut on the frame rail. So these are splined studs, these are a little bit different than what you might've seen before if you've ever seen a spacer installed. What we're gonna do is we're gonna actually press this through the holes on the spacer like so, and then actually while we're at this here, something you guys should know, the holes on the spacers are not the same diameter. These holes are a little bit wider, those are gonna be accommodating the factory studs on the strut, the skinnier holes are gonna be accommodating these spline bolts. So what we're gonna do is we're gonna press this through this hole right here. It's gonna be a little bit of a tight fit, guys. If you need to, might actually to rotate these and kind of thread them through because it's very tight especially with the paint on here.But once you have those in all the way, you're gonna grab the nuts that are also provided in the same bag in the kit. You're just gonna thread these on all the way. And what we're gonna do is we're gonna grab a 17-millimeter socket. We're gonna spin this nut and what that's gonna do is it's gonna pull the entire bolt through our spacer. And these splines are gonna kind of cut out their own little shaft in this hole right here and that's what's gonna keep this stud secured inside the spacer. Now you don't want to put a thousand pounds of torque on this nut because you could actually end up kind of breaking these splines. We're just gonna use our impact gun on full power. We're gonna get him mostly seated until the splines are all the way in. Make this a little bit easier and actually throw this on top of your strut, it's gonna kind of keep it from going anywhere. You want to kind of watch from the inside as you're doing this, you want to see those splines get seated all the way. All right, go ahead and pop that off. We're gonna grab the hardware now, our flat washers as well as our nuts in order to secure the spacer itself to the strut.All right, guys, real quick here. We actually ran into a slight problem here and this is something that you guys also might deal with here. If you go to remove the nuts on the spline bolts you might run into the problem where the splines, even though you took your time, even though you were kind of gentle, you can see here the splines they can kind of wear out a little bit as you're tightening everything and you end up with this case where the spline bolt ends up spinning inside of here.Being perfectly honest with you guys, this is kind of a complex design for a relatively simple product. I don't think these spline bolts are necessarily the best design for this. So if this does happen to you, it's not the end of the world all you gotta do is find a way to get that nut and that bolt off of there. Just grab a cutoff wheel and just chop it off there real quick. And you can actually replace this hardware with just a regular hex bolt and a regular nut. The only thing that you'll need to consider is when you go to throw the strut with the spacer back into the truck, you're just gonna have to hold the bottom of the hex bolt that you use while you tighten the nut down on top. And again, that's actually a more conventional way of doing this as opposed to these spline bolts. So we're gonna get that out of there real quick, we'll replace that with a regular hex bolt then we'll throw the space on top of our strut. I'll show you guys what hardware you need in just a second then we can go ahead and throw this guy back in place.Okay, so I went ahead and I got rid of those bad spline bolts, we replaced them with some regular hex bolts and nuts. Now we're gonna actually install the spacer onto our strut, and in order to do that, we're gonna be reusing the factory nuts that originally secured the top of our strut to our vehicle. So what you want to do is just line up the holes. It can only go on one way, just keep that in mind. So line up the holes, kind of get the tips of the studs on there and then you have to slide the nuts in here before you get it seated all the way. And unfortunately, whether you were using the spline bolts or you're using your own hex bolts here, you can see once you get the nuts on there, it's a really tight fit in here so you're probably gonna have to use an open ended wrench to tighten this stuff down. And again, these nuts are 18-millimeter, so you'll need an 18-millimeter wrench for these. Just get them hand tightened as much as you can for...save you some time.All right, guys, we got the spacer installed successfully, now we can throw the strut back into our truck, there's a couple ways to go about this. And honestly, the easiest way to do this especially if you're doing it by yourself is to actually get the strut mounted to the lower control arm first then grab the large pry bar and kind of crank down on the lower control arm. Use the strut itself as kind of a lever on those bushings where it mounts to the lower control arm, you can kind of push it into place. Sounds a little confusing, it's a little bit easy so just let me show you how it's done.Okay, our strut's in place. Generally speaking, we have the holes on the bottom of the strut, line up with the holes in the lower control arm with those bolts we removed earlier. They do provide new hardware in the kit for you guys, but honestly, it makes no difference, we're not modifying anything down here. If your factory hardware rather is in good condition, you can reuse it. So we're gonna go ahead and get these bolts lined up here, gonna help line things up a little bit.Okay, now that you have the bottom strut secured to the lower control arm, now comes the part where we have to get it inside of the top here of our frame. Pretty simple guys. Again, grab a large pry bar, just put it in the bottom of the control arm here. You want to grab hold of one of the coils. Make sure you don't get your hand stuck in here, you don't want yourself pinching against the upper control arm and just give it a good push while you line up the three studs up top.All right, now that are strut is seated, we have all of our studs coming through the top here, we're gonna throw our hardware on. They do provide some crush washers and flat washers as well as regular nuts for the top of these. Whether or not you decided to stick with those press-fit bolts here, you might have an issue with the studs not coming up enough and the top of the spacer might not actually be flush inside of the pocket here until the suspension is under load. So we're just gonna throw this hardware on right now and get it hand tight. We'll actually tighten all this stuff down fully once our truck has our wheels back on it, everything else is back together because we want the suspension under loadwhen we tighten all this hardware down, make sure the spacer's flush. So you can see here we're having a little bit of an issue. We don't have enough thread coming through with our washers on there because of this press-fit bolt having a shorter stud than what we're using elsewhere so you can just leave that hardware there for now. We'll get the nuts on the other two.Okay, now we're gonna get the upper ball joint stud back into the top of our knuckle here. Guys, the easiest way to go about this is with a floor jack, there's really no other way to do it easily especially with how big the spacer on top of the strut is. So you're gonna put a floor jack on the lower control arm and you're just gonna slowly pump that up, that's gonna bring the lower control arm with our steering assembly on the end and it's gonna close the gap between the upper control arm and the top of the knuckle. Once you get those two in there, we're gonna push down on the upper control arm using a pry bar and we're gonna push the stud through and get our nut in place and get it hand tight. At that point, you can actually tighten down the nut all the way. But you might run into that issue like with our sway bar end link here as well as with our tie rod end link where you go to tighten the nut and the entire thing is actually gonna spin on you. If that happens, pretty simple fix, grab a 7/32 Allen key, you're actually gonna put it in the bottom of the stud. Once you have the nut on there, you're gonna hold the stud in place and you're gonna ratchet that tight using a regular wrench.Now as you're lifting the lower control arm, you want to do this relatively slowly because you want to give the strut time to compress without lifting up the entire truck. You also want to make sure your truck is well supported on jack stands as you're doing this. Okay. We've raised our lower control enough, we have it pretty much maxed out at this point. Now that our truck is starting to come off of our lift a little bit, we went ahead, we backed it off. Now I'm just pressing down on the upper control arm using a pry bar. And my pry bar is seated on one of these coils here. Go ahead and get the threads through. Go ahead and hand thread that nut on. Once you get a couple of turns on that, go ahead and make sure your truck is seated on your jack stands and lower it back down. All right, let's go ahead and try and tighten this thing down. We're gonna try it with a regular deep socket first to see if we can get lucky without the stud spinning on us.All right, now we're gonna go ahead and get our tie rod end link back in place, same process as our upper ball joint. Go ahead and get the nut on there. If it starts spinning you'll have to hold the stud using a 10-mill socket and you'll have to get this tight using a 21-millimeter wrench.All right, guys, we're just about wrapped up, everything is back together for the most part, all we got to tackle here is the sway bar end links. Now, if you're doing both sides, obviously you want to make sure that both of the end links are in place before you tighten down one side, otherwise you're gonna have to loosen it back up so you can get the other one in place. Once you've done that, it's just a matter of throwing these little rubber grommets or bushings on, get our top nut in place and get him tightened back down. Again, you'll need a 15-millimeter socket as well as a 15-millimeter wrench for these.Okay. Last thing we need to do before we start putting our brakes back on is get this ABS line back in place if you removed it. So go ahead and pop the Christmas tree fitting up top here on this little brake line bracket. Go ahead and remove that 10-mil bolt in order to get the second bracket on there as well. And just press the ABS line back in place. Same thing for our little gray clip on the knuckle.All right, so first thing we gotta do is get our rotor back in place. Don't forget that little Torx head retaining screw as well. Remember this a T30. Okay, now we can throw our bracket for our caliper back in place. Remember it bolts to the knuckle with these two large bolts, you'll need an 18-millimeter socket for both of these guys.Okay, now we can throw our pads back in place. Make sure you got the right pads on the right side of the rotor then you can also throw your caliper in place. Before you throw the caliper on, you want to make sure you can press it as well. You can use an actual caliper compressor, but in a pinch, you can also use a D-clamp. Once you have it compressed and lined up, go ahead and get the bolts in on the back. Again, two bolts on the bottom and the top, 19-millimeter flanges, so you'll need a 19-millimeter socket.Okay, so we finally got everything back together, our brakes are back on, ABS lines are all good. We actually found when we put our jack on our lower control arm and we jacked everything up to get the upper ball joint seated that our strut actually went flush here in the top pocket and it actually didn't come back out. So we have a correct alignment on the strut so we don't have to put our wheels on just yet, we can actually tighten down the nuts up top here. If yours is still out of alignment, it's not flush up here then, unfortunately, you'll have to put your wheel on, put your suspension under load. But at any rate, you'll need an 18-millimeter socket if you're using the hardware provided in the kit.Okay, now by this point, the front end should be all wrapped up, congratulations. Now all we have to do is tackle the rear end. There's gonna be a lot of rust back here guys, there's just no two ways to go about it, so you definitely want to grab yourself a penetrating oil, I'm a personal fan of PB B'laster. Make sure you spray down all your shock mounts, bottom and top. You also want to spray inside where the U-bolts come through on the axle both inside this little retainer and on the bottom for the nuts as well. Really get those soaken because again, this is big heavy hardware with high torque specs and there's again gonna be a lot of rust back here, that's just the way it goes. But firstly what we're gonna do, disconnect both of our shocks. We'll do the bottom brackets here first. You need a 21-millimeter ratchet and a 21-millimeter socket for these.All right, we're gonna do the same thing with the bolts securing our shock up here as well. They were nice enough to weld the nut on the other side, so you don't need a wrench for this one. Once you get the bolts out, just kind of wiggle the shock out of the bracket. Sometimes these brackets can get a little bent out of shape when they go to tighten them down. All right, let's go ahead and do the same thing for the other shock. Sometimes the shock bolts can get stuck in there as well, helps to kind of twist them and thread them out.All right, guys. Now that we have both of our shocks removed, we can start unbolting the U-bolts on both sides. At this point, the leaf packs are the only things that are holding the axle to the vehicle minus the driveshaft. So at this point, you want to really put safety first. Make sure you got some floor jack and jack stands, all that good stuff supporting the axle on either side of the differential. It's also good idea to have one underneath the pinion if you can manage. You don't necessarily need to but it does make it a little bit easier to get the new lift blocks in place. To hold the U-bolts off, you'll need a 21-millimeter deep socket for all these. All right, once you have the U-bolts on one side, go ahead and do the same thing on the other side.All right, guys, now we're ready to lower our axle just enough so that we can get our new lift blocks in place. At this point, now that all the U-bolts have been removed, the axle's now only supported by your jack stands or floor jack as well as the driveshaft, so really take your time with lowering that axle down. If you have jack stands on both sides of the differential make sure that you're lowering them at the same time that way you're not kinking the axle or anything like that. You want to lower it just enough so you can slide the new blocks in place. Then we'll throw the new U-bolts back in place and we should be just about wrapped up.All right, so we lowered our axle just enough, see now we got some clearance inside of here, we're gonna be pulling out this factory block. Might be kind of stuck on there, especially if you've got some rust and corrosion back here, so try and pry it off by hand, if not you might have to grab a small mallet and pop it off of there. And once you have that factory block out of there, you want to install the new block. You have a little hole in here, that's for the guide pin on the bottom of the leaf pack, you also have a guide pin on the block itself, there's also an alignment hole on this little bracket or mount right here for the axle also. One thing to keep in mind here, these are tapered, you can see that the rear is just a little bit taller than the front and this is not a direct conversion if you will, this isn't gonna give you exactly three inches of lift nor is the block even close to three inches. But when everything's all said and done, our truck will be nice and level out at three inches.So go ahead and slide the tapered end in towards the front. Make sure the pins are lined up as well, and again, only lower this thing just enough to squeeze this in here. You also have these ABS lines and you have some brake lines up there that are probably gonna be a little under tension while you're doing this. And I'm just raising this up a little bit to take some slack off and get it kind of centered, then I'm gonna just throw the block in the other side before we get it completely up in place.All right now we've got both sides in, just kind of puts some gentle pressure on the axle with my hands as I line everything up. You can see here this rotation that I'm doing right now, that's me pressing on the pinion of the driveshaft. You can see why it's helpful to have a third pole jack or a buddy under there helping you getting all this stuff lined up. If you're having some issues with getting that pin in there as well, we're just fine here, but if do you have issues with that it's helpful to spray that down with some spray lubricant and kind of wiggle this spacer to kind of get some of that corrosion off of that guide pin. But we have both of our lift blocks in place, everything is sandwiched nice and tight, let's go ahead and throw our new U-bolts on.All right, guys now at this point we would be throwing on our new U-bolts but you do have a decision to make here, this is entirely optional if you will. So when you got to throw the U-bolts on, I went ahead and I threw one of the new nuts on there as well, you're gonna probably find the studs themselves are a little bit too long, so when you actually go to throw the nuts in place and you try and tighten these down with a deep socket, you're not actually gonna get all the way. So what we can do, if you'd like to, take a couple of minutes, can actually shorten these up a little bit, it's gonna make it a lot easier especially if you're using deep sockets and impact guns like me, it's gonna make it a lot easier to get this stuff on here. Could probably take off about an inch and a half or so off of these studs. One thing to note, when you do cut these, go ahead and put a nut on there first past the point of where you're gonna cut, that way once you make your cut, you can drive the nut back off, it will clean up the threads for you. We're gonna go ahead and head over to our chop saw real quick, we'll cut these to length then we can throw these back in place.All right, so we have all of our nuts on our U-bolts here, I went ahead and I marked about an inch and a half up the stud, that leaves us with a little bit of thread here and these are actually gonna be tightened up even more once we actually put them in place. Little tip here, try and get the nut flush against whatever cutting surface you're using, that way the cut that you're actually making on the U-bolt itself is also flush.All right, so we got our U-bolts cut up, we got the threads cleaned up, we pulled our nuts off, now we're gonna go ahead and throw them on here and we are reusing the factory hardware to secure the U-bolts underneath the axle. Just keep that in mind, once you get these in place. Make sure they're actually lined up in these little grooves as well on top of the leaf pack here. Go ahead and slide this retainer on the bottom. U-bolts are kind of flared out, I'm gonna have to kind of squeeze the threads together to get them through these holes here. All right, and once you have it in place, go ahead and grab your flat washers as well as your nyloc nuts. Get those hand threaded a little bit and we'll drive them home. These nuts are a little bit bigger than the factory ones, by the way, so you'll be stepping it up from a 21 to a 22-millimeter deep socket. Let's go ahead and do the same thing for the rest of our U-bolts.All right, guys, we're just about wrapped up. All we need to do is throw our new shocks in place. But before we do that, I wanted to give you a quick little comparison between the two here. Couple of similarities that matter, obviously everything is still a factory configuration if you will, so we have eyelets on either side. Rough Country was nice enough to press the bushings and sleeves in place, that can be kind of a pain. So thank you for doing that for us, makes the install a lot easier. We are gonna be reusing our factory hardware for these, by the way. But couple of things that point out at me, this thing is way, way heavier than our factory shocks, so it's probably got a lot more damping force behind it. Also has a little bit of a longer travel compared to our factory one, that's to accommodate our new lift blocks so that our leaf springs aren't too springy if you will. And this is definitely gonna make our ride comfort what it should be with these new blocks and these new spacers in place. So let's go ahead and discard these little guys, throw the new ones in place, pistons facing up towards the bed as well.All right, easiest way to go about this guys is to actually bolt the shock up top first. Go ahead and get that factory bolt in place through the eyelets. This can be a little bit of a tight squeeze, by the way, with the new shock, I believe that the eyelet in the sleeve might just be a tiny bit bigger than the factory one. So if you run into issues actually getting this thing bolted in up here, can actually grab the factory shock and you can kind of wiggle it around like that to open up the bracket.All right. I'm gonna come in with my impact gun to get this thing in all the way. I'm not gonna tighten it down completely because I want a little bit of rotation so I can get the bottom eyelet in. I'm just using my socket and my gun to kind of get the bolt through. Okay, now we're gonna get our bottom bolt and nut back in, the bolt faces out towards the tires and you can actually use your pole jack or floor jack or whatever to kind of help the axle get the correct height for this.All right, guys, so once you got to lift blocks installed, the shocks are back in place, you got your wheels on, go ahead and put the truck down, take a nice deep breath, you finished the install. Just do a double check on everything up front and out back. Makes sure all your hardware is tight. Don't want any loose ball joints, tie rod ends or anything like that and that should wrap up everything. That'll also wrap up my review of Rough Country's 3.5-Inch Suspension Lift Kit, fitting your '07 to '13 Two-Wheel-Drive Silverado or Sierra. Be sure to check it out more on the site. And for all things Chevy and GMC, keep it right here at americantrucks.com.

      Product Information

      Features, Description, Reviews, Q&A, Specs & Installation

      Features & Specs

      • 3.50-Inch Suspension Lift Kit
      • Increases Ground Clearance for Improved Off-Roading
      • Accommodates Wheel Size of Up to 32 Inches
      • Features New N2.0-Series Shocks
      • Includes Fabricated Rear Blocks
      • Lifetime Manufacturer’s Warranty
      • Expert-Level Installation with Bolt-On Design
      • Requires Cutting, Grinding, and Minor Trimming to Factory Bumpstops
      • No Need to Disassemble Struts for Installation
      • Installation Hardware Included
      • Sold as a Kit
      • Fits 2007–2013 2WD Silverado 1500 Models

      Description

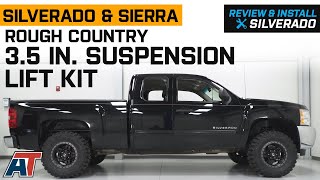
      Increases Ground Clearance for Improved Off-Roading. True to its name, the Rough Country 3.50-Inch Suspension Lift Kit introduces an additional 3.50 inches to your Silverado 1500. That guarantees farther distance from the terrain, which boosts protection of the undercarriage. Plus, this suspension lift kit, which is recommended for aftermarket wheels as large as 32 inches, will level the front with the rear of the vehicle for a more stable ride—and you can return your truck to stock height if you want to.

      Features New N2.0-Series Shocks. This lift kit is refreshed with application-valved N2.0 shock absorbers. They are specifically valved for use with this specific vehicle-and-lift combo, thus giving you optimal performance in both on-road and off-road situations.

      Includes Fabricated Rear Blocks. Also included in this Rough Country 3.50 Inch Suspension Lift Kit are a set of fabricated rear blocks. They will not only prove to be stronger and longer-lasting than cast ones, but also will be less susceptible to damage and fading.

      Lifetime Manufacturer’s Warranty. Rough Country warrants that this suspension lift kit will be free from defects in material and craftsmanship for the life of the vehicle if installed and operated properly.

      Expert-Level Installation with Bolt-On Design. This lift kit, which sports a bolt-on design, is packaged with bolts, nuts, screws, and other types of installation hardware. Note, however, that it requires some cutting and grinding, as well as minor trimming to the factory bumpstops; and you will not need to disassemble your struts to apply it on your vehicle. Expect to spend up to 5 hours to complete the installation process.

      Application. The Rough Country 3.50-Inch Suspension Lift Kit fits the 2007–2013 2WD Silverado 1500 models. It is sold as a kit.

      Shop All 3 to 5 Inch Truck Lift Kits

      Shop All Truck Parts And Accessories

      Shop All Truck Lift Kits

      Fitment:

      Details

      Rough Country 26830

      CA Residents: WARNING: Cancer and Reproductive Harm - www.P65Warnings.ca.gov

      Installation & What's in the Box

      Installation Info

      What's in the Box

      • (2) Strut Spacers
      • (2) Rear Shocks
      • (2) Rear Blocks
      • (4) U-Bolts
      • Installation Hardware
      4.8

      Customer Reviews (418)

        Questions & Answers

        10 More Questions

        Will It Fit My Silverado 1500

        • 4.3L V6 - 07, 08, 09, 10, 11, 12, 13
        • 4.8L V8 - 07, 08, 09, 10, 11, 12, 13
        • 5.3L V8 - 07, 08, 09, 10, 11, 12, 13
        • 6.0L V8 - 07, 08, 09, 10, 11, 12, 13
        • 6.2L V8 - 09, 10, 11, 12, 13

        Not Compatible with the 2007 Silverado 1500 Classic Model.