Talk to a F-150 Sales Tech
1-888-706-1096
M-F 8:30A-11P, Sat-Sun 8:30A-9P
$20K Sweeps! 10 Chances to Win! Enter Daily >

S&B Cold Air Intake with Oiled Cleanable Cotton Filter (11-14 3.5L EcoBoost F-150)

Item T533972
Verify parts fit and get product recommendations.
F-150 Sales Techs: Connect Now M-F 8:30A-11P, Sat-Sun 8:30A-9P
$0.00
Our Price

$349.00 (each)

FREE Shipping Market Price $407.99 You Save 14% ($58.99) Up to 10% off for Military & First Responders! See Details

Will this fit your Vehicle?

Select a different vehicle Help?
Update or Change Vehicle
Ship to: Ashburn - 20149
Sorry, please enter a valid US or CA postal code
We're sorry, zip can't be updated at this time.
Recommended Install Shops
How It Works
Install Shops are available near Ashburn - 20149

Add Local Shop Installation

Total cost of service $175.00
    Create a list
    Add to New List

    Saved - View your saved items

    We're sorry. We couldn't save this product at this time.

      Video Review & Installation

      So, if you own an '11 to '14 3.5-liter EcoBoost powered F-150 and you're looking for the most affordable closed element cold air intake upgrade in order to get that nice cold, dense air to the motor, open things up with some more CFMs, and get some more horsepower and torque, then you should be checking out S&B's cold air intake with their oiled cleanable cotton filter.Now, if you've been looking at the product pages, then you've probably seen a couple of different options. And the reason I mentioned that closed element design again is because that's gonna insulate that new filter the best thus giving you the most performance. Those open element designs are cool because you can see the intake underneath there. They have, kind of, an old-school design and a lot of times, they have some polished tubing and things of that nature, but they will not insulate that conical filter as well as a closed element design, and thus you will not get as dense air as you would with a closed element design. So, again, if you want the most performance possible out of a cold air intake, a closed element design like this one is the way to go.Now, obviously, the closed element options are a little bit boring normally, right? You can't actually see anything underneath the air box and most of the time, those closed element boxes look pretty close to factory, however, S&B approached this in a pretty cool way. They actually threw this really neat, little plexiglass window on here. It gives it a pretty cool look underneath the hood, it cleans things up nicely, and all other things considered, the actual tubing and the air box still are a nice aesthetic upgrade compared to that factory air box even still.Now, as far as filter goes, there are few options. You have those dry filters and then you've got the oiled cleanable filters like this one. Well, which one should you go with? Right. Simply put, those oiled filters will move more airflow or more CFMs if you've been doing your research, thus providing more air to the motor, and thanks to the EcoBoost's ability to map things on the fly, theoretically, you should get more performance compared to a dry filter.A dry filter is nice if you like to go off-road a lot because you can simply blow it out with compressed air, throw it back in, and you're good to go. The oiled filter, you actually have to remove it and wash it off with some basic detergent and water, oil it back up, and throw it back in. However, because a closed element design like this insulates it so well, it will stay clean for quite a while and honestly, you probably only have to clean it maybe every other oil change or so.So, it's not a huge tradeoff or I should say it's not a huge negative to go with the oiled filter in exchange for that better airflow to the motor. So, all in all, the S&B has a lot of good stuff going for it, right? Aesthetically speaking, it's a nice upgrade. Functionally speaking, it's still a closed element design, still retains the cold air inlet inside the fender, and because it's an oiled filter, you can clean it off, throw it back in, and technically you're good to go for the life of the filter.Now, I'm also happy with this intake because it installs very easily and really, any cold air intake for the EcoBoost is a relatively straightforward install. It's an excellent first mod, so I'd recommend this if you just bought your EcoBoost truck or if you're doing some work to it, this is a good place to start. For that reason, I'm gonna give the install a pretty simple one out of three wrenches on my difficult meter. So, again, you want the most affordable closed element design, you want to get some better horsepower and performance, you want to clean up the look inside the engine bay, go ahead and stick around. And if you pull the trigger on the S&B, I'll show you guys what tools we need on the table here and we'll get started on the install in just a second. In order to install our intake, you'll need a standard drive ratchet with an 8-millimeter socket and an 11-millimeter wrench.You'll also need a T20 Torx bit with a Philips head screwdriver. And optional but helpful tools include a couple of medium and long extensions and some spray lubricant. All right. So, obviously, before we install our new intake, we have to remove some of our factory components here. We're gonna start with our tube and our box, but before we do that, we want to disconnect our sensor here. There's a little red tab on the bottom so go ahead and pull that out with your finger, squeeze down gently to remove it.Once you've done that, you can start loosening all these clamps here. These are just worm gear clamps. You'll need an 8-millimeter socket for these. Some of them can be a little bit difficult to access, so it might be helpful to have a long extension, especially for that bottom clamp that we're about to hit. All right, like I said, that one clamp is, kind of, tucked down behind here so it's helpful to come in with a really long extension behind the tube itself, then you can loosen it pretty easily. All right, now that we have all those clamps loosened, we can remove the tube itself. Simply give it a good pry and it should pop free.Now there might be a vacuum line located on the bottom of the tube here, you can see that just pops right off. Just make sure don't yank on it too much. You don't want to rip that rubber hosing. All right, now we're gonna remove the top of our air box. It's secured with a couple of clips there. You don't need any tools for these, just pry them off by hand like so, and you can pop the top of the air box free. Then go ahead and remove your factory paper element filter.Alright. So, we have our factory air box and our factory filter removed. Now you guys can see some comparisons, really some of the big differences between our old and busted factory stuff and new S&B setup, right? A couple of cool things to point out here, things actually look surprisingly factory in comparison, and some of you guys might like that. A lot of cold air intakes go for that flashy, open element design, lots of polished stuff everywhere. That's not the case here. They decided to go with a more understated look. We're still working with all this black plastic here, so it's not gonna stand out too much, and some of you guys might appreciate that factory look under the hood. Now, those are where the similarities end. Obviously the big differences here, yes, those closed element designs that I mentioned can look a little bit boring sometimes because normally you can't see that filter underneath going to work, but that's not the case here. We have a new top of our air box with this cool, little plexiglass window here so you can see the filter underneath there and that's a nice way to tell if you need to clean your filter, right?Obviously, with that factory air box, we don't see the filter underneath. This thing looks pretty gross, right? It's not doing a good job obviously. It's pretty much choking our motor. That's not the case here. You'll be able to see the filter underneath with the plexiglass window, and if you ever need to clean it off and re-oil it, you can do so very easily. But besides that, everything else pretty much remains the same, which I actually like.Now, before we ditch our factory stuff, we do have to remove our sensor here from our air box, and in order to do that, you're gonna need a T20 Torx bit for those two screws. Now, our factory sensor's removed, you can ditch your factory air box and tube. We're gonna install our sensor into our new tube before we do anything else. Go ahead and line up this little foam seal right here, put your bracket on top, which we are working with a 2011 truck, by the way, so we're using the smaller bracket. You have to use that larger bracket if you're working with a '13 or '14 truck. Go ahead and grab the larger Phillips head screws in the kit in order to secure the bracket to the tube. Now you'll need a Phillips head screwdriver to do this.All right. Once your bracket is secured, go ahead and throw your sensor in, make sure the bulb of the sensor is facing towards the inlet on the tube itself. And again, you're going to need your Phillips head screwdriver with those smaller screws in the kit. All right, now that our sensor's out of the way, we're gonna install this little barbed fitting in the hole on our intake tube for that crankcase breather hose that we removed earlier.Now, if your truck does not have a hole in the intake tube for a breather hose, then there is an Allen head bolt that you can actually throw in here. You'll need an Allen head key to secure it and you want to close that hole up, that way you're not getting any extra air into the manifold that's not being metered by the truck itself.Now, these are plastic threads, so you want to hand tighten them and like I just did, and then just give it a couple of turns with a little 11-millimeter wrench if you want to. Make sure it's nice and tight, but again, you don't want to strip this out and cause any leaks. All right, now our tube is all good to go. We got our barbed fitting in there or your plug depending on what truck you're using. You got your sensor in place. Now we can finally start working on our new air box here.You want to throw this rubber cuff in place. In order to do that, you'll need this large band clamp. Now, this is a little bit of a pain to get this on here, this rubber against plastic, so it's very helpful to have some spray lubricant. Spray it down, make it a little bit easier on yourself. All right, with our rubber cuff in place, we're gonna throw the tube through there so we can secure our new air filter. Again, it's a little bit of a squeeze. You are working with plastic on rubber here, so it's helpful to spray that down before you do this. It makes it a lot easier on yourself. All right. We're almost ready to throw our new intake into our truck. Obviously, before we do that, we want the star of the show in place, our new conical filter. Let's go ahead and make sure that large band clamp is on there. Throw it onto the intake tube inside of the box. Make sure it's seated nice and flush because it is a little bit of a tight fit inside the truck. Once you got that seated all the way, you can actually tighten down that clamp using your 8-millimeter socket.Obviously, you can see this as a pretty tight fit. If you're using power tools, something like a cordless impact, it's very helpful to have an impact swivel socket. All right. We're finally ready to install our new intake. Now, quick install note here. If you guys were looking at the instructions while you're following along, you might have noticed we did avoid something with the factory air box, and that's actually pulling out the factory duct and replacing it with this duct.Now, we did a little bit of work under there. I actually did a couple of measurements and that duct is not really any smaller than this one and it'll work just fine with your new filter. So, if you want to avoid the hassle of removing the bottom end of the factory air box and getting all those bolts out of the fender, you can avoid that entirely. This is technically optional in my humble opinion.At any rate, we're gonna go ahead and throw this guy in place. Make sure you got your rubber couplers on the tubes here. If you don't, go ahead and secure those, again, with your 8-millimeter socket. Make sure you got the rest of the band clamps in the kit. We're gonna save our plexiglass window for last because we don't want to scratch it up. We're gonna go ahead and throw everything in place and I'll show you guys how to tighten everything down.All right, so the best way to get this new intake in here and secured easily is to line up the new air box with the bottom of the factory box. Make sure all the little lips on here are lined up in those holes, go ahead and secure that. And once this is sitting flush, you can maneuver all the little tubes, get these rubber grommets in place, and we'll tighten those down with that 8-millimeter socket. All right, go ahead and throw these rubber couplers in here.Like I said, keep these loose for now until you get both of them seated. You want a little bit of play in there until you get both of them lined up. Then once you've got them both seated, again, you want to tighten them down with that 8-millimeter socket. All right, now both of our fasteners are tightened down, we're gonna secure the clips on our air box so it's one piece again, and then we're also gonna reinstall the connection for our sensor. All right, make sure you install that breather hose if your truck came equipped with it.Once you got that installed on that barbed fitting, you can throw your plexiglass cover onto your air filter, and you can use your Phillips head screwdriver with the provided hardware. When you throw these screws on, make sure you install those little rubber grommets underneath, that way you have a little bit of insulation between the metal fasteners and the plexiglass, that way they won't crack.All right, so once you've got your plexiglass window in place and fastened down with your screwdriver, that'll wrap up the install. It also wraps up my review of the S&B Cold Air Intake with their Oiled Cleanable Cotton Filter, fitting your '11 to '14 3.5-liter EcoBoost Powered F-150. I'm Travis. Thanks for watching. And for all things F-150, keep it right here at americantrucks.com.

      Product Information

      Features, Description, Reviews, Q&A, Specs & Installation

      Features & Specs

      • Enhances Torque and Horsepower
      • 28.33% More Airflow Over Stock
      • Oiled Reusable Silicone Filter
      • Degrade-Resistant Silicone Rubber Seals
      • Million-Mile Warranty
      • 50-State CARB Certified; CARB EO Number: D-590-12
      • Made in the USA
      • Fits Any 2011-2014 3.5L EcoBoost Ford F-150

      Description

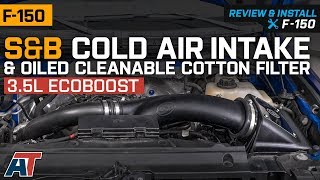
      Enhanced Horsepower and Torque. Ready to take your F-150's horsepower to the next level? The S&B Cold Air Intake w/ Oiled Cleanable Cotton Filter features a wider inlet, a bigger air box and advanced silicone air filters, all of which adds up to an incredible 28.33 percent increase in airflow to your engine compartment. That means more horsepower, increased torque and better gas mileage.

      Silicone/Cotton Air Filter. The S&B Cold Air Intake comes with an Oiled Cleanable Cotton Filter that features four-plies and wider pleats for better engine protection and increased airflow. The filter body is crafted from silicone for elasticity and heat-resistance.

      Brilliant Design. S&B custom engineers this Cold Air Intake to utilize every inch you've got in your engine compartment. That results in a much larger air box, a 48 percent wider inlet opening and bigger intake tubes, which means insane amounts of rich, cool air being funneled into your engine compartment. 

      Simple Installation. With the included mounting hardware, you'll be feeling your new horsepower gains in less than a half an hour.

      Backed by Million-Mile Warranty. Your new intake is covered by S&B's industry-leading Million-Mile Warranty. Please see the S&B site for full details.

      CARB Certification. The S&B Cold Air Intake w/ Dry Extendable Filter is street legal in all 50 states. CARB EO Number: D-590-12.

      Application. The S&B Cold Air Intake w/ Oiled Cleanable Cotton Filter is designed to fit any 2011-2014 3.5L EcoBoost Ford F-150.

      Shop All Truck Parts And Accessories

      Shop All Cold Air Intakes For Trucks

      Fitment:

      Details

      S&B 75-5067

      CA Residents: WARNING: Cancer and Reproductive Harm - www.P65Warnings.ca.gov

      Installation & What's in the Box

      Installation Info

      What's in the Box

      • Cold Air Intake
      • Installation Hardware

      4.8

      Customer Reviews (500+)

        Questions & Answers

        10 More Questions

        Will It Fit My F-150

        • 3.5L V6 EcoBoost - 11, 12, 13, 14

            Related F-150 Categories