


Installation Time
(approx) 1 Hour
Difficulty Level:
Simple installation for anyone.
 FREE 1 to 3-Day Delivery on Orders $149+ Details

$389.99 each
CONFIRM THIS FITS YOUR VEHICLE!
Saved - View your saved items
We're sorry. We couldn't save this product at this time.
or use

Features, Description, Reviews, Q&A, Specs & Installation
| Brand | Roush |
| Cold Air Intake Type | Cold Air Intake |
| Tuning Requirements | No Tune Required |
| Cold Air Intake Tube Material | Plastic |
| Cold Air Intake Filter Type | Dry |
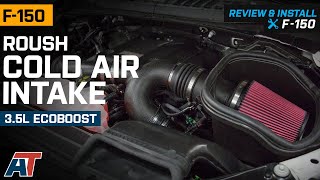
HIGH-PERFORMANCE AIRFLOW ENHANCEMENT. The Cold Air Intake Kit significantly improves engine airflow efficiency for the 2015-2017 F-150 2.7L and 3.5L EcoBoost V6 engines. It reduces intake restriction, enhances performance without the need for PCM re-calibration, and delivers a more aggressive induction sound while increasing horsepower and torque.
CONSTRUCTION AND APPEARANCE. This kit is engineered using computer-aided design to ensure precise fitment and optimal sealing to reduce heat soak under the hood. It includes a high-flow, washable, and reusable air filter that does not require oiling, and durable EPDM rubber couplers ensure a secure and vibration-resistant installation.
INSTALLATION. Installation is straightforward and requires only basic tools, with no cutting or modification of the stock intake system necessary. The complete kit comes with all hardware and detailed instructions, making it an accessible upgrade for enthusiasts with moderate mechanical skills.
WARRANTY. This product is backed by a 90-day limited parts warranty, providing coverage against manufacturing defects.
APPLICATION. Designed specifically for 2015-2017 F-150 models equipped with the 3.5L EcoBoost engine but does not fit Raptor models due to design differences in the intake system.
Shop All Truck Parts And Accessories
Shop All Cold Air Intakes For Trucks
Roush 421981
CA Residents:  WARNING: Cancer and Reproductive Harm - www.P65Warnings.ca.gov
Installation Info
Installation Time
(approx) 1 Hour
Difficulty Level:
Simple installation for anyone.
What's in the Box
Tech Guides:
Sponsored
