FREE 2 or 3-Day Delivery on 10,000+ Items. Details

Talk to a F-150 Enthusiast
1-888-706-1096
M-F 8:30A-11P, Sat-Sun 8:30A-9P
$12k Summer Sweepstakes! Enter Daily >

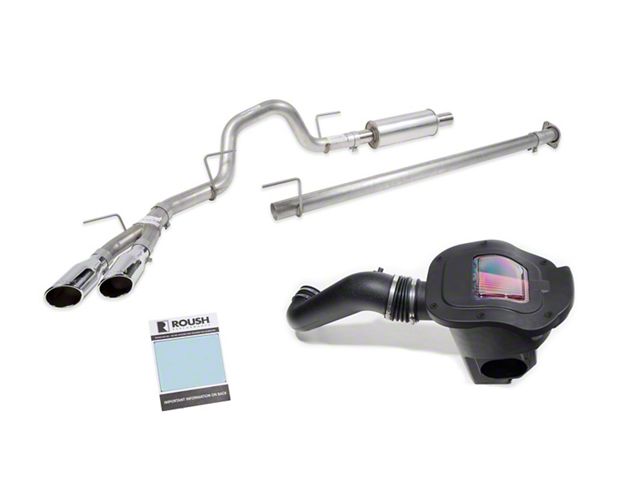
Roush Performance Power Pac; Level 2 (18-20 5.0L F-150)

Item T542522
AmericanTrucks no longer carries the Roush Performance Power Pac; Level 2 (18-20 5.0L F-150). Please check out Roush Performance Power Pac; Level 2 (18-20 5.0L F-150) for an updated selection.
Call a F150 Enthusiast at 1-888-706-1096
M-F 8:30A-11P, Sat-Sun 8:30A-9P
$0.00

    Video Review & Installation

    Justin: The Roush Level 2 Power Pac is gonna be for the 2018 and newer 5.0L F150 owners out there who wanna knock out 3 of the most basic modifications at one time. An intake, an exhaust, and a tune all from a trusted name like Roush. Now, the exhaust is gonna be on the aggressive side, so perspective buyers should be aware of that and the calibration which is optimized for 91 octane fuel. Can still be used with lesser octanes, although gains might suffer because of that. Finally, interested buyers can take advantage of Roush's optional 3-year 36,000-mile warranty with the Power Pac and calibration, something you don't always see in the land of aftermarket tuning. The install is gonna get a middle of the road two out of three wrenches on the difficulty meter and take a few hours to complete from start to finish. So, as I just mentioned, the Roush Power Pac is going to include three essentials if you will in the performance world, right? The cold air intake, the aftermarket or cat-back exhaust system, and last but not least, the Roush calibration all for right around 1800 bucks, which I feel is pretty solid given the quality of the parts along with factoring in that optional warranty. Now, Roush is gonna claim gains of 26 horsepower and 34-pound-feet of torque, but we wanna see what is possible using our in-house dyno and our 2018 F150. Baseline run using our 2018 F150 gave us 330 horsepower and 331-pound-feet of torque to the rear wheels. With the Roush Power Pac installed, the truck is now making 339 horsepower and 337-pound-feet of torque. Now, that's good for peak gains of 9 horsepower and 6-pound feet of torque over our baseline numbers and gains of as much as 26 horsepower and 24-pound-feet of torque under the curve. So, now that we got all of that out of the way, let's break down the Power Pac 2 here from Roush. Now, first thing's first, you do have the Roush cold air intake system which is going to be a very solid piece. Now, this guy will replace the factory airbox and that cheap paper element factory filter with a reusable high flow dry option there. Now, the Roush filter will not only be an improvement in filtration and appearance but, of course, power, as well thanks to less intake restriction. Now, for 2018, the gang at Roush have moved to a sealed enclosure. Basically, they put a lid on their standard airbox which is great for keeping those intake air temps down while also getting a little bit more throttle response than before. Up next, an extremely popular mod for the five-liter trucks and, of course, the second part of the Power Pac and that's gonna be the very popular Roush cat-back exhaust. And the Roush cat-back continues to be a favorite with the five-liter owners out there and on the site. And as you guys just heard, this is certainly gonna turn more than a few heads when you're laying into things. Now, going back to my review of the Roush cat-back a few years ago, I gave this thing a strong four out of five on my one to five or one the wake the neighbor scale for the five-liter trucks and that certainly has not changed here for 2018. And this is a great time to remind you guys that if you want a little bit more info on either the intake or the exhaust alone, feel free to check out the respective product pages at any time as we do tend to break things down a little bit more there. Now, like the cold air intake, the Roush cat-back does feature a stellar build quality here guys including 304 stainless steel throughout, three-inch mandrel bent tubing all exiting out the twin four-inch polished tips here and a configuration, I might add, that does look sharp on any truck.Last but not least, you do have the included calibration here from Roush. And while they do include a calibration, what you really are gonna be receiving here is this voucher that you will need to take to your local dealer and either have flashed or if you have access to a J2534 Pass-Thru or interface device, you can do it on your own along with the RDT or Roush diagnostic software. I do also want to point out guys that neither the intake nor the exhaust require a tune, so if you don't have access to that Pass-Thru device, you can install these parts first and then at that point, drive to your local dealer without harming anything or anything like that. But speaking of those gains, they are made possible in the calibration thanks to the improved camshaft timing along with a big focus on throttle mapping. Basically, to give the truck a sportier feel. Now, as we pointed out earlier too, guys, if you wanted to opt for that 3-year 36,000-mile warranty, you totally have that option, but you have to keep in mind you must apply with that or for that with Roush directly and it must be done so within 30 days of the installation. But now what do you say we switch gears and briefly talk through some of the installation, guys, and again, I did go two out of three wrenches on the difficulty meter here. These parts aren't really hard to install but because there's a few of them at play here, in addition to the flashing of your calibration, there will be a little bit of work involved. But to give you a better idea of how the intake and exhaust will go down, here's that detailed walkthrough along with a quick tool break down.Man: Tools required for this installation: Sawzall, if you are going to cut your exhaust with a nice sharp blade, a breaker bar, 21-millimeter socket, a half-inch, 3/8, and a quarter-inch drive, 24-millimeter socket, and 21,15, 13,10. This is a universal swivel to get in those tight spots. A T30 Torx bit, eight-mil, seven-mil, various extensions, push pin removal tool, breaker bar, pry bar, exhaust hanger removal tool, this die grinder to cut the edges off of our exhaust, some hearing and eye protection. Optional is this impact. We also used a mallet, some soapy water, and some white lithium grease.So, let's start off the install by getting this exhaust out of the way and the new Roush up. If you're working on the ground, I recommend cutting it out of the way. We are on a lift so we'll be able to get it out in one piece. But if you are using a reciprocating saw, remember your eyes and ears. So, we're gonna start up here at the flange and we have a 13-millimeter on my impact with a universal swivel because it is a little tight in some spaces. So, let's go ahead and get these bolts out of the way. All right. So, now that we have our exhaust disconnected from the flange and we actually soaked our hangers in some white lithium grease, if you don't have white lithium grease, go ahead and use some WD-40 or penetrating lube. And I also have my dead blow here to help me get these out of the hanger. So, I'm gonna hold on to the pipe over here and just start tapping on the muffler to get those out of the hanger. Kinda gotta snake this through and she's out of here.So, what we have to do now is cut our midpipe and Roush includes a diagram with wheelbase lengths and cut lengths. So, this midpipe, our truck being 154 inches, we need to go 42.2 inches on this pipe. So, we're gonna measure from the hanger side over here. There's our 42 and a quarter. Now, I already marked that off camera so it's already marked and I have it in my chop saw with a metal blade. You may not have this at home, you can use your sawzall again or a cut-off wheel. So, let's go ahead and make that cut and always remember your eyes and ears. What we're gonna do now is take some time and deburr this. I just have my a die grinder here with a soft pad on it. So, let's start with our install. This is your outlet for your tailpipe coming right out of your catalytic converters. We are reusing the factory hardware, so let's start this by hand first. And you can clock this pretty much anywhere you want. I'm gonna put it pretty much in the stock location on an angle like that. And again, this is that 13-millimeter socket that I have on the end of a swivelNow, we're gonna install the pipe that we cut earlier. So, we're gonna put it through the hanger first and then we're going to get a clamp, put that on the outlet there, and just work this pipe in. I'm gonna get my mallet real quick and just tap it in a little bit. All right. That should be good there. Clock it a little bit and make sure that that hanger's... And we'll tighten this clamp up. It's a 15-millimeter socket. So, let's go ahead and get our muffler in next. Again, we're gonna need to install that clamp first. Just put it over there. This is going to slip on. Just twist it until it seats all the way back. And then we get that clamp tightened up. Again, 15-millimeter. So, to make installation of our next piece of tailpipe easier, we're actually going to remove one of our hangers up here. This is actually the rubber isolator that the hanger sits into. That's a one 10-millimeter bolt holding that in and it'll slide out that crossmember right there. Now, let's install that rubber isolator onto the hanger here and then we'll put a clamp on the tailpipe section and bring it in place. So, we're going to put this rear hanger in first into that rubber isolator. And get that tailpipe section into our muffler, then bring this other hanger into place. So, let's get our rubber isolator back into place. Again, this is going to slide right into that crossmember and then we'll go up and get our bolt started and back in. So, let's go ahead and tighten this clamp as well then we can move onto our tailpipe.What we have to do next is actually add a hanger. What we're gonna do is use this bolt right here. We don't have to remove it all the way. Thank God. We only have to remove it about six to seven millimeters. So, I've got my half-inch breaker bar on this 21-millimeter bolt and I'm just going to loosen it. And now that it's loose, I can use my ratchet. So, that bolt is broke free. There is actually a 24-millimeter nut on the backside here, so I got a deep socket there, I still have my breaker bar here. Work it loose until I have enough room then I can slide my new isolator into that bolt head. And if you notice that it's loosening towards the inside, you can use a pry bar to get that bolt towards the outside.So, one important thing to note is that this spring is under a tremendous amount of load, so we're actually going to need to lower it onto the ground before tightening this bolt back up. What I'll do is actually put it in and hit like that so it stays. And then tighten it up a little bit. Now that we like the location of that, again, I'm just going to put one more turn on it so it stays. Now, we're ready to install our tailpipe section.So, here's our tailpipe section. I did spray some white lithium grease just to help me out a little bit. I'm gonna give this a little love tap. And that's pretty much on. What we're gonna do next before we tighten up that clamp is get our tips on and make sure that we like the way they're positioned, then we can move it up or down accordingly. So, let's get the tips on next. Like I said, let's get our tips in place. Of course, we wanna put our clamp on first, bring those all the way up. There is a Roush logo, so that's going to go level and perpendicular with the ground, slide our clamp over. Do these one at a time. Now, we can push the tips in place. I almost like them as close to the bed or box as possible. I think that looks good right about there. Tighten this tailpipe clamp. That's gonna wrap up the exhaust. Let's get the cold air intake on next.All right. We've got the truck down off the lift and flipped around, we're gonna start working on our cold air intake. First, we're going to remove the airbox lid and tube running down to our throttle body. So, what we have to do is release these two tabs here and then there are two connections in the back for your EVAP and your PCV. So, here's our EVAP and we're just going to lift up on this plastic and then pull back. And then down here is our PCV, there's going to be a little tab you press and pull back. And then we're gonna use a seven-millimeter socket to release this hose clamp connecting our tube to the throttle body. So, let's release this overflow line here. Pull back on the tube and then we can slide it up and out of the way.So, for this next step, we're going to be removing our fresh air supply and you'll need a flathead screwdriver or a push pin removal tool. We're just going to push up on these pins here, get underneath of it, and release it. All right. So, that's free. Now, we can move onto our airbox. This is a 13-millimeter socket and we have one bolt. All right. And we can lift our airbox out of the way. It's own by a couple pressure fittings on the back side. Now, before we can start working on our Roush cold air intake, we do have to borrow this fresh air darn. So, I have an eight-millimeter socket on my quarter-inch drive and there's just one bolt holding this in. And then we can separate it by just pulling it apart. And we're going to transfer this to our new Roush box.So, we've got a few Roush parts on the table. We're going to install our air filter first onto this tube. We're going to use the biggest of the hose clamps. And I have my impact with an eight-millimeter socket for this hose clamp. Then we're going to take this, place it inside the airbox just like this. And you'll see there's a couple of brass fittings down there that we will actually attach this to. So, we're going to use the 10-millimeter hardware supplied by Roush. We're just going to start them. So, what we're gonna do next is install these grommets into our elbow or tube and then connect our new PCV nipples. So, what I have here is a bottle of soapy water, we're just going to soak these grommets just so we can slip them in this pipe a little easier. It is going to be a tight fit. Should look like that. Now, we are going to spray the bottom sides these and we are going to the PCV closest to the largest opening. Should look like that when you're done. So, let's get our fresh air darn onto our new Roush box. We are going to reuse that hardware. It's eight-millimeter, kind of like a plastic screw. I'm just gonna try to get a thread started, maybe a half a thread and then drive it in one with my impact. All right. Now, this is ready to be installed on the truck. So, we're actually going to steal this grommet and bolt from our stock airbox. Just push that out, put your airbox to the side, and then we're actually going to thread it back into that hole. So, we're not gonna tighten it up all the way, we're just going to cinch it down and then we can bring in our airbox. Now, bringing me in our Roush airbox, we've got two locator pins on the bottom. They're going to go right where those factory grommets are on that bracket. So, just lower it into place, press down, and then that grommet over there has a slot on our airbox right there so it's just going to sit right in those ridges. So, just press down and secured. We can put our push pins back at our fresh air dam here. And then we can work on our elbow and our lines. Next up we're going to attach two couplers to our crossover pipe or elbow and then we're going to tighten it up, attach it to our airbox and throttle body. I like to clock these so we don't see the hose clamp itself. Flip it around, put this side on. Now, that first clamp was an eight-millimeter and the second is a seven so I gotta change up my socket. Now, we can flip this around, bring it underneath this coolant pipe, attach it to our airbox here. So, now we're going to attach this coupler to our mass air flow. Again, this is that seven-millimeter clamp. So, let's go ahead and attach our PCV and EVAP line right here. So, now we have our airbox lid here and we have six T30 plastic bolts or screws that we're going to put into all the holes before we hit it with our impact just to make sure it's on there nice and square.Now, next up we are going to tune the vehicle. I'm using the J2534 diagnostics tool that plugs right into our OBD and goes into our laptop. Now, if you didn't wanna spend another 250 bucks on this, you can actually go to a Ford dealership and have them do it for maybe an hour or two of labor. So, we're gonna plug this in and then follow the instructions on this voucher that Roush supplied. All right. So, we're gonna connect to the vehicle here. So, we've entered all of our information in and all we have to do now is hit flash and wait. So, we're almost done here. I have to cycle the ignition now. It's cycled. Okay. Clearing codes, flash is complete.All right. That's gonna wrap up my install of the Roush Performance Pac Level 2 for your F150. And for all things Ford, keep it here at americantrucks.com.

    Product Information

    Features, Description, Reviews, Q&A, Specs & Installation

    Features

    • Roush Performance Power Pac - Level 2
    • Increases of over 26 RWHP and 34 ft/lb RWTQ
    • Improves Throttle Response
    • Roush Cold Air Intake Kit with Reusable High Flow Dry Air Filter
    • Roush Cat-Back Exhaust with Dual Four-Inch Tips - Side Exit
    • Calibration Optimized for 91 Octane Fuel
    • Flashed via a J2534 Interface Tool - A Dealer Service Charge May Apply
    • Optional 3-Year/36,000 Mile Limited Powertrain Warranty Available
    • NOT CARB Certified
    • Fits 2018-2020 5.0L F-150s

    Description

    Turn Up the Performance and Volume.  Give your 5.0L F-150 a complete renovation in Performance and Exhaust Tone by removing the factory Cold Air Intake and Exhaust System and upgrading to a Level 2 Performance Power Pac from Roush. The Engineers at Roush designed this Power Pack to give your F-150 a sportier drive with an aggressive throttle mapping, while adding that signature exhaust tone that Roush is known for. Optimized for 91 octane fuel, the Power Pack includes a complete high-flow cold air intake, a mandrel-bent Dual Side Exit Exhaust System and RDT software with a power-building tune. Installed together and properly set up, these components will give your F-150 an increase of 26 Horsepower and 34 ft-lb of Torque at the rear wheels.

    Wire Mesh Supported, Washable Filter.
    Roush's Cold Air Intake was engineered using CAD data to eliminate restrictions and to optimize air flow. Injection molded from premium automotive-grade materials, this Cold Air Intake will last a lifetime. The included high-flow dry air filter provides excellent filtration of harmful power robbing particulates. The filter is composed of two layers of wire mesh for durability and is proven to retain its shape even under high airflow. Washable, this dry air filter does not require oiling, saving you time and money.

    Built from Advanced Materials.
    Roush uses quality materials throughout the Roush Level 2 Power Pac. The cold air intake features an injection-molded polyethylene air box with a seal fashioned from EPDM foam at its top to fit against the hood. High density polyethylene comprises the intake tube itself, made in a black textured format. The cat-back exhaust is made from fast-flowing, T304 stainless steel tubing with mandrel bends. The exhaust tips are also T304 stainless, chromed for extra splendor.

    Some Cutting Required to Install. Several of the Roush Level 2 Power Pac parts are constructed for bolt-on application. The Cold Air Intake is designed to be bolted on without any type of modifications. Depending on your F-150s Cab and Bed configuration, some cutting is required to bolt the Dual Exhaust System on your truck. Both come with a full packs of the needed hardware to mount them. However, the tuning/flash may need to be done professionally.

    Roush Calibration. Roush engineers developed their dedicated premium fuel calibrations under laboratory conditions to increase the horsepower and torque of your 5.0L across the entire RPM range with their Cold Air Intake and Exhaust installed. The improved throttle mapping of the included Roush tune will also give your 5.0L powered F-150 a much more aggressive feel. Roush's calibrations have been optimized for 91 octane fuel, they are compatible with lower octane ratings with reduced power and performance output.

    J2534 Interface Tool Required. Just about any dealer can perform this calibration upgrade in under an hour without even breaking a sweat. The Roush Flash Pack Calibration is flashed on to your F-150's ECU using Roush's RDT software and an industry standard J2534 interface tool. Please note that a dealer service charge may apply.

    Optional Warranty. An optional 3 Year/36,000 Mile Limited Powertrain Warranty is available through Roush. The optional warranty must be purchased within 30 days of the service installation date.

    Not California or CARB Legal.
    This product is not legal for use in California or any other state adopting California emission standards. Not legal for use on pollution controlled motor vehicles; intended for off road use only.

    Application.
    This Roush Level 2 Performance Power Pac is specifically designed for use on 2018-2020 F-150s equipped with the 5.0L V8 engine.

    Shop All Truck Parts And Accessories

    Shop All Truck Engine Parts And Accessories

    Shop All Truck Performance Power Packages

    CA Residents: WARNING: Cancer and Reproductive Harm - www.P65Warnings.ca.gov

    Installation & What's in the Box

    Installation Info

    What's in the Box

    • (1) Muffler Inlet Pipe Assembly
    • (1) Exhaust Converter Outlet Pipe Assembly
    • (1) Muffler Assembly
    • (1) Muffler Outlet Pipe Assembly
    • (1) Tail Pipe Assembly
    • (2) Exhaust Tips
    • (2) Exhaust Tip Clamps
    • (4) Pipe Clamps
    • (1) Y-Pipe Hanger Bracket
    • (1) Upper Airbox Cover Assembly
    • (1) Airbox Tray
    • (1) MAF Tube - No Insert
    • (1) Clear Air Tube
    • (1) Air Filter
    • (6) M6 x 25mm Self Tapping Screws
    • (2) MAF Tube to Airbox Bolts
    • (1) Airbox to Tube EPDM Coupler
    • (1) CAT to T-Body EPDM Coupler
    • (1) 3/8 in. PCV Fitting
    • (1) 5/8 in. PCV Fresh Air Fitting
    • (2) 5/8 in. Grommets
    • (2) MAF Tube to Air Tube Worm Drive Clamps
    • (2) 90-110mm x 12mm Stainless Clamps
    • (1) Power Pac Calibration Card
    • (2) Roush Stickers
    4.9

    Customer Reviews (23)

      Questions & Answers

      10 More Questions