Talk to a F-150 Sales Tech
1-888-706-1096
M-F 8:30A-11P, Sat-Sun 8:30A-9P
$20K Sweeps! 10 Chances to Win! Enter Daily >

MBRP Armor BLK Dual Exhaust System; Middle Side Exit (11-14 5.0L F-150)

Item T532376
Verify parts fit and get product recommendations.
F-150 Sales Techs: Connect Now M-F 8:30A-11P, Sat-Sun 8:30A-9P
$0.00
On Sale

$659.99

FREE Shipping Market Price $758.99 You Save 13% ($99.00) Up to 10% off for Military & First Responders! See Details

Will this fit your Vehicle?

Select a different vehicle Help?
Update or Change Vehicle
Ship to: Ashburn - 20149
Sorry, please enter a valid US or CA postal code
We're sorry, zip can't be updated at this time.
Recommended Install Shops
How It Works
Install Shops are available near Ashburn - 20149

Add Local Shop Installation

Total cost of service $299.00
    Create a list
    Add to New List

    Saved - View your saved items

    We're sorry. We couldn't save this product at this time.

    or use

      Video Review & Installation

      What's up, guys, Travis from americantrucks.com, and today we're looking at a very cool, very unique exhaust system from MBRP. This is our Black Series 3-inch dual exhaust system in the middle side exit configuration. Now, if you own an '11 to '14 F-150 with the 5-liter motor under the hood, then this system is going to suit you quite well, regardless of the cab or bed length if you're looking for arguably one of the loudest setups that you can get your hands on. Guys, full disclosure, I've done a ton of exhausts on a lot of different trucks, a lot of different motors, and I actually have Flowmaster Outlaws on my Ford V-8 and, guys, this is actually a little bit louder than those in my personal opinion, and that's for two reasons. One being the muffler that they throw in this kit, it's very high flow. Very non-restrictive. It's a real small muffler.I'll show you a comparison to the factory one later. But the other part of that is because of the configuration. You're getting all that volume dumping out just behind the cab there, and you're definitely going to hear that 5-liter motor dumping under the hood, whether you're on idle or at redline. If you have neighbors nearby and you wanted to wake up when you do, then this is gonna be the system for you. I'm going to easily give this system a solid five out of five on my loudness meter, guys. Now, with that said, you should not be worried about drone or volume in the cab. That's just gonna be a fact of life with this system. It's not anything too crazy.The resonance isn't gonna have all your trim pieces inside the cab buzzing around or anything like that. But again, no matter where you are on the RPM band, you will hear that exhaust going at some point or another, so you should not be afraid of volume with this one. But if you're watching this video, you probably aren't because let's face it. This thing is really wild-looking too. I'm a huge fan of this configuration personally. I love how it cleans up the look behind the bumper there, especially if you don't have cutouts for your exhaust tips. And personally, I love the SVT Lightning. That was a real bad ass truck, and this clearly pays homage to that. It's almost a perfect setup compared to that Lightning truck.Now, as far as the install goes, guys, this system is very affordable. It actually comes in at around the $600 price point. And that's for a pretty simple reason. They didn't do as much fabrication and pre-assembly as a more expensive setup in this configuration. You do have to play around with fitment a little bit as far as how the muffler is oriented, and you got to kind of figure out this perfect formula for getting everything lined up. It does take a little bit of time, and maybe the instruction can be a little confusing, but I promise you that's not going to be a problem because if you do decide to opt for this system, you can actually come back in a little bit, and I'm going to show you guys the entire install step-by-step, so that's not to worry. But once the system is installed, guys, it sounds perfect, and it looks really good.So, for that reason, I'm going to go ahead and give the install a pretty modest two out of three wrenches on the old difficulty meter. And I wager it'll probably take you about two hours in the driveway with some basic hand tools to get this thing bolted on. You might have to make one cut to the provided mid-pipe, but again, there are directions that tell you how much to cut, and I'll also walk you through that as well. Now, one last thing to consider is overall build quality. The system bolts up nicely, and honestly, at the $600 price point, you're definitely getting a lot more than you pay for, in my personal opinion. This is actually a black ceramic finish. This is not even a black powder coat finish and, guys, at the $600 price point, honestly, I was expecting this thing to cost a lot more. If you're looking at other exhaust options in this price range, or if you want to consider ones that are less expensive, just keep in mind that they'll probably have a bare steel finish, maybe a chrome or a polished or a brushed finish, but they're not gonna have a protective coating like this one. And I'm a huge fan of ceramic.We actually just finished our driving with this guy. We do have a lot of road salt out there. We're in Pennsylvania. There's a lot of snow around, but I was able to wipe this thing down with just the basic hand towel. That's awesome because you're never gonna have to worry about rust or corrosion on this thing. And that's important, especially if you take your truck off-road, or again if you daily drive your truck. No matter what the weather is looking like outside, the ceramics is going to do a great job of keeping this thing looking brand new for years to come. And that's pretty important because you can pretty much see all the flow tubes under here. That's a pretty cool little thing to consider as well. So, again, if you want a super affordable exhaust system that has some really great qualities about it, you want something that looks really unique, and you want something that's crazy loud, then MBRP has got you covered in pretty much every category with the Black Series range dual exhaust system.And again, if you decide to opt for this system, come back in a little bit when it shows up at your door. I'm gonna show you exactly what tools you need to get out of the old toolbox over there. And then again, we'll get into that install. I'll walk you through it step-by-step. Okay, guys, before we get started, you'll need a standard drive ratchet. You'll need a 5/16 Allen key or Allen head socket, and you'll need some SAE hardware, including a 1/2-inch socket and wrench, a 9/16 socket and wrench, and you'll need some metric stuff, including a 13-mil shallow or deep socket, and a 15-mil deep socket. Now, it goes without saying, if you want to make things go a little bit quicker, you could always use an impact gun with an impact swivel socket. And depending on your cabin bed length, you might have to make a cut to the provided mid-pipe, in which case, you'll need a measuring tape with a marker or some sort of marking tool. And you'll also want some ipro, and you'll also want a grinder or a hand file to de-burr that pipe after you've cut it.Then you'll obviously want some spray lubricant for those exhaust hangers. It's always helpful to have an extension for some of those hard-to-reach clamps, and you'll want to have something like a flat-head screwdriver for your speed clips. Lastly, very helpful to have a dead blow mallet to help get that factory system removed. And it's also helpful to have an exhaust hanger puller tool or a pry tool of some sort again for those exhaust hangers and rubber isolators. All right, guys. Once you get the tools out of the tool cart, go ahead and meet me under the truck here behind the crossmember. We have to disconnect our factory mid-pipe from our factory Y-pipe with this flange up here. It's secured with two bolts. The flanges on those bolts are 13 millimeters, so we want a 13-millimeter socket. And if you're using power tools like me, it's helpful to have an impact swivel socket because it's kind of a tight squeeze up here. All right, guys.Once you get those bolts removed, technically, our cat-back is now disconnected from the truck, but obviously, it's still in place with all those rubber isolators. There's actually three in total. There's one just in front of the muffler, one directly behind it, and then one out near the bumper/leaf pack at the tailpipe. So, what you want to do, grab some spray lubricant. I highly recommend some WD-40 or some PB B'laster if there's a lot of rust. You want to spray down all those rubber isolators. Really get them soaking up a little bit because what we're gonna do next, grab exhaust hanger puller tool or a pry tool of some sort. You're actually gonna be pushing all of those exhaust hangers out of those rubber isolators. That's gonna unseat the cat-back from the truck. Then we can pull it out from underneath. Now, the system is pretty heavy, and I'll go into a little more detail in a little bit, but let's go ahead and get the spray down and get them soaking first.All right, guys. Once you get those rubber isolators sprayed down and lubed up, now comes the fun part. It's very helpful to have a friend handy if at all possible, maybe give him a beer, try and convince him because this thing is heavy and you definitely want two people helping you out. But if it's a one-man show like I'm doing today, then I'm going to show you how to do it safely. What you're going to do, you're going to grab either a dead blow mallet, some sort of hammer, or some sort of pry bar. You're going to get a hold of that muffler. These are big old muscles. Keep a nice tight grip on it. You're actually gonna push the entire cat-back out towards the rear bumper until those exhaust hangers fall out of those rubber isolators. You can actually make it even easier on yourself. You can actually pull that first rubber isolator in front of the muffler, so we only have to deal with two. At any rate, take your time with this. Again, it's a little bit heavy. When you get this thing unhinged, you want to have the tailpipe kind of rest on the axle right here. That will kind of count as your second friend right there. Then you can get the mid-pipe to come down. We'll pull the entire system out from underneath the truck. It sounds kind of confusing. So, I'm just gonna show you how it works.Now, while we have both systems sitting here next to each other, I wanted to point out some cool differences and similarities that I think you guys might like. Some of the cool differences here. We are stepping up the mid-pipe to a three and a half inch tube. Our factory set up is somewhere around two and a half inches to two and three quarters of an inch. And obviously, we also have the factory resonator on here. We're ditching that completely. So, that's where you're getting all that deep tone coming into this muffler. And then obviously it goes without saying this muffler is a hell of a lot smarter than the factory system. This thing has all kinds of baffles and chambers in it. It's not good for high flow, and it's not good for volume. Obviously, it kills the sound of that 5-liter motor. That's not gonna be the problem here.This is a very simple setup. This is very high flow. It's gonna give you that really deep lopey idle, and it's gonna keep that nice kind of throaty sound all the way through the RPM band. And then obviously, we have the business end here of this beautiful ceramic coat. MBRP did a very good job on the coating here. Obviously, this is not a bespoke $2,000 exhaust system, so the ceramic coating can make some of those connections a little tight. So, it might be helpful to have some sandpaper or something like that. That's also why it's a good idea to test-fit everything. But from my personal experience here, everything fit up nicely. So, we might have to make some cuts to the mid-pipe here, depending on your cabin bed length, but they do provide the instructions in the kit depending on your cabin bed length. We're actually working with a 145-inch wheelbase truck, so we're gonna have to cut this thing down to approximately 24 inches.Now, it goes without saying, if you guys do have to cut that mid-pipe, obviously have some eye protection on there. We only got one set of eyes. So, let's go head over to our top salve. We'll make that cut real quick, then I'll meet you guys underneath the truck. I'll show you how to get the mid-pipe bolted up, and then I'll show you how to piece together the muffler and both of our tailpipes.All right. Once you have your pipe cut and de-burred, you want to grab the flange provided in the kit and face it on the pipe like so, and then you're gonna press it into the Y-pipe fitting right here. And they do provide new hardware in the kit. These bolts with flat washers, crush washers, and nuts. This is actually 9/16 hardware. This is SAE and not metric. So, you will need a 9/16 wrench and a 9/16 socket. If you only have metric stuff hanging out, you can get away with a 14-mil, but it might be a little tight.All right. Now, as you're throwing this hardware in here to secure the new mid-pipe to the Y-pipe, you want to get the nuts on both of the studs just barely flush with the ends of them because we want to make sure we tighten down both of these sides evenly. That way, our pipe is not torqued to one side or the other. And obviously, it goes without saying, you probably want both hands free while you're doing this, so it's very helpful to have a jack or a friend hold the mid-pipe while you get everything oriented. Then again, you can drive it home with that 9/16 hardware.Now, I'm just tightening this stuff down a little bit, just to keep the pipe in place. I'm not gonna drive it home all the way. That way, if I need to adjust my pipes' direction at all, I can do so easily. All right. Now that we have our mid-pipe in place, we're going to install our new hanger/bracket. That's going to help secure our new tailpipes on our muffler assembly. Now, if you're following along with the instructions, as you're also following along with me, there's a misleading picture in the instructions that shows you where this is supposed to go. They actually illustrate the bracket going right here next to this body mount. That's incorrect, actually. The description is correct. They want you to put this above the leaf pack eye, which is actually located further back here. Now, in order to do that, you're going to have these speed clips in the kit.You're also going to have those small bolts and flat washers that were threaded in there as well. And it's very helpful to have some sort of pry tool or something like a flat-head screwdriver to help press these onto the frame rail. Once you've done that, go ahead and throw the bracket up there. And in order to tighten down all this stuff, you will need a 1/2-inch socket. Okay. Once you have your bracket in place, go ahead and throw a band clamp on the end of your mid-pipe there. And you also want to throw your muffler in place. Now, the muffler needs to be at approximately a 35-degree angle in order to accommodate both of the tailpipes, but it can be a little bit of a pain getting both of the tailpipes in the muffler as well as all of our hangers, so we're not going to tighten this down just yet. We're going to leave it free, so we can rotate it. We'll tighten everything at the end. Okay.Once you have the muffler gently oriented, you want to get both of your clamps on there, and you're gonna be grabbing that tailpipe with both of the hangers on there. That's gonna go into the bottom of the muffler. As you're doing that, obviously, you want to make sure you get that exhaust hanger into that first rubber isolator as well. Once you've got both of these in place, go ahead and come on the outside of the frame and get that other hanger in there. All right. Now, we're going to do the same thing for our other tailpipe, which by the way, our muffler was unfortunately angled in the opposite direction. You want to have this so that it's angled towards your gas tank. And again, you want to keep this loose, and you're gonna have to play around with the fitment here. So, as you put this tailpipe in there, you want to check the exit of the tailpipe with the other one. Make sure they're flush. Then I'll show you how to get the hardware in that bracket to secure the two together.All right. So, we have both of our tailpipes lining up pretty nicely here. We didn't have to make too many adjustments. So now you're gonna grab the remaining bolt with washers and nut in the kit, and you're gonna press it through these two brackets right here. It's helpful to have the stud coming down at the bottom because it's gonna hold everything in place. Then you're gonna get that other flat washer and crush washer on the stud. You'll get that nut on there, and you'll need a 1/2-inch socket and wrench to tighten all this stuff down. Obviously, you can see this as a really tight space here, so unless you got a four-year-old with tiny hands, I definitely recommend having a nice long extension and maybe even having a swivel socket.All right. Now, we're gonna throw our exhaust tips in place. And again, that ceramic coat can be a little tight on here, so if you need to, you might want to gently tap on the end of the tailpipe with a rubber mallet or something like that. But once you got both of those pipes in place and you're happy with where they're sitting, you want to go ahead and grab a 5/16 Allen key or Allen head socket and drive those home. All right. Once you get both of those tailpipes in place, you got them zipped down, make sure you're happy with where they're actually sitting, and double-check all of your tubing. Again, it is a little bit of a squeeze in here, and you do have to do a fair amount of adjusting with the tailpipes and the muffler to make sure everything lines up nicely without anything banging around against the frame rail.So, once you're happy with where all your pipes are sitting, you can zip down all your band clamps. Now, for some reason, we're going back to metric from SAE, so we need a 15-mil deep socket. Once you've tightened everything down, that should wrap up this install. All right, band clamps are tight. Again, our factory connect clamp right here is SAE 9/16 wrench and socket.All right. So, once you got both tips installed, you got all those clamps zipped down, you double-check your connections, that will wrap up this install. And that will also wrap up my review of MBRP's Black Series 300 dual exhaust system in the very cool middle side exit configuration, fitting your '11 to '14 5-liter-powered F-150. I'm Travis. Thanks for watching, and for all things F-150, keep it right here at americantrucks.com.

      Product Information

      Features, Description, Reviews, Q&A, Specs & Installation
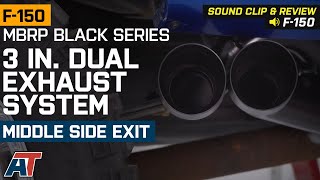
      Features & Specs

      • Creates Improved Exhaust Flow
      • Aggressive Exhaust Sound
      • Black Ceramic Coating
      • 3 in. Aluminized Steel
      • 4 in. Stainless Steel Exhaust Tips
      • Exits Before Rear Passenger Tire
      • Bolt-On Installation, Some Trimming May Be Required
      • Not CARB Compliant
      • Fits Ford F150 2011-2014 5.0L Model

      Description

      Throaty Growling Exhaust. Step up the aggression of your pickup truck with this MBRP Black Series 3 in. cat-back exhaust. It will give your truck that throaty sound you've been looking for. You won't believev how much your truck will stand out when equipped with this top-grade exhaust system thanks to its thick pipes.

      More Horsepower. Enhance your truck the easy way by adding this MBRP Black Series 3 in. cat-back exhaust kit. It opens up the exhaust airways and lets it flow through more easily. With 3" pipes all the way through, your exhaust won't be slowed, and that adds horsepower to your truck. The kit is designed from smooth stainless steel and offers minimal bends. You may even see an efficiency boost.

      Long Lasting Durability. For an exhaust kit, one of the most importnat concerns you'll have is durability. That's why it's nice that this kit is made from tough stainless steel that's protectively coated with a thick powder coat. This MBRP Black Series 3 in. cat-back exhaust comes with three 3" pipes, a muffler and tips all made from 304 stainless steel. They hold up well through hard use and can be relied on to last.

      Goes on Fast. No cutting or fabrication is necessary to install this MBRP Black Series 3 in. cat-back exhaust. It is designed to use the stock mounting points in your Ford F-150 and can be installed with basic hand tools. This makes it an affordable task to bring to the pros or a project you can even do on your own.

      Application. The MBRP Black Series 3 in. Cat-Back Exhaust - Middle Side Exit is made to fit your 2011-2014 Ford F150 5.0L.

      Shop All Truck Parts And Accessories

      Shop All Truck Exhaust

      Fitment:

      Details

      MBRP S5261BLK

      CA Residents: WARNING: Cancer and Reproductive Harm - www.P65Warnings.ca.gov

      Installation & What's in the Box

      Installation Info

      What's in the Box

      • (1) Cat-back Exhaust
      • Installation Hardware

      4.6

      Customer Reviews (214)

        Questions & Answers

        10 More Questions

        Will It Fit My F-150

            Related F-150 Categories