Talk to a F-150 Sales Tech
1-888-706-1096
M-F 8:30A-11P, Sat-Sun 8:30A-9P
$20K Sweeps! 10 Chances to Win! Enter Daily >

Max Trac 1-Inch Rear Lift Shackles (15-24 F-150, Excluding Raptor)

Item T536970
Verify parts fit and get product recommendations.
F-150 Sales Techs: Connect Now M-F 8:30A-11P, Sat-Sun 8:30A-9P
$0.00
Our Price

$93.66 (pair)

FREE Shipping on orders over $119 Market Price $108.45 You Save 14% ($14.79) Up to 10% off for Military & First Responders! See Details

Will this fit your Vehicle?

Select a different vehicle Help?
Update or Change Vehicle
Ship to: Ashburn - 20149
Sorry, please enter a valid US or CA postal code
We're sorry, zip can't be updated at this time.
    Create a list
    Add to New List

    Saved - View your saved items

    We're sorry. We couldn't save this product at this time.

    or use

      Video Review & Installation

      Justin: The MaxTrac rear shackle kit that we have on the table today will be an affordable way for all 2015 and newer owners looking to add an additional 1 inch of lift to the rear end of their rigs. Now, the MaxTrac kit will combine a tough steel construction, along with greaseable polyurethane performance bushings, all for right around that low $100 price point for the pair. So, why would you want to consider the MaxTrac 1-inch Rear Lift Shackles for your rig? Well, to find that answer, you really don't have to look any further than our customer review section. For instance, you'll find one owner that who installed a leveling kit on his rig, and the front end was just a little too nose-high for him, so therefore he picked this kit up, and really helped dial in the stance. Now, on the other hand, we found an owner who did a lot of heavy hauling or heavy towing, and he just wasn't thrilled with how much the rear end of his truck was sagging when fully loaded up.So, pulled the trigger on the MaxTrac kit, helped level out the truck a little bit more under load, and seems to be pretty happy with it. So, my point is here, guys, there are many different reasons why you might wanna consider the MaxTrac shackle kit for your truck, and the customer review section is a very valuable tool to help you make your correct decision for your F-150 at home. So, be sure to check those out first.But now that we've talked about why you might wanna add an additional 1 inch of lift to the rear end, let's talk about what you are getting here with this kit in, as you can see, you're getting the two shackles that will mount in between your truck's leaf springs and the frame, to give you that slight bump in rear-end altitude. Now, some people prefer this method to maybe adding another rear block, because sometimes those blocks, while effective at raising the truck, can contribute to increased axle wrap, which certainly isn't ideal.Now, those included brackets are made from a very durable stainless steel material, before being finished off in kind of this battleship gray powder coat, and that powder coat's there to help prevent any corrosion over the years. Now, loaded inside those stainless steel shackles will be your performance polyurethane bushings, guys. These things are greaseable, thanks to the included zerk fittings, and greasing the bushing is very important. It's gonna help ensure things remain quiet, and essentially make sure that those bushings last the lifetime of your rig.Now, MaxTrac feels so good about their setup here and the quality of their kit that they do back each set with a limited lifetime warranty. And that's always a nice thing to point out. But now, we do wanna shift gears. We're gonna segue into the install, as usual here at AT. Site's gonna call this one a pretty solid two outta three wrenches on the old difficulty meter. And I would say an hour at least to complete, from start to finish. Maybe a little bit more, depending on your expertise. But now, to give you a better idea of just how things will go down on your rig at home, here's an AT customer to walk you through it.Man: Tools I used for this: hydraulic jack, couple of wooden blocks, wooden blocks, jack stands. And then, because my driveway slopes, or even if it doesn't slope, you wanna go ahead and chock your tires, to make sure that the vehicle does not roll forward. All of the tools that I used for this install... So, here we've got the instructions, the box, the old shackles. I have a half-inch drive ratchet, 15/16 open-end/box-end wrench, I have a 21-millimeter socket, 15/16 socket, 12-millimeter open-end/box-end wrench, pin or a punch, to help line up the holes, small extension, since I didn't have a deep socket, and then a rubber mallet.This is a 2015 F-150. We've got jack stands under the frame, so that we can keep the frame level. We have a jack under the rear axle so that we can raise and lower the axle, to take the pressure off of the rear shackles. And we'll come in under here, under the back side. Right here are our shackles that we're going to be removing. So, we'll remove these, install our 1-inch lift ones. They'll be shorter, so it will lower the leaf spring down, so that we get that 1 inch of lift. Now, we got one wrench there. This one here to keep it from spinning. Gonna squeeze them together.Woman: I'm not [inaudible 00:04:37].Man: All right. We'll go ahead and just loosen that nut. We won't take it all the way off just yet. All right. Now we'll come to the other side and get the other side loose. All right. Now we got everything loose, where it's finger-tight. All right. So, we've got all our parts out here now. We put just a little bit of lubrication on the bolt and on the ends of the shackle. We'll still use a grease gun and actually grease it after install. The lubrication on the outside just helps with install. Makes things slide a little bit easier.All right. It looks like I'm gonna need a rubber mallet to kind of tap on that bolt, to help slide it out. All right. So, I had to get a rubber mallet to tap on this here. We're using a 12-millimeter open-end/box-end wrench for the end of the bolt, to hold it, to keep it from spinning. The back side head is a 21-millimeter. The rest of the bolts and these nuts are 15/16 size. All right. So, we'll put just a little bit of pressure down on the leaf spring here, tap it with our rubber mallet. And once we get it out where we can grab it on the other side with our hand, we'll pull the bolt out, and we'll let the leaf spring kind of come up.All right. So, for this part here, we're gonna go ahead and take the other side loose. In order to take the top bolt out, we are going to have to jack the axle up, to get the leaf spring below the frame so that the bolt will come out. And that top bolt is the one that's gonna be replaced with this new one, with the shaved-off or flat head, to clear the frame. All right. So, here we are on the other side. Same thing. Put a little bit of pressure back down on the leaf spring, to slide the bolt out. And now we're going to have to adjust the jack, to get enough clearance to remove the top bolt.My arm's too short, so I'm gonna have to use the hammer and the pin. So, you can see here, we've raised this up enough into the body so that the bolt has enough room to come out over the top of the frame. All right. Well, the bolt is out, and the [inaudible 00:09:27] is out. And we'll move to the other side. All right. We're on the other side. Same thing. Leaf spring up above the frame, so that we can wiggle this around. All right. Old shackle is out.All right. So, we're gonna put in the new shackle. It says in the instructions you could put the grease zerk forward or backwards, whichever way you prefer. I'm gonna go ahead and point mine towards the front of the vehicle. All right. So, the bolt is in. The flat shaved-off head goes towards the inside of the vehicle, towards the frame. The washer and the lock nut go towards the outside. And we'll just get these finger tight for now, and then we'll move to the other side, to put in the new shackle on this side. We'll get the new shackle lined up. Reach over the top of the frame with the new bolt. All right. New one is slid in. Again, the washer and the lock nut go on the outside. And again, those are just finger-tight. All right. Now, we will lower the jack, so that we can get the leaf springs back in place.All right. So, we've got all the pressure back off the axle and stuff. The frame's on the jack stand, so, that way, we've got a little bit of tension pressure that we can put on the springs here with our hands. And we'll go ahead and line these bolts up. To help us out, we're gonna go ahead and use a pin over here, to help start getting the hole lined up, and to give us a little bit more precision leverage for the other side, to help get the bolt lined up. All right. So, we've got the bolt started. I'll go ahead and tap on it with my rubber mallet.All right. So, we're gonna go ahead and go to the other side and get that bolt started before we line everything up and tighten everything else down. All right. Here we are on the other side. Same thing. We're gonna go ahead and pull this down by hand. All right. So, we use our pin here to line up the hole. I did have to have an extra set of hands, so my cameraman had to put the camera down for just a second, just so he could keep it straight while I hammered, because I couldn't do both. Anyway, so, we've got this bolt pushed through. So now we can put the nut on, and we will go ahead and tighten this bottom bolt. We got our 12-millimeter to hold the end of the bolt, so that we could tighten the nut up. You could also use a long socket, and come in through the frame on this back side and use a ratchet. I just prefer to use the two wrenches on the one side. All right. We're just gonna snug that down hand tight for now, and move to the other side. So, for this side, I'll demonstrate using the ratchet and socket, if you prefer, through the frame.And again, we'll just hand-tighten it, and not actually torque it down yet. All right. Then we'll tighten up the top nut. All right. So, we removed the jack stands from the frame, and lowered the entire weight of the pickup down, in order to get the top bolt with the thin head in the correct position enough to get the top, the big open-end/box-end wrench on it. And then we could put our ratchet and socket on here and tighten it down. All right. We just kinda hand torque it down for now, and we'll move to the other side. All right. This side, you might be able to see a little bit better without the sun, but here's our 15/16 open-end wrench. There's just barely enough room to slide it between the frame and the bolt head, in order to tighten it down.All right. So, everything is hand tightened down. And then, we'll shake the pickup up and down a little bit, jump on the bumper, make sure everything settles. Then we torque everything down, and the install's complete. I'll go ahead and get a tape measure. So, before we installed the shackles, I had 16 inches from the top of the wheel to the bottom of the fender, and we are currently sitting at 17 and a half. So, we got just a little bit over an inch without everything being settled. I'm sure once everything...once we drive it and everything settles, it'll probably come back down closer to about an inch, maybe just slightly over an inch of extra lift.Justin: So, if you are looking to give the rear end of your 2015 and newer F-150 a slight boost in height, you'll wanna check out this kit from MaxTrac, available right here at americantrucks.com.

      Product Information

      Features, Description, Reviews, Q&A, Specs & Installation

      Features

      • Levels the Rear End with the Front of the F-150
      • Maintains Ride Quality
      • Made of Strong Stainless Steel
      • Gray Powder Coat Finish
      • 1” Rear Lift
      • Sold as a Pair
      • 100% Bolt-On Installation
      • Limited Lifetime Warranty
      • Fits all 2015-2024 Ford F-150s, Excluding Raptor Models

      Description

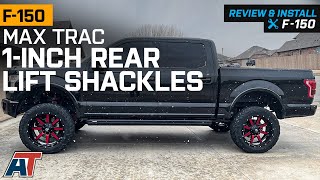
      Increased Ride Height. MaxTrac has produced these 1” Rear Lift Shackles as a simple way to increase the rear ride height of your Ford F-150, leveling it up with the front end of your vehicle. This kit offers an easier to install alternative to a using a block and u-bolt combination to raise your ride. Furthermore, these 1” Rear Lift Shackles can even be used in combination with a rear block as a way to get even more additional lift.

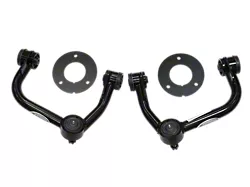
      Durable Construction. These 1” Rear Lift Shackles are made of tough stainless steel, and finished with a gray powder coat finish which provides increased protection from corrosion.

      Straightforward Installation. MaxTrac have designed these 1” Rear Lift Shackles as an alternative to the traditional block and u-bolt combination which many people use to increase ride height. This kit can be installed in as little as 1 hour and features a direct bolt-on installation method. Following installation, MaxTrac recommend that you check and adjust both the alignment and headlights of your vehicle.

      Lifetime Warranty. MaxTrac provides a limited lifetime warranty on the quality of materials and workmanship for this product.

      Application. These MaxTrac 1” Rear Lift Shackles are compatible with all 2015-2024 Ford F-150s, excluding Raptor models.

      Shop All 1 to 2 Inch Truck Lift Kits

      Shop All Truck Parts And Accessories

      Shop All Truck Lift Kits

      Fitment:

      Details

      Max Trac 713210

      CA Residents: WARNING: Cancer and Reproductive Harm - www.P65Warnings.ca.gov

      Installation & What's in the Box

      Installation Info

      What's in the Box

      • (2) Rear Lift Shackles
      • (2) Grease Fittings
      4.6

      Customer Reviews (20)

        Questions & Answers

        10 More Questions

        Will It Fit My F-150

        • 2.7L V6 EcoBoost - 15, 16, 17, 18, 19, 20, 21, 22, 23, 24
        • 3.0L V6 Power-Stroke - 18, 19, 20, 21, 22
        • 3.3L V6 - 18, 19, 20, 21, 22, 23
        • 3.5L V6 - 15, 16, 17
        • 3.5L V6 EcoBoost - 15, 16, 17, 18, 19, 20, 21, 22, 23, 24
        • 3.5L V6 EcoBoost Limited - 19, 20, 21, 22, 23
        • 3.5L V6 EcoBoost Raptor - 17, 18, 19, 20, 21, 22, 23
        • 3.5L V6 PowerBoost - 21, 22, 23, 24
        • 5.0L V8 - 15, 16, 17, 18, 19, 20, 21, 22, 23, 24
        • 5.2L V8 Supercharged Raptor - 23