 FREE 1 to 3-Day Delivery on Orders $149+ Details
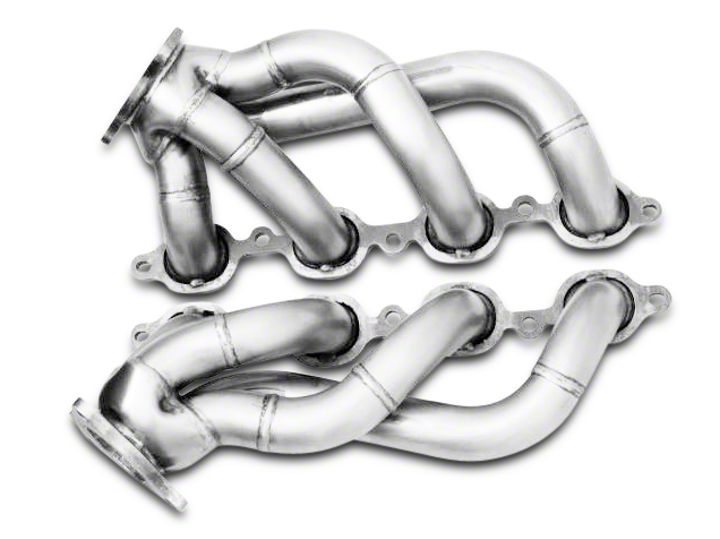
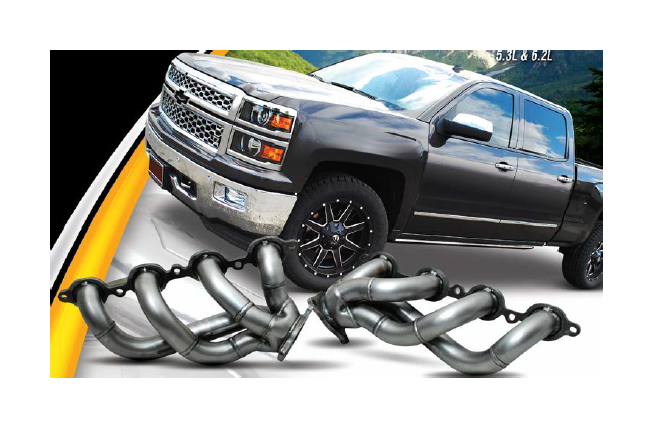
How to Install Gibson 1-3/4 in. Performance Headers - Stainless on your Silverado
Installation Time
4 hours
Tools Required
- 10mm, 13mm, 12mm” WRENCHES (VARIOUS LENGTHS)
- 10mm, 12mm, 13mm” SOCKETS (SHALLOW AND DEEP)
- 9/16” WRENCHES (VARIOUS LENGTHS)
- 9/16” SOCKETS (SHALLOW AND DEEP)
- 5/8” SPARK PLUG SOCKET
- 15MM DEEP SOCKET/SHALLOW
- 15MM BOX END WRENCH
- 3”, 6”, AND 12” EXTENSIONS FOR SOCKETS
- GOOD RUST PENETRANT
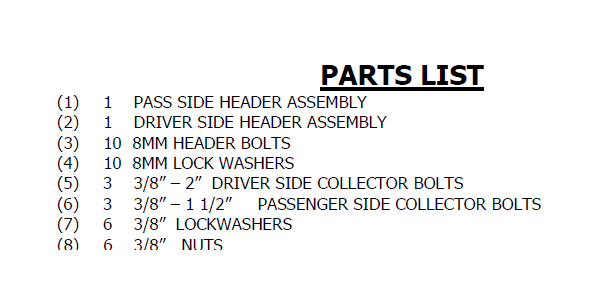
Shop Parts in this Guide
WHEN THESE INSTRUCTIONS ARE FOLLOWED PRECISELY, YOU WILL FIND THE INSTALLATION OF YOUR EXHAUST SYSTEM TO BE RELITIVELY SIMPLE. WE CANNOT OVER EMPHASIZE THE IMPORTANCE OF ADHERING STRICTLY TO THIS PROVEN APPROACH, AS IT WILL VIRTUALLY ELIMINATE ANY DIFFICULTIES, WHICH YOU MIGHT OTHERWISE ENCOUNTER.
NOTE: INSTALLATION OF HEADERS ON VEHICLES WITH CATALYTIC CONVERTERS AND/OR OTHER EMISSION CONTROL EQUIPMENT MUST BE ACCOMPLISHED IN ACCORDANCE WITH ALL GOVERNMENT REGULATIONS PERTAINING TO SUCH EMISSIONS STANDARDS.
WARNING: MAKE CERTAIN YOU HAVE ENOUGH CLEARANCE AROUND BRAKE, FUEL, AND ELECTRICAL LINES, ETC. IN SOME CASES, IT MAY BE NECESSARY TO RELOCATE ITEMS WHICH MIGHT BE ADVERSELY AFFECTED BY EXHAUST HEAT.
WARNING: INSTALLATION OF ANY TYPE OF "WRAPPING" MATERIAL ONTO THE HEADERS WILL DESTROY THE HEAT DISSIPATION PROPERTIES OF THE TUBING, CAUSING PREMATURE DETERIORATION OF THE METAL AND SUBSEQUENT FAILURE. USE OF ANY "WRAPPING" MATERIAL WILL VOID THE WARRANTY.
INSTALLATION INSTRUCTIONS FOR GIBSON SHORTY HEADERS GP137S
INSTALLATION OF THESE HEADERS REQUIRES AN ADEQUATE WORKSPACE, GENERAL MECHANIC’S TOOLS, GENERAL MECHANIC’S KNOWLEDGE, AND A REASONABLE DEGREE OF EXPERIENCE. MOST AUTO-ENTHUSIASTS WITH THESE RESOURCES WILL HAVE LITTLE DIFFICULTY INSTALLING THESE HEADERS. HOWEVER, YOU SHOULD CAREFULLY READ THE INSTRUCTIONS BEFORE ATTEMPTING TO INSTALL THESE HEADERS. IF IN DOUBT, CONSULT A PROFESSIONAL MECHANIC.
1) PLACE VEHICLE IN A LOCATION WHERE THE FLOOR IS SOLID,FLAT, AND HAS ADEQUATE LIGHTING. DO NOT WORK WITH A HOT ENGINE!!! HEAT CAUSES METAL TO EXPAND AND MAKES REMOVAL OF FASTENERS DIFFICULT. DISCONNECT THE NEGATIVE BATTERY CABLE. RAISE THE FRONT OF THE VEHICLE TO OBTAIN ADEQUATE ACCESS TO THE BOTTOM OF THE MANIFOLD FLANGES. USE LARGE BASE JACKSTANDS TO SUPPORT THE VEHICLE. DO NOT RELY ON THE JACK!! BLOCK THE TIRES TO PREVENT THE VEHICLE FROM ROLLING OFF THE JACKSTANDS.
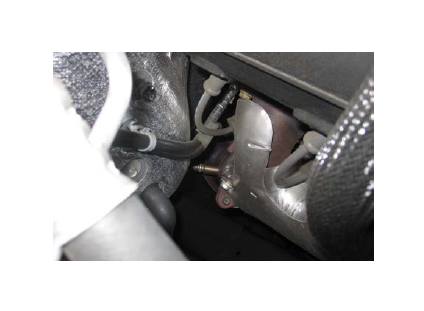
2) FROM UNDER THE VEHICLE REMOVE THE 6 FACTORY NUTS THE COLLECTOR THAT HOLDS THE Y-PIPE TO THE MANIFOLDS. NEXT, DISCONNECT THE SPARK PLUG WIRES BY GRASPING AND GENTLY TWISTING THE SPARK PLUG BOOT. DO NOT PULL ON THE PLUG WIRES.SPRAY WD-40 OR SOME TYPE OF PENETRATING OIL ON ALL ACCESSIBLE FASTENERS BEFORE ATTEMPTING TO REMOVE THEM. REMOVE THE FACTYORY DECORATIVE PLASTIC VALVE COVERS.
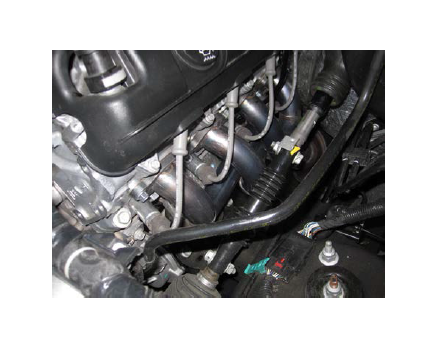
3) MARK ALIGNMENT OF THE SHAFT BEFORE REMOVING,THEN REMOVE THE BOLT FROM THE STEERING SHAFT. SLIP STEERING SHAFT APART. REMOVE THE 10MM BOLT THAT HOLDS THE DIPSTICK TUBE ON AND PULL THE DIPSTICK TUBE UP AND OUT.
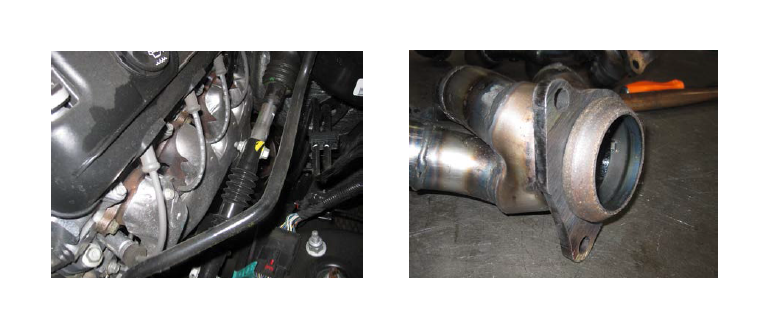
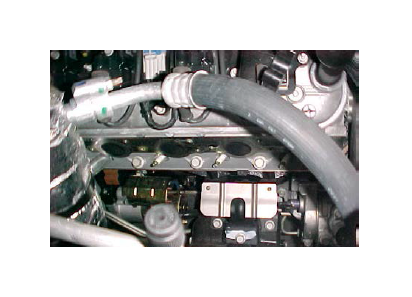
4) REMOVE THE FIVE BOLTS HOLDING THE EXHAUST MANIFOLD TO THE HEAD, THEN REMOVE THE MANIFOLD FROM THE TOP OF THE ENGINE BAY. NOTE: YOU WILL RE USE THE FACTORY DOME GASKET AT THE COLLECTOR. SEE PICTURE ABOVE. WITH THE MANIFOLD OUT OF THE WAY, CLEAN ANY CARBON DEPOSITS ON THE HEAD WITH A WIRE BRUSH. PREPARE THE SUPPLIED HEADER BOLTS WITH A SMALL AMOUNT OF ANTI-SEIZE TO THE THREADS.
5) INSTALL THE NEW HEADER USING THE SUPPLIED HEAD GASKETS, BOLTS, AND LOCK WASHERS. TIGHTEN THE GIBSON HEADERS FROM THE MIDDLE BOLT TO OUTSIDE BOLTS.
6) RE-INSTALL THE SPARK PLUG WIRES, DIP STICK TUBE, AND RECONNECT THE STEERING SHAFT ON THE ALIGNMENT MARK.
7) ON THE PASSENGER SIDE REMOVE SPARK PLUG WIRES AND SPARK PLUGS AND SET ASIDE.
8) REMOVE THE FIVE BOLTS ATTACHING THE MANIFOLD TO THE HEAD. REMOVE THE MANIFOLD FROM THE TOP OF THE VEHICLE.CLEAN THE SURFACE OF THE HEAD. REMOVE ANY CARBON DEPOSITS THAT MAY BE ON THE HEAD.PREPARE THE SUPPLIED HEADER BOLTS WITH ANTI-SEIZE TO THE THREADS.
9) INSTALL THE NEW HEADER USING THE SUPPLIED HEAD GASKETS AND BOLTS. TIGHTEN THE GIBSON HEADERS FROM THE MIDDLE BOLTS TO THE OUTSIDE BOLTS. Torque all fasteners to factory specifications.
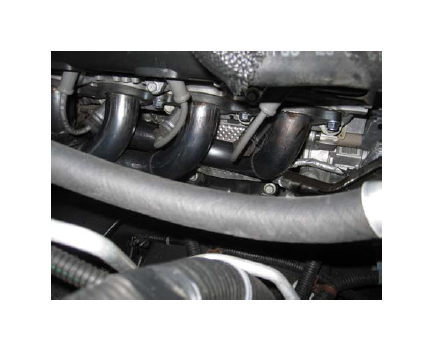
10) WRAP SPARK PLUG BOOT WITH HEAT WRAP PROVIDED AND RE-INSTALL. USING THE NUTS AND BOLTS PROVIDED, RECONNECT THE HEADERS TO THE STOCK EXHAUST UNDERNEATH THE VEHICLE.
NOTE: On some models, may need to bend heat shield out of the way on passenger side header. Due to header tube being very close to heat shield. (Only some models.)
11) FINALLY, MAKE SURE ALL BOLTS ARE TIGHT AND EVERYTHING IS RE-CONNECTED. START THE ENGINE AND LET IT WARM UP. CHECK FOR LEAKS. TURN ENGINE OFF AND MAKE SURE ALL BOLTS ARE TIGHT.
12.) E.O. STICKER INFORMATION
Place the sticker in an area that is protected from high wear or frequent exposure to dirt, water, etc. Make sure the area is clean before applying. E.O. are usually updated annually, your E.O.. sticker does not need to be replaced to reflect changes that are made. Smog inspection stations are updated regularly.
RE-TORQUE HEADERS AFTER 100-200 MILES
PERIODICALLY CHECK AND RE-TIGHTEN THE HEADER BOLTS. IF YOU DON’T RE-TORQUE YOUR HEADER BOLTS YOU COULD DEVELOP A LEAK AT THE HEAD GASKET.
THIS IS NOT COVERED UNDER WARRANTY.
IT IS CRITICAL THAT ALL BOLTS BE RE-TIGHTENED HOT AFTER ABOUT 20 MINUTES OF OPERATION TO PREVENT GASKET FAILURE.
NOTE: HEADERS ARE NOT MEANT TO SERVE AS “EXHAUST SYSTEM SUPPORT HANGERS”. ADDITIONAL HANGERS MAY NEED TO BE ADDED AT THE TIME OF THE INSTALLATION OF THE HEADERS SO THAT THE EXHAUST SYSTEM SUPPORTS ITSELF WHEN THE COLLECTOR BOKTS ARE REMOVED. HEADERS THAT HAVE “SAGGED” DUE TO THE LACK OF SUFFICIENT EXHAUST SYSTEM SUPPORT WILL NOT BE REPLACED UNDER WARRANTY.
NOTE: HEADER BOLTS SHOULD BE INSPECTED FOR TIGHTNESS FROM TIME TO TIME TO ENSURE OPTIMUM GASKET LIFE. THE BOLTS WILL STRETCH SOME AT FIRST DUE TO THE EXHAUST HEAT; SO, THEY’LL LOOSEN WITHOUT TURNING UNTIL THEY “TAKE A SET”. (BOLTS HARD ENOUGH NOT TO STRETCH WOULD BREAK!) WE’VE EXPERIMENTED WITH THE VARIOUS “LOCKING DEVICES” ON THE MARKET, WHICH PREVENT BOLTS FROM TURNING. THEY DON’T WORK ON HEADER BOLTS, AND THEY GREATLY COMPLICATE THE PROCESS OF RE-TIGHTENING THE BOLTS WHEN IT’S NECESSARY.
WHAT DOES WORK IS THIS:
GO OVER THE BOLTS AGAIN AFTER THE FIRST DAY OF DRIVING (OR ABOUT 100 MILES-WHICHEVER COMES FIRST) THEN AFTER THE FIRST WEEK, AFTER THE FIRST MONTH, AND THEN EVERY 6 MONTHS. OUR EXCLUSIVE GASKETS ARE SPECIALLY MADE SO THAT THE CYLINDER HEAD SHOULD BEGIN TO MELT BEFORE THE GASKETS CAN BURN UP. ABOUT THE ONLY WAY TO KILL THE GASKETS IS TO LET THE HEADERS GET LOOSE AND THEN KEEP DRIVING WITH A LEAK.
DUE TO VARYING CONDITIONS BETWEEN GEOGRAPHICAL LOCATIONS AND USAGE, WE STRONGLY RECOMMEND HAVING THE ENGINE RE-TUNE AT A REPUTABLE TUNE-UP SHOP AFTER THE INSTALLATION OF THE HEADERS. DOING SO WILL ENSURE THAT YOU GET THE MAXIMUM BENEFIT FROM THE INSTALLATION OF THE HEADERS.
GIBSON PERFORMANCE STRIVES TO DELIVER THE HIGHEST QUALITY MATERIALS, WORKMANSHIP, AND SERVICE. PLEASE SO NOT HESITATE TO CALL OUR TECHNICAL LINE IF YOU HAVE A QUESTION OR EXPERIENCE A PROBLEM.


