Talk to a F-150 Sales Tech
1-888-706-1096
M-F 8:30A-11P, Sat-Sun 8:30A-9P
$20K Sweeps! 10 Chances to Win! Enter Daily >

Powered Heated Towing Mirrors with LED Turn Signals; Textured Black (15-19 F-150)

Item T559279
Verify parts fit and get product recommendations.
F-150 Sales Techs: Connect Now M-F 8:30A-11P, Sat-Sun 8:30A-9P
$0.00
Our Price

$344.99 (pair)

FREE Shipping Market Price $397.99 You Save 13% ($53.00) Up to 10% off for Military & First Responders! See Details

Open Box from $155.25

Will this fit your Vehicle?

Select a different vehicle Help?
Update or Change Vehicle
Ship to: Ashburn - 20149
Sorry, please enter a valid US or CA postal code
We're sorry, zip can't be updated at this time.
    Create a list
    Add to New List

    Saved - View your saved items

    We're sorry. We couldn't save this product at this time.

    or use

      Product Videos

      Jake: Jake here for americantrucks.com. And today, I am taking a look at these Powered Heated Towing Mirrors with LED Turn Signals in Textured Black for 2015 to 2019 F-150s. If you tow or haul a lot with your F-150, you know how inadequate the stock mirrors can be for those applications. So, if you're looking for a way to increase your visibility and the safety of your towing setup while keeping that OEM look, these are gonna be a great option for you that won't break the bank. Now, straight away you'll notice that these mirrors retain many of the features of your stock setup. The OEM grade housings have this nice textured black finish and it coordinates nicely with other trim on the F-150. They can also always be painted or finished off with one of the many choices of mirror caps that are out there on the market if you're looking for a bit of a different visual flare.They also feature integrated LED turn signals on the back of the housing which is gonna help you be seen by other vehicles. Plus you retain the factory power adjustments and the heating elements too, and you also have the option of puddle lights. So, even if your truck didn't come with them from the factory, you've got the option to include them here. So, there's no compromise and functionality overall. And with those added heating elements, you're not gonna have to worry about scraping these off on a snowy day. Now, all of that is great, but a mirror's primary function is, of course, visibility. And that's why you're looking for something like this. These are set up just like factory tow mirrors. They have that wide angle on top and the smaller convex mirror down here on the bottom. They do adjust separately and you get them set up to see exactly what it is you need to see.You also have the ability to adjust the entire housing in and out, so if you're towing a larger trailer and you need a little extra angle to be able to see the end of it, you're covered there as well. And of course, they also fold in for those tight parking spots or for some added security. Now, if you've had the same experience I have and had to replace a mirror or two in your time, you know that they can be a little on the expensive side, but that's really not the case here. These are gonna run you around $450 for the set. That's right. That is for both of them. These are sold as a pair and they're gonna undercut the pricing of some of the other aftermarket options out there. They're also significantly less expensive than even one of the OEM ones. I know that because I checked.Installation here comes in at a one out of three on the difficulty meter. And these should take you about 40 minutes to install, about 20 minutes per side. This is pretty much a plug-and-play operation with a few bolts to loosen and one connector to plug back in. Two things of note, though, if you want to take advantage of those puddle lights we were just talking about and your truck doesn't have them from the factory, you are gonna need to run some wiring. That is going to increase the difficulty and the amount of time you're gonna need to spend on the job. However, you do get all the wiring that you need in the kit, so everything you need is already there. Also, if you have a 2018 or 2019 F-150, you're also gonna need to get and install an air temperature sensor for the passenger side as they were relocated to the mirror in mid-2018. Otherwise, though, this is a pretty straightforward installation. I'm gonna show you exactly how to get this done. Let's head over to the install bay and we'll walk you through it.Man: The tools we'll need for this project is a 7-millimeter socket, a 10-millimeter socket, a short extension, a 1/4-inch drive ratchet, a power ratchet if you have one, a small flat blade screwdriver, a couple of soft trim removal tools, wire cutters, pliers, wire stripper and crimper, electrical test light, and a couple of pieces that will not be included in the kit, some sort of electrical connector such as a T-tap, and some spade bits. Hi, everyone. Today, we're gonna be installing a set of towing mirrors on our 2018 F-150, but before we can do that, let's get the old ones uninstalled. Our first step is going to be removing this inner trim panel using our soft trim removal tool. So, let's do that. Now, we're gonna disconnect our electrical connector by pushing in on the tab and pulling it out. Then we can use our soft trim removal tool to remove the hold down from the stud at the bottom and just push that out of the way.Now we can remove the four 10-millimeter nuts, two right underneath the panel, two on the outside of the trim, and then we can remove the mirror. Okay. Using our 10-millimeter socket, we'll take these nuts off. I recommend loosely installing one of the original nuts onto the stud just to keep it from falling when you take out the other last two bolts. Now we're gonna use our 10-millimeter socket to remove these bolts. Now, we can support the mirror with one hand by removing the loosely attached nut from the other side and go ahead and slide the mirror out of its mounting point. Now, you can repeat this process for the other side. Our next step is gonna be to remove our door panel. And in order to do that, we've got a couple of pieces of trim that we need to remove first, one is the trim on the door panel and there's a second piece right underneath it that needs to come off so that we can access the screws.Okay. We're gonna be using our small flat-head screwdriver to help pry this trim away so that we can get our soft trim removal tool in there to finish the job, being very careful, of course, not to damage the trim. Now that we've got it partially pried away, we can insert our trim removal tool, and pull it out. Now we can use our small flat-head screwdriver once again to remove this small piece right here in the middle. You should be able to slip your trim removal tool behind it and pop it out. Now we're gonna remove the four 7-millimeter bolts here, here, here, and here using our 7-millimeter socket. Now, there are two more 7-millimeter bolts at the bottom of this door panel here that we also need to remove. Now we can disconnect our door handle cable from the door panel or trim itself by using our flat-head screwdriver and prying down on this clip. Once you have the clip disconnected, then you can push the cable away from the door.Now we can go ahead and remove our door panel. Now we can go ahead and remove our door panel simply by pulling away at the bottom, disconnecting all of the clips, and then lifting the door panel straight up. Now, be careful when you lift this up because there are wires connected to the back that have to be disconnected before we can fully remove the door panel. Now we can disconnect our power windows and our power lock connectors simply by pushing in on the tab on the connector and pulling it down. Now you can repeat that same process for the other door.Now we can remove our A-pillar trim by removing this cover here exposing a 10-millimeter bolt that we can use our 10-millimeter socket to remove. Now we can remove our A-pillar trim simply by squeezing this cover here, and one at the bottom to pull it away and expose our 10-millimeter bolts. Simply pull away. Now, you do wanna be careful when you get into this area because there is an airbag right behind that cover. So, just be careful when you're moving around and you don't disturb it. Now you can repeat the same process for the other side.Now, because we've decided to connect our puddle lamp to our dome light, we're going to remove our dome light using our soft trim removal tool so that we can have access to it to tap in with our puddle light wire. Now, there's a spring clip right here on the end that holds this in place. So, what we're gonna do is slip our tool underneath the middle here, being careful because there's a metal ring that goes around the inside. So, we're just gonna slip it in there and slide it around, and then push it in to release that spring clip, and then we can go ahead and pull it down. Now we can go ahead and install our mirror by sliding the electrical connector through the large rectangular opening in the door and securing it with our 10-millimeter nut.Now we can go ahead and reinstall the two 10-millimeter bolts that we pulled out of our old mirror and get that secured. Using our 10-millimeter socket, we'll go ahead and tighten those up. Now we can go ahead and connect our new harness to our mirror.Now at this point of the install, things get a little bit more complicated because we've got some additional functionality of this mirror that we didn't have before. So, we have three new wires here, a brown wire, a blue wire, and a white wire. The white wire is going to be for our puddle lamp, our blue wire is going to be for our clearance light, and our brown wire is for an auxiliary light. So, at this point, in order to make our connections, we're gonna need some parts that aren't sourced with the kit, mainly things like a T-tap so that we can plug this into the existing wires, some wire strippers, and some crimpers. So, now we need to find a 12-volt power source for two of our wires in our new harness. And to do that, we're gonna use a test light by grounding it to our door frame and then probing the harness that we currently have installed to find out which one is live.Okay. So, the first connection we're gonna look for is for our blue wire, which is our turn signal. The easiest way to do that is probing this harness right here. And to do that, what we're gonna do is turn on our hazards first and see which one of the lights flashes. Now, using our test light, what we're gonna do is go into the back of this plug and touch the connector on each one until we find one. There we go. As you can see, the test light is flashing at the same rate that our hazards are, so that's the power source we're going to use. So now that we found a wire that we're going to use, we're gonna go ahead and use a T-tap, and we're gonna attach a spade fitting to the blue wire to connect it in case we have to disconnect it later on. So, to install this, we just wrap it around the wire and use a pair of pliers to secure it and make sure that it pinches the covering on the wire. Now we can cut our blue wire and attach a spade bit to the end of it and plug it into the harness and test it again.Now we can go ahead and cut our wire, strip the end of it, and attach our spade bit. And then just plug it in. Now, we'll do the same thing for our brown wire. Now we need to find a 12-volt switch power source. In order to do that, we're going to insert the key, turn the ignition to the ON position, and then probe the plug to see when our test light comes on. And there we go. Now we'll turn the key off and see if the light goes out as well. So, now we know we found the correct power source for our light. So, we'll go ahead and tap into that wire. Now we'll go ahead and install our T-tap on our power source. Use our pliers to close it down. Now we can cut our brown wire and attach our spade bit to it and plug it into our T-tap.So, at this point, the last thing remaining to hook up our mirrors would be our white wire for our puddle lights. Now, since we do not have the existing circuitry in the door to be able to do this, it would require permanent modification to our vehicle in order to run the puddle lights. Something we are not gonna do today. So, a brief overview of the steps that you're gonna need to do in order to hook up your puddle lights is you're gonna have to put a hole in this grommet right here, feed the wire through it, and then drill a hole in your door and in your body so that you can run the wire through. And I suggest that you put rubber grommets in both of those locations to keep from chafing the wire. And then what we're gonna do is run it up inside along your A-pillar, along the front of your headliner, and you can connect it to your dome light up there.So, here's our dome light. You need to find out which wire is the power wire, and then you can hook up your puddle light to that wire. Just tap into that source and that'll get you your puddle light functions. So, once you run your puddle light wire through the door and through the body, you're gonna fish it up to the A-panel here. There's already a wiring harness on the A-pillar, so all you have to do is just zip tie along this other wire harness and feed it across the front edge of your headliner. All right. So, once you get your wire up to the front of the headliner here, you can use something like a stiff wire to feed that through and then fish that wire through. Once you fish your wire through, using your test light, you can find out which wire is the hot wire and tap into that, and that should complete the functionality for your puddle lights. Now we can reinstall our dome light by slipping in the wired end, compressing the spring, and popping it back in so it snaps in. Now we can go ahead and reinstall our A-pillar trim by simply sliding it back into where it was at, and inserting our 10-millimeter bolts, and tightening it down with our 10-millimeter socket.Now, just slide our covers back over top and snap them in and repeat this step on the other side. Now we can go ahead and reinstall our door panel. First thing we wanna do is make our electrical connections. Now we need to reinstall our door handle cable. Now we can go ahead and slip our door panel over the door lock and onto the top of the door. And then insert the clips in the door. Now we can go ahead and install the screws at the bottom of the door using our 7-millimeter socket. Now we can go ahead and install our four bolts in the center of the door to here, one on each end of the door handle using our 7-millimeter socket. We repeat that step for the other side. Now we can go ahead and install our trim pieces and our lower piece. And now we can go ahead and reinstall our mirror trim piece, and repeat the steps for the other side.And that wraps up our review and install of the Powered Heated Towing Mirrors with LED Turn Signals in Textured Black finish for our '15 to '19 F-150. Thanks for watching. And remember for all things F-150, keep it right here at americantrucks.com.

      Product Information

      Features, Description, Reviews, Q&A, Specs & Installation

      Features

      • OEM Style Towing Mirror
      • Increases Rear Visibility
      • Dual Mirror Design
      • Manual Folding
      • Manual Telescoping
      • Power Operated Adjustment
      • Heated Defrost Function - Yes
      • Turn Signals - Yes
      • Puddle Light - Yes
      • Spotlight - No
      • Temperature Sensor - No
      • Blind Spot Detection - No
      • Memory Function - No
      • Durable, Automotive-Grade ABS Construction
      • OE Style Textured Black Finish
      • Plug and Play, Bolt-On Installation
      • Includes 22-Pin to 8-Pin Harness Adapter
      • Power Functions Only Apply to Models Originally Factory Equipped with These Options
      • Sold as a Pair - Driver and Passenger Side Included
      • Not for use on 2018 Models
      • Fits 2015-2017 and 2019 Ford F-150 Models

      Description

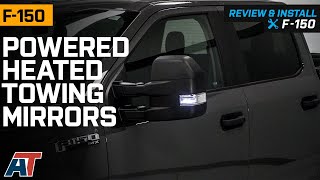
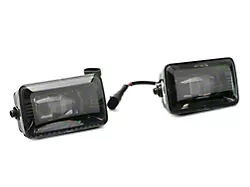
      OEM Style Towing Mirrors. Replace your F-150's cracked or broken side mirrors with a brand new pair of OEM style replacements. These OPR Towing Mirrors are designed to replace the mirrors found on 2015-2017 and 2019 F-150 models equipped with Power Adjust, Heat, Manual Foldaway, Puddle Light, and Turn Signal options from the factory. These Manual Telescoping Towing Mirrors are the ideal solution for F-150's that are driven regularly, but only tow occasionally. Mirror length is approximately 23-inches when fully extended and 20-inches when closed.

      Durable ABS Construction.
      These Towing Mirrors are manufactured from an OEM quality acrylonitrile butadiene styrene (ABS) material. ABS is known for its light weight, superior durability and impact resistance, making it the ideal material for use on and off road. These Mirrors are completed in an OE style black textured finish that matches your truck's existing factory trim.

      Bolt-on Installation. These Towing Mirrors are designed to be a direct bolt-on replacement using basic hand tools. No cutting or drilling is required, as these Mirrors use existing holes for a painless installation. Removal of the interior door panel may be required for installation.

      Application. These Powered Heated Towing Mirrors with LED Turn Signals; Textured Black are designed to fit 2015-2017 and 2019 Ford F-150 models. Not compatible with 2018 models. Driver and passenger side included. Includes 22-Pin to 8-Pin Harness Adapter.

      Please note that the heat and power functions only applies to vehicles that were originally equipped with these options from the factory.

      Fitment:

      CA Residents: WARNING: Cancer and Reproductive Harm - www.P65Warnings.ca.gov

      Installation & What's in the Box

      Installation Info

      What's in the Box

      • (2) Towing Mirrors
      4.5

      Customer Reviews (200)

        Questions & Answers

        10 More Questions