Talk to a Silverado 1500 Sales Tech
1-888-706-1096
M-F 8:30A-11P, Sat-Sun 8:30A-9P
$20K Sweeps! 10 Chances to Win! Enter Daily >

Barricade 3-Inch Bull Bar; Black (19-24 Silverado 1500, Excluding ZR2)

Item S112317
Verify parts fit and get product recommendations.
Silverado 1500 Sales Techs: Connect Now M-F 8:30A-11P, Sat-Sun 8:30A-9P
$0.00
Clearance Price

$244.99 (each)

FREE Shipping Market Price $286.99 You Save 15% ($42.00) Up to 10% off for Military & First Responders! See Details

Will this fit your Vehicle?

Select a different vehicle Help?
Update or Change Vehicle
Ship to: Ashburn - 20149
Sorry, please enter a valid US or CA postal code
We're sorry, zip can't be updated at this time.
Recommended Install Shops
How It Works
Install Shops are available near Ashburn - 20149

Add Local Shop Installation

Total cost of service $199.00
    Create a list
    Add to New List

    Saved - View your saved items

    We're sorry. We couldn't save this product at this time.

      Video Review & Installation

      Hey, guys. It's Joe from AmericanTrucks. And today we're gonna be working with the Barricade 3-inch Bull Bar in Black fitting all '19 and newer Silverado 1500s. Now, this is gonna be a great option if you're looking to add some cost-effective protection and off-road looks to the front end of your brand new Silverado. So, what do we have here with the Barricade bull bar? Well, this thing is made out of heavy-duty 3-inch tubular stainless steel. It's finished in that gloss black powder coating which is not just there to add to the looks. Albeit if you were going for the blackout look on your truck which this truck is obviously not, there's a lot of chrome on here, this would fit perfectly with that blackout look but mainly that black powder coating is there to serve as a second layer of protection over top of that stainless steel. Now, as far as features go, you do get a little bit of a skid plate here, it's got some holes in it for airflow, and at the very least, it's going to encourage things to go under the truck rather than into the front end of your truck. We also have some pre-drilled holes on this crossbar right here for some extra LED lighting, you can throw in a couple of cube lights there or up to a 20-inch light bar. However, if you don't plan on running any lighting, the kit does include two plugs to clean up the looks. Now, if you're not a fan of the black looks with this one which I have to admit I typically do like that stealthy blackout look, but on the case of this truck, we do have a lot of chrome here from the factory. So, I would understand getting a bare stainless version of this which Barricade does offer. It would match perfectly to the front end of this '19 Silverado we're working with today. However, it is gonna cost you a little bit more to get that polished stainless. We're looking at right around 290 bucks for this one. However, the black version is going to be a little bit cheaper, looking at around 230 bucks for what we have here today. And that's gonna be a great price. You're getting a little bit of protection, the off-road looks, and good build quality with that stainless steel. Definitely, well worth the money.Now, before we move on to the install here, one thing I did want to touch on is fitment. This is not intended to fit the Legacy Silverado model so that's gonna be the third-generation. This is only intended to go on the newest fourth-generation Silverado. But with that out of the way, the install is going to be extremely easy, even easier if you have tow hooks because you already have holes pre-cut in the bumper to get some mounting brackets into the frame rails. If you do not have tow hooks, you will have to cut those holes. And that's gonna give this an easy one out of three wrenches on our difficulty meter. Should take you about two hours to get this hooked up fully. So, without any further ado, let me show you exactly how it's done.Tools required for this install are going to be an impact, U-joint, ratchet, extension. You want some deep and short socket versions of 17, 18, and 19-millimeter sockets. Pliers aren't necessary but they do make things a little bit easier. You'lll see how we use these in just a second here. An 18-millimeter wrench and a 16-millimeter wrench as well.Now, like I said earlier, this is going to be extremely easy. However, if you don't have tow hooks, you're gonna have to start by cutting some holes to allow you to get to the frame rail in the front bumper right here. Now, afterwards, you can pick up right with us as it's pretty much going to be the same. If you do have tow hooks, you can pick up with me right now. We're just going to loosen those up with an 18-millimeter socket and wrench behind our front bumper. So, here we are behind the bumper on the driver's side tow hook. And this one is the one we're gonna start with and it's a little bit tough to get at with this bumper mount right here. So, I'm just gonna take that 18-millimeter short socket on a ratchet and wrench on the nut over here and I'm gonna loosen that up. So, the one in the rear, I'm gonna hit next. This one you should be able to get to with the impact gun. If you have a U-joint, that's gonna give us some wiggle room to be able to slide this out past this bolt. And that one I just removed with the impact gun threads right into the tow hook itself. So, as you can see, we're actually still running into that other bolt. This is a design flaw that's existed on the older Silverados as well. Fortunately though on the new trucks, you probably don't have to remove the whole bumper, just this bolt. I know in the old trucks you did have to remove the whole bumper to get this one tow hook bolt out. So, what I'm gonna try to do first is get this bolt out of the way and that might be able to give us a little bit more clearance past that welded on nut. So, that will give you enough clearance to pull that tow hook bolt out. Now, we shouldn't have this problem on the other side but it's pretty much gonna be the same process. And with the tow hook out of the way, I'm just gonna tighten this back down right now. I think I forgot to mention this but this is an 18-millimeter bolt on top as well. So, moving on to the other side. As you can see, the bolt head isn't even on this side because the tow hook hardware isn't mirrored. They're actually the same for both frame rails. So, once we get this nut off, we can pull the bolt out on the other side of the frame rail. Now, we're going to hop over to the other side of the frame rail. There's that one last bolt that's threaded into the tow hook itself. So, now we're just going to take a mounting bracket, we're gonna push that through the hole in the bumper there and get this to mate up with the frame rail. You wanna make sure you grab the right one for whatever side you're working on. Passenger side first for us. This one is marked right there with a P, driver side will be marked with a D. Now, before we do this, one thing I did wanna touch on here is when we slide this in, it's gonna be a tight fit. I already tried this and you can see it's eaten up the plastic around where your tow hook used to be. If you're not into that, you could easily clean that up with a Dremel tool or a body saw, something like that. But I did just wanna mention that because I know some guys would not like that on the front of their brand new Silverado. But if you're willing to get over that, this isn't gonna be extremely easy. We're just gonna line it up like so and push that through. Now, we're gonna go over to the driver side and do the same exact thing.So, now we have both of our mounting brackets in place, we're ready to tighten them down. And to do that, we're just gonna push in some bolt plates. These are gonna go in the frame rail and then poke through. Then on the other side, we're going to tighten these down with a 19-millimeter nut. This double bolt plate right here, this is going to be toward the left of the frame rail. The single bolt plate, that's gonna be toward the right. So, now we have the double bolt plate on on this side, we're gonna do the same thing with the single bolt plate on the right side of the frame rail. Over on the driver side, we're gonna do the same thing here. Double bolt plate on the left, single bolt plate on the right. Now, a helpful tool here, you can probably hold on to the end of that tab on the bolt plate with some pliers and that makes it exponentially easier to get these into place.So, now we're gonna go back underneath of our truck here to those bolt plates, we're just going to install a flat washer and a 19-millimeter nyloc nut. And on the double bolt plate, we're gonna do that twice. On the other side of this frame rail, we're only gonna hit one, obviously. Now, we're gonna tighten down our mounting bracket with a 19-millimeter socket. And as you just saw right there, this bracket is slotted on the holes so you could always come back and loosen that up later on if you need some adjustment. So, now we have one side in place, we're just gonna jump over to the other side here and install that as well. You want to be careful not to push that back in. Now, this is going to be in a pretty tight spot here, so I'm just gonna take the 19-millimeter short socket on a ratchet and get that snugged up.Now we have the nut on and we were just thinking of the best way to tighten this thing down. Since it's on a bolt plate in the frame rail, it's kind of tough. If you're using a ratchet, it's just gonna ratchet back on you. The best way that I found to get in there is with an extension and maybe a little bit of a U-joint. And that'll get you around the nut and you'll be able to impact this down. Now, we're gonna jump over to the other frame rail, get all of our hardware situated and tighten down as well. And for this side, you should have plenty of room. You just get a socket on that single bolt plate. On the other side of the frame rail here, we have the double bolt plate interfering with that one bolt. And again, we're gonna get our hardware on there and then we're probably gonna break out the short 19-millimeter and the extension just like we did on the other side. Again, a U-joint will probably be a good idea and that will get this tightened down.So, we're over the hill as far as the hard part goes for this install, our mounting brackets are all set up and good to go. You can probably guess what the next step is. We're gonna mount up our bull bar and that's gonna be with the 16-millimeter bolts and 17-millimeter nyloc nuts as well as a couple flat washers all of which come included in the kit. We are gonna get the hardware started on the other side here too. And just like the brackets, these are slotted so we're gonna dial in the adjustment here and then tighten all of these down. Again, 16-millimeter bolts and 17-millimeter nyloc nuts. Now, if you're like me and you want the nuts to be hidden on the inside here, this bottom one is at an odd angle so you'll probably need the ratchet and 17-millimeter socket to get that one tightened down.But guys, that is pretty much gonna do it for me and the Barricade 3-inch Bull Bar in Black fitting all '19 and newer Silverado 1500. Thank you for watching. For more videos like this one, make sure you subscribe. And as always, keep it right here at AmericanTrucks for all things Chevy.

      Product Information

      Features, Description, Reviews, Q&A, Specs & Installation

      Features

      • Bull Bar
      • Provides Front End Protection from Off-Road Hazards
      • Heavy-Duty, 3-Inch Tubular Stainless-Steel Construction
      • Confidently Handles Bumps and Bruises Without Damage
      • Gloss Black, Powder-Coat Finish
      • Resistant to Rust and Corrosion
      • Includes 2 Auxiliary Light Mounts
      • Bolt-on Installation - Some Trimming May Be Required
      • Does Not Fit Chevrolet Silverado 1500 Legacy Models
      • Fits 2019-2024 Chevrolet Silverado 1500 Models

      Description

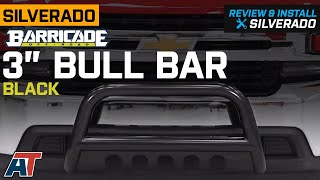
      Superior Protection. Looking for a bull bar that will provide superior front end protection for your Silverado 1500? Look no further than the Barricade 3-Inch Bull Bar; Black. Engineered to handle bumps and bruises with confidence, you won’t have to worry about off-road hazards that may happen.

      Lighting Accommodation. This tubular bull bar is designed to accommodate 2 auxiliary lights. In fact, there are 2 auxiliary light mounts integrated into this dynamic design.

      Unmatched Construction. Crafted from a heavy-duty, 3-inch tubular stainless steel, this high-impact bull bar is built with refined precision. Showcasing a gloss black, powder-coated finish, this surface is resistant to rust and corrosion.

      Installation. This bolt-on installation may require some trimming, but can be completed within 2 hours or less. For a durable performance, quality hardware is included.

      Application. The Barricade 3-Inch Bull Bar; Black is manufactured to be a direct fit for 2019-2024 Chevrolet Silverado 1500 models. Does not fit Silverado 1500 Legacy models.

      Barricade Off-Road

      Shop All Truck Parts And Accessories

      Shop All Truck Bumpers

      Shop All Front Truck Bumpers

      Fitment:

      Details

      Barricade S112317

      CA Residents: WARNING: Cancer and Reproductive Harm - www.P65Warnings.ca.gov

      Installation & What's in the Box

      Installation Info

      What's in the Box

      • (1) Bull Bar
      • Installation Hardware
      4.8

      Customer Reviews (59)

        Questions & Answers

        10 More Questions

        Will It Fit My Silverado 1500

        • 2.7L I4 - 19, 20, 21, 22, 23, 24
        • 3.0L I6 Duramax - 20, 21, 22, 23, 24
        • 4.3L V6 - 19, 20, 21
        • 5.3L V8 - 19, 20, 21, 22, 23, 24
        • 6.2L V8 - 19, 20, 21, 22, 23, 24

        Does not fit 2019 Silverado 1500 Legacy Models, fits the New Body Models Only.