 FREE 1 to 3-Day Delivery on Orders $149+ Details
How to Install Coyote Internal Boltless Beadlock for 16x7-10 in. Wheels on your F-150
COYOTE BOLTLESS BEADLOCK SYSTEM INSTALLATION OVERVIEW
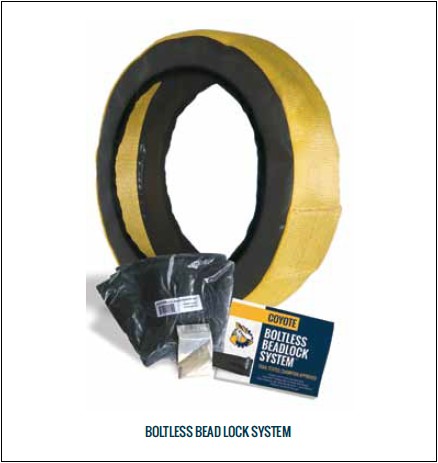
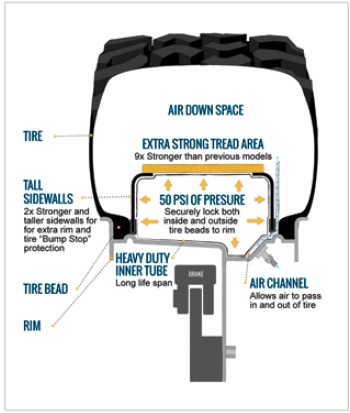
The Coyote Boltless Bead lock is a tire within and tire. The mounting process is very much the same as mounting a motorcycle, bicycle or automotive inner tube in a tire. Neglecting the rim and tire preparation steps, you first mount the inner tire bead. Working through the space between the outer tire bead and outside of the wheel, you mount the inside Bead of the bead lock case. Now, working through the outer bead lock case Bead and the inside of the rim, you mount the inner tube inside the bead lock case. Next, you mount the final bead lock case Bead followed by the outside tire bead. Following are detailed instructions.
BEADLOCK PART IDENTIFICATION
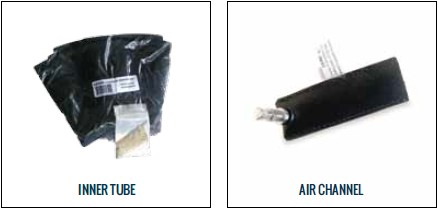
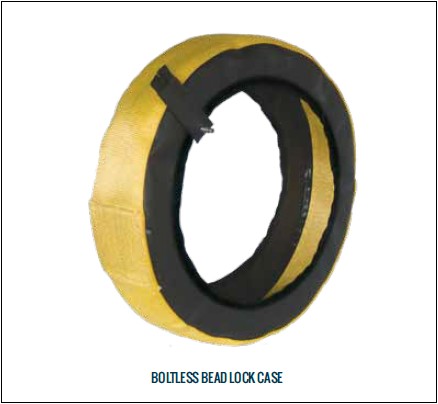
Think of the bead lock case as a mini-tire,(left) hence it has a Tread (the yellow webbing), Sidewalls (the black PVC) and Beads (the black webbing at the inner diameters of the case Sidewalls). The separate Air Channel is the rectangular PVC envelope with a metal valve stem at one end. The Tread overlap area is where the Tread is sewn together.
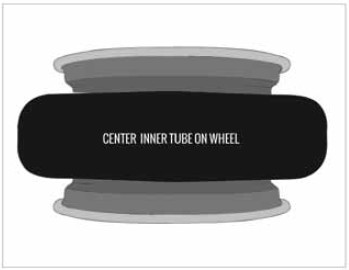
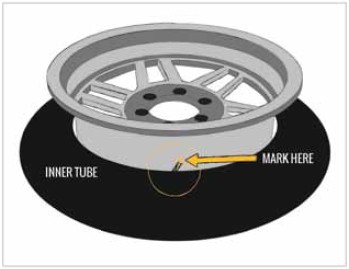
1. Locate position for the inner tube valve stem hole:
To determine the “perfect” inner tube valve stem hole location, put the tube on the flat lying rim (no tire), valve stem up (toward the outside of the rim), about 150 to 200mm (6 to 8 inches) clockwise from the standard valve stem hole and then inflate the tube to just take shape. Valve stem distortion is expected, but that will not hurt the inner tube. Center the tube vertically on the wheel and mark the valve stem location. Finally, since this is not always a practical location, “optimize” that location to accommodate your rims. If the inner tube valve stem is located inboard (brake side) of the wheel, it must not interfere with the brakes and associated components. Ensure that the proposed tube valve stem hole surfaces are flat, parallel and less than 13mm (1/2”) thick. This is to accommodate both the inner and outer inner tube valve stem O-rings.
2. Drill and chamfer the tube valve stem hole:
Center punch and drill an 8 mm (5/16”) hole at the chosen position. Chamfer the drop center side of this hole to receive the smaller, inner O-ring. The chamfer face should be 1 to 1.5 mm (0.040 to 0.060”) wide. It is very important to clean all metal chips off the wheel,all bead lock components and from within the tire. Chips can cause tube failure.
3. Prepare the rims:
For new rims, skip to step 4. For used rims, carefully inspect 100% of the rim’s inside and outside ODs for any sort of blemish or rock rash. The wheels should be clean and free from all rough edges to ensure that the tube is not damaged during installation. Smooth as necessary. All labels, their adhesives and rust should be removed from the rims, too.
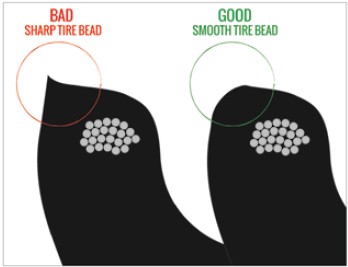
4. Prepare the tires:
The inside edges of tire beads are very sharp. Sometimes, they are too wide to fit fully behind the bead bump. In mounting the final tire bead, you may also pinch the inner tube. As a result, the inside edges of the tire beads must be slightly rounded. This is a very important step! We recommend using a #40 grit, 2 inch diameter sanding drum. All tire bead inside edges must be smoothed.
5. Powder all components:
Powder the bead lock case, inner tube, Air Channel and the rim’s drop center. Pay particular attention to the inside and outside of both bead lock case Beads (the black webbing at the inner diameter of the case Sidewalls). Powder the components inside the tire to contain the powder.

6. Contour the Air Channel:
Check that the Air Channel rubber grommet is the proper size for your rim’s tire valve stem hole. Temporarily, and without force, hold an Air Channel up to the existing valve stem hole noting the shape necessary to fit it to the inside of the wheel assuming the tire bead is in position. Pre-contour the Air Channels to this shape as necessary. Set these aside for step 12.
7. Mount the inside tire bead:
Mount the inside tire bead using the drop center of the wheel as normal. A Windex-like product is recommended in place of conventional tire mounting lubricants. This ensures that if rewetted in actual use, the rim will not spin within the tire.
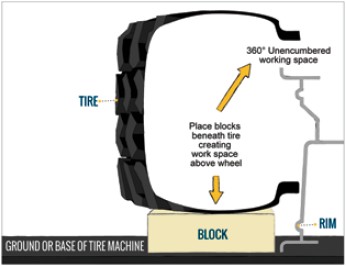
8. Elevate the tire:
Elevate the tire 75 to 125 mm (3 to 5”) with wooden blocks to provide space so you can work between the outside tire bead (unmounted portion of the tire) and the outside of the wheel (now inside the tire).
9. Mount the inside beadlock case Bead:
Mount the inside bead lock case Bead using the drop center of the rim in a manner similar to mounting the inside tire bead. Position the Tread overlap (sewn portion) opposite (180° across from) the tube and Air Channel valve stem holes to aid in balancing the tire.
10. Mount the inner tube:
Check to make sure that the smaller, inner O-ring (only) is at the base of the tube valve stem. Lay the inner tube flat on the tire with the valve stem pointing up unless the valve stem hole is inboard of the center of the wheel. In that case, the valve stem should point toward the inside (brake side) of the rim. Insert the tube valve stem through the newly drilled hole, install the outer (larger) O-ring and cone washer on the outside of the wheel, and thread the nut half way down. From the drop center of the rim, the inner tube part order is: small O-ring inside the rim, then, on the outside of the wheel, the large O-ring, the cone washer and nut. After inserting the balance of the inner tube, check to ensure that there are no folds, wrinkles and twists in the tube, or strain on the valve stem. This is also a good time to push the inner tube to the inside of the rim to prevent pinching when mounting the outside tire bead in step 13.
11. Mount the outside bead lock case Bead:
Mount the outside bead lock case Bead over the rim using the drop center as before. After mounting, run your hand around the inside of the bead lock case to ensure that there are no wrinkles or folds in the bead lock case and that the tube is still not wrinkled or stressed in any manner.
12. Install the Air Channel:
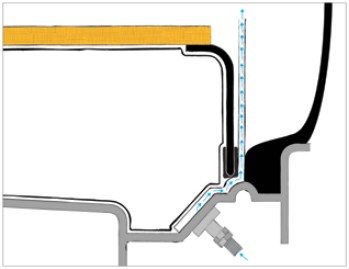
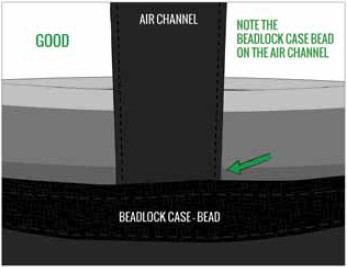
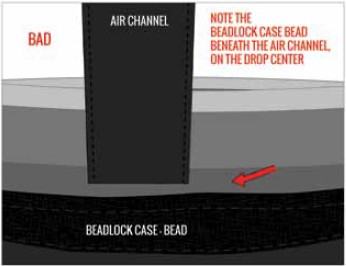
Remove the blocks and let the tire rest on the rim. Tilt the tire over the original valve stem hole to where you can freely access this hole without stressing the inner tube valve stem. With the long end (the nonvalve stem end) of the Air Channel pointing outboard (up), insert the metal portion of a pre-contoured Air Channel (step 7) into the original valve stem hole ensuring that the grommet seats properly into the rim and the short end (the valve stem end) of the Air Channel is lying flat and pointing down toward the drop center (long end pointing into tire’s air chamber). Now, lift and preposition the bead lock outside Bead up and on the valve stem end of the Air Channel (see next page). Finally, apply the washer and nut to the outside of the rim, and then secure, but do not tighten. Lift the tire bead over the Air Channel and rest it squarely back on the wheel. The long end of Air Channel will eventually end up between the bead lock Bead and tire bead pointing into the tire’s air chamber. Save final tightening until after the bead lock is fully inflated. This will help hold the Air Channel in place and prevent turning.
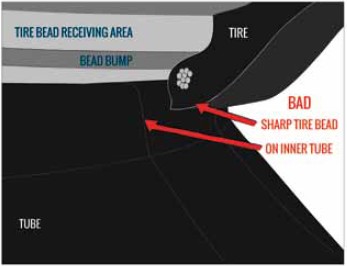
13. Mount the outside tire bead:
When placing the outside tire bead in the drop center of the rim, ensure that it is not on or pinching the bead lock inner tube.(See previous page) Start mounting the outside tire bead with it crossing over the rim lip at the Air Channel valve stem and continue mounting the long way around to the other valve stem until the bead is about to drop over the wheel above the valve stems. Support the tire to avoid stressing the Air Channel and continue mounting the bead so that the tire bead finally drops onto the rim above both valve stems. The tire machine bead mounting tool should never cross over either valve stem.
14. Tighten the tube valve stem nut:
Inflate the tube to shape. This is typically about 2 psi (0.13 Bar). Now tighten the tube valve stem nut firmly, but do not over tighten.
15. Use the bead lock to bring the tire beads into contact with the rim:
Lubricate both tire beads with a Windex-like product before starting this step. Inflate the bead lock inner tube until both tire beads are in full (air holding) contact with the rim, but not popped over the rim’s bead bumps. This will typically be less than 10 psi (0.66 bar) in the inner tube.
16. Pop the tire beads on the rim:
Using the tire valve stem, pop both tire beads onto the wheel. Relubricate as necessary. In some rare cases when the bead will not pop on the rim, use the bead lock to finish the job. Now, remove the tire valve core and deflate the tire completely.
17. Fully inflate the beadlock:
Inflate the bead lock to 40 psi (2.6 bar) cold. This leaves room for temperature, pressure expansion. The maximum bead lock pressure is 50 psi (3.3 bar). Tighten the inner tube valve stem nut ensuring that you are not twisting the valve stem.
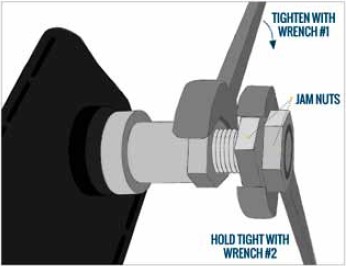
18. Tighten the air channel nut and reinflate the tire:
Tighten the Air Channel valve stem nut. If the valve stem appears to rotate upon final tightening, use a pair of the extra inner tube nuts to “jamb nut” and hold it in place during final tightening. The fully inflated bead lock will also help hold it in place. Under all circumstances, the tire pressure should always be at least 5 psi less than the bead lock pressure and more difference is acceptable. You will not be able to balance the tire if the tire pressure is at or higher than the bead lock pressure.
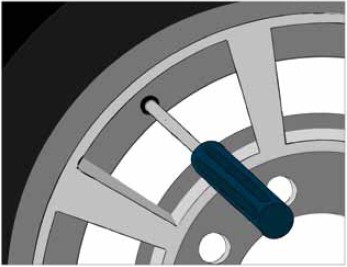
19. Check air channel flow :
Depress the tire Air Channel valve stem for 5 seconds to ensure that air flows out of the tire. Air should come readily out as will happen when airing down. If not, the Air Channel must be checked for proper alignment and reinstalled.
20. Check for leaks:
With both bead lock and tire fully inflated, and both valve stem nuts tight, use a mild soap and water solution to check both tire beads and valve stems for leaks.
NOW HIT THE TRAIN
Now that you’ve installed the Best Boltless Beadlock System in the market, let Coyote Enterprises help make airing down easy.
The Coyote Automatic Tire Deflators are the next generation of tire deflator. They take all of the hard work out of accurately airing down your daily drive and turning it into your trail-ready rig.
UNINSTALLING THE Bead lock AND/OR TIRE
First, deflate the tire and then the bead lock. You must deflate both the bead lock and tire to uninstall either. Remove both valve stem nuts and push the valve stems out of the rim and into the tire cavity. Taking care to not place the bead breaker tool over either valve stem (preferably 180° across from them), break both tire beads. First dismount the out side tire bead taking the long way around described in install step #13. Next,dismount the outside bead lock case Bead. Ensure that neither valve stem is stressed while dismounting the outside tire bead. Remove the inner tube only if you are replacing the tube, otherwise, remove the tube and then the bead lock case. If you are replacing the tire, finally dismount the inside tire bead.
FOR OFF HIGHWAY USE ONLY
The Coyote Boltless Bead lock System may not be legal for street use in all jurisdictions. Coyote Enterprises LLC and its distributors are not liable for incorrectly installed and/or misused Coyote Boltless Bead locks in a manner for which they were not intended. It is not a run flat. Vehicles driven with low tire pressures may result in unfamiliar and less predictable handling on or off the highway, so drive accordingly. Coyote Enterprises LLC does not accept responsibility or liability for misdrilled wheels and/or pinched or damaged inner tubes. First, confirm the suitability of your rims with qualified personnel prior to starting installation. Read the INSTALLATION instructions completely before starting. Installation can be dangerous. Safety is paramount! Use common sense and good, safe work practices throughout the entire installation process. Wear gloves and safety glasses. Be cautious with compressed air. Use tire chocks before jacking the vehicle up and safety stands after it is up. Work sober! Keep these instructions in the vehicle for future reference. Others may need them to replace or repair your tire or bead lock.


