Talk to a F-150 Sales Tech
1-888-706-1096
M-F 8:30A-11P, Sat-Sun 8:30A-9P
$20K Sweeps! 10 Chances to Win! Enter Daily >

Whipple Cold Air Intake (15-20 3.5L EcoBoost F-150)

Item T533533
Verify parts fit and get product recommendations.
F-150 Sales Techs: Connect Now M-F 8:30A-11P, Sat-Sun 8:30A-9P
$0.00
Our Price

$379.99

FREE Shipping Market Price $444.99 You Save 15% ($65.00) Up to 10% off for Military & First Responders! See Details

Will this fit your Vehicle?

Select a different vehicle Help?
Update or Change Vehicle
Ship to: Ashburn - 20149
Sorry, please enter a valid US or CA postal code
We're sorry, zip can't be updated at this time.
    Create a list
    Add to New List

    Saved - View your saved items

    We're sorry. We couldn't save this product at this time.

      Video Review & Installation

      Hey guys. Adam here with americantrucks.com. Today we're taking a quick look at and installing the Whipple cold air intake fitting your 3.5 liter EcoBoost F-150. If you're the owner of that 3-5 Eco and you're looking to ditch the factory airbox to pick up one that gives you a better fuel efficiency, better engine efficiency and of course give you a bump in horsepower and torque as well as a little bit of engine noise. If that's what you're looking for the Whipple option is a huge upgrade over the factory one. Whipple claims 132% airflow boost over the factory option which we'll take a closer look at side-by-side on the table in just a second. Whipple also lets us know you can expect about 15 foot-pounds of torque and 10 horsepower when picking up their cold air intake. It's made from extremely high-quality materials. Cotton gauze filter with a black stealth hex filter design which I'll show you in a second as well. You're also looking at roto molded tubing with the Whipple name steel plated on the side of the tubing. Now it comes with all new couplers, all new clamps and the install is extremely easy. You can pick this particular kit up for just about 380 bucks. The install, one out of three wrenches on our difficulty meter here, 30 to 45 minutes in the driveway at home at the absolute maximum. The thing is extremely easy to install. It's one of the first mods truck owners and car owners in general really do under the hood. It's super easy to do, it's pretty affordable and it really gets the job done. Now I'm gonna show you guys how it gets installed so let's get to it. Taking off this install, I'm using a topside creeper simply because we've got a 4-inch lift on our EcoBoost so it's a little tough to reach the back here this engine bay. So making our lives a little easier up top here, I'm gonna use my extension here with my 7-millimeter deep socket to tackle the three clamps up top. So we've got one, we've got two, and one a little bit down lower here which actually is facing the reverse side so the extension is really gonna come in handy with that one. Once we get those clamps loosened up we'll be able to remove the sensor on the backside, the three tubes on the bottom end and then we'll disconnect the top here of our factory air filter and remove that all in one piece. Next, up here we have to unplug our sensor right above our throttle body in between the tubing and the manifold. Now that's just gonna be a pinch and pull and it'll come right off. Now at this point, we can disconnect this factory tubing from the intake filter along with the top end of the airbox. That'll all come off in one piece. All right. We can pop these two tabs off of the factory airbox lid. At this point, we can disconnect the tubing from the bottom and lift all of this up in one piece. And of course, a super easy step of all these is just to remove the factory filter from the airbox and you can see it's a pretty dirty paper element filter. That one we can toss aside because we are not reusing this. So we got our factory air box off of our EcoBoost and sitting on a table here next to our Whipple cold air intake. Now as you can see filter, tubing, airbox, complete night and day difference. Now the factory air filter here is a paper element filter which does a relatively decent job of filtering out the particles and making sure cold air gets your engine although it is pretty restrictive when compared to the Whipple option here. As you can see this is a much larger conical air filter that has a cotton gauze filter with a mesh screen on the outside making sure that there are just several layers of protection filtering out the particles you don't want getting into your engine while still pulling in a ton more air than the factory filter. As far as the rest of the kit here you're looking at roto molded plastic with just a completely streamlined tubing making sure there is no kinks, no hard bends to restrict that airflow. It's got a smooth finish from the outside of the truck all the way to the manifold in your turbo. As you can see it's got the Whipple plate here that's got the Whipple name and EcoBoost cut out into this stainless steel plate which I think just really adds a nice styling touch under the hood. Lets you know what brand you're rocking under there and keeps a really good appearance. Now the rest of the kit here from the factory is just honestly subpart quality. There's a lot of ripples and bends and hard kinks that just restrict all that airflow. The tubing here also has a textured black powder coated finish which again just adds to that appearance under the hood and gives it a nice stealthy appearance to blend in with the rest of the engine bay. The factory stuff night and day in comparison, and I'm really excited to see what this does on our EcoBoost so what do you say we get started on the install. The only thing we have to transfer over from our factory tubing here is the temp sensor. Now to get this out we've already unplugged the sensor clip when we were in the truck. So to get that out we've already twisted it here. You just pull straight back and there is a blue o-ring seal which keeps it pretty tight, so just put a little elbow grease into it, you'll pop that right out. Now we're gonna be careful with this transferring it over to the new tubing. We've also got a rubber grommet that we have to pre-install. Now the black rubber grommet here we're gonna put in with the cone side first kind of twist that into place. And we're going to take our temp sensor and that's gonna go in next. Now when we toss this in the truck, we'll just cap it off with a harness from in the engine bay. So out of all the clamps provided in the kit there are two larger ones and two smaller ones. Your two larger ones are gonna be used obviously for the larger end of the tubing. We're going to slide one of them on first. And we're gonna take the larger of the two couplers and slide this over the end. And it'll take some, you know, manipulation of some of the ends just to get it on, but once you get it on you'll be able to loosen this clamp up and slide it over this end of the coupler. Loosen that up with our 8-millimeter socket. Take our ratchet and tighten this one down here. First thing we're gonna do is set in place our new Whipple filter. We're gonna drop that into the factory lower air box and put on our new heat shield from Whipple. Now that's gonna go over the edge and you'll see two little clips here that will hug the inside of that lower heat shield and it will kinda sit in place. Now these old clips will snap right on over these cutouts holding that in place. You can grab our tubing and you wanna make sure you have this oriented properly and again with the secondary clamps on the end of each coupler and we're gonna set that in place on the factory tubing. Take our 8-millimeter socket and tighten down those clamps. All right. At this point, we can do the same thing with the filter here over the tubing. Clamp already preinstalled out of the box on the filter. All right. With the filter installed, now we can install our weatherstripping around the heat shield. We put our weather stripping roughly in place here. Now what I'm gonna use are wire cutters here just to make snips at each 90-degree angle edge. That way we know exactly what we're gonna need to cut this weather stripping. We got one snip there at the edge, one snip up here roughly about where that would be, down at each corner. Now we can take this off and make our cuts clean through on a cable. All right. Now that we have them cut in their appropriate sizes we can install our weather stripping. All right. Last step here of the install is to make sure we plug in our temp sensor here on the tubing. Take our factory harness, snap it right into place. Now we're good to go. That's gonna wrap up my review and install of the Whipple cold air intake fitting the '17 3-5 EcoBoost at F-150. This one's going to be a huge night and day difference over your factory option. A huge boost in airflow, streamlined airflow with less restriction, something that gives you horsepower and torque gains that are pretty noticeable according to Whipple, and something that has just a seriously high-quality build. If this is what you're looking for you can get yours right here at americantrucks.com.

      Product Information

      Features, Description, Reviews, Q&A, Specs & Installation

      Features & Specs

      • Improve Your F-150's Horsepower and Torque
      • Better Flow Over Stock
      • Powder-Coated Heat Shield
      • Black Series HEX Filter
      • Bolt-On Installation
      • Limited One-Year Warranty
      • Custom Computer Tune Required
      • Fits 2015-2020 3.5L EcoBoost Ford F-150s

      Description

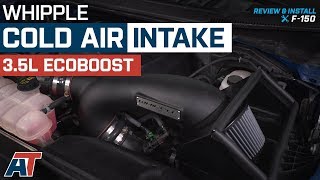
      Fly Free, Suck with Power. Your 3.5L EcoBoost F-150 is a powerful machine, and a powerful air intake system is what you need to make sure it performs the way you want it to. So bring out the Whipple Cold Air Intake and immediately experience a boost in power, performance, and total air flow. 

      The Quality. Whipple is known for being a top of the line piece of kit. From the powder-coated heat shield to the roto-molded air intake tube, right down to the cleanable Black Series HEX filter, you're going to feel the immediate power increases as you hit the gas. There's no better way to keep your stuff maxed out and street legal. 

      Improvements. Just with this, you can feel about 15 ft lbs of torque and 10 horse power. There's a powerful boost, and the 132% air flow boost from the stock panel filter is cleanable to bring pure air for years to come. 

      Installation. This is a completely bolt-on install, no mods necessary. Just some hand tools and about an hour.

      Required Upgrade. Installation of this Whipple Cold Air Intake will require a custom tune with the use of a Handheld Tuner to reprogram the vehicles computer (ECU) for operation.

      Warranty. This air intake comes with a limited one-year warranty to protect against material and manufacturer's defects. Please see their full warranty for complete details.

      Application. This Whipple Cold Air Intake is designed to be used on the 2015-2020 3.5L EcoBoost F-150s.

      Shop All Truck Parts And Accessories

      Shop All Cold Air Intakes For Trucks

      Fitment:

      Details

      Whipple EB-8140

      EB-8150

      CA Residents: WARNING: Cancer and Reproductive Harm - www.P65Warnings.ca.gov

      Installation & What's in the Box

      Installation Info

      What's in the Box

      • (1) Air Filter
      • (1) Air Filter Shield
      • (1) Intake Tube
      • Clamps
      • Mounting Hardware
      4.8

      Customer Reviews (17)

        Questions & Answers

        10 More Questions

        Will It Fit My F-150

        • 3.5L V6 EcoBoost - 15, 16, 17, 18, 19, 20
        • 3.5L V6 EcoBoost Limited - 19, 20

            Related F-150 Categories