Installation Time
(approx) 4 Hours
Difficulty Level:
Mechanical expertise or professional installation required.
FREE 2 or 3-Day Delivery on Orders $119+ Details
$324.95 (kit)
FREE Shipping Market Price $379.99 You Save 14% ($55.04)Saved - View your saved items
We're sorry. We couldn't save this product at this time.
or use
Hey, guys. Joe from American Trucks and today we're gonna be working with the Supreme Suspensions three and a half inch Front, three inch Rear Pro Lift Kit fitting all '07 to '18 Silverado 1,500s.Now this kit is going to be great for any Silverado owner out there looking to improve the looks and overall off-road performance at the same time at a budget friendly price. This is gonna be CNC machine T6 billet aluminum. It's finished in a black anodized coating which is there to serve as a layer of protection from the elements and overall, we're looking at a 3.5 inch front, 3 inch rear lift. That's going to allow us to run up to a 34 inch tire. Now we put 35s on this truck and they seem to clear on flat ground. They might rub under extreme circumstances so if you plan on doing any off-roading, you might have to trim a little bit because the square wheel wells aren't really fond of 35s. We also put a set of 33s on there and I'm sure that would be a safer bet if you weren't looking to do any trimming. And obviously the 34s will fall into that category as well.Now this kit is going to be great for a multitude of reasons here and one I'm gonna start with, as you probably noticed, this truck has some heavy-duty off-road gear in the front of it with that brush guard. This is gonna help dial out some of that droop from that added weight of any extra gear in the front. If you have a brush guard like that one, this is gonna be the perfect option. If you have a heavy-duty off-road front bumper, again, this is gonna help dial out some of that weight. Maybe a winch as well. This is gonna be a great option to bring the front of the truck back up a little bit.Now another great thing about this kit is it comes with a differential drop for the front which helps improve all the angles, keep them close to that factory geometry. That's gonna make it a little bit easier on your CV joints, your axels, ball joints. All of that stuff won't wear out as prematurely as it would if you didn't have that differential drop on the truck.Another great benefit is going to be some added clearance. Now this isn't going to be your full-on full suspension six inch lift kit that you pay thousands of dollars for but that added clearance is something to keep in mind. That's there to dial out what's called rake. And all Silverados and trucks in general for that matter come from the factory with a little bit of rake. And that means the front is gonna sit lower than the rear and that's there to combat any extra added weight if you have something heavy in the bed or if you're towing something. The truck would then level out. It's not gonna sag. If this was level to begin with, you load up the bed, it's gonna look like the rear is sagging so they add a little bit of extra height in the rear to level it out when you have some weight in there.Now if you're not towing or have anything heavy in the bed often, it's more of a looks thing and that difference in numbers is going to help dial that out and improve the looks of your truck.Now pricing for this kit is going to drop in right around the $300 mark. And at that price, you do get a lot of benefits here. Better overall off-road performance with more clearance. You get the ability to fit some larger tires and if you have any added goodies in the front, it's gonna help dial out that extra added weight. So you get a lot of benefits for your 300 bucks. Definitely well worth the money. Also included in that price is going to be a limited lifetime warranty from Supreme Suspensions.Before we move on to the install here, I did just wanna make a couple of quick notes. LTZ and Z71 models will require a trip to the hardware store to pick up longer bolts as this kit is designed with the other models in mind. So they're gonna be a little bit too short. Secondly, you will need a cutoff wheel. Some minor cutting will be required but nothing too major. Install difficulty? Definitely gonna be a three out of three wrenches with this one. Should take you about four hours, maybe a whole day depending on your working conditions. Budget a little bit more than four if you're working in the driveway but this isn't that difficult even though there is some cutting. It's nothing too bad. So without any further ado, let me show you what tools you'll need and how it's done.Tools required for this install are going to be an impact or 2, some safety glasses, a basic socket set ranging from 22 millimeters all the way down to 10 millimeters, an 8 millimeter Allen key. I have mine on a socket just to speed things up a bit. An extension, cutoff wheel, ratchet, 16, 15 and 21 millimeter wrenches. Ratcheting wrenches will help you a ton with this install. Vice grips, trim panel removal tool, pry bar, dead blow, hammer. Now although we didn't need it, a good tool to have on hand would be some rust penetrant like PB B'laster and not pictured in this shot will be the floor jack and pole jack.So the first step of our install here obviously. We're gonna get the truck in the air safely. We're gonna get the wheels off as well and before we touch any of our suspension components, we're just gonna take a 10 millimeter socket and remove a couple of our brake and ABS line brackets. You don't wanna put any stress on those as we're disassembling the suspension. You wanna make sure that they stay nice and loose during the install.Now there's one bracket right behind the brake rotor and there's another one on the upper control arm here. I'm just gonna remove that again with a 10 millimeter socket. Just gonna pull that away from the control arm. And I'm just gonna thread this back in for safekeeping.Next we're gonna move onto the tire rod here. This is held on with a 21 millimeter nut. We're gonna get that all the way off and then we're gonna thread it back on a little bit. Most likely this ball joint is stuck in this collar here so I'm gonna thread the nut back on to protect the threads. We're gonna hit this collar with a hammer to knock the taper on the ball joint loose and then we can pull this apart.Next up is going to be our tire rod. And this is extremely easy. It's one long bolt all the way through the whole thing. Two 15 millimeter wrenches. One on the bottom for the bolt, one on top for the nut and we can break this loose.Now that it's loose, I'm just gonna come in with a wrench and the 15 millimeter socket and get that the rest of the way.Now we're gonna loosen up this 18 millimeter nut on the ball joint on the upper control arm. Just like the tire rod, we're gonna thread that back on finger tight and hit that collar with a hammer to knock the ball joint loose.Now I'm just gonna take a small pry bar, pull down on the upper control arm. And remove that nut. Then release pressure on the pry bar and we get to unseat that ball joint.Next we're gonna take a 15 millimeter socket and remove the two bolts that hold the lower strut assembly to the lower control arm. Now as we loosen these up, keep an eye on your brake and ABS line brackets. Also the axel boots. You don't want those to stretch too far.Now all we have left to remove are 3 18 millimeter nuts on the upper side of our strut assembly here. Now before we go and take those off, we do have a couple of wiring clips on top of those studs. I'm gonna peel those off with a trim panel removal tool.Now again, once those are out of the way, we can take the 18 millimeter wrench and remove those 3 nuts. The ratcheting wrench helps a ton right here.And with everything removed, you should be able to work that strut assembly right out of the truck. So now we have our strut assembly off the truck. We're ready to install our spacer but there's a little bit of extra work we're gonna have to do here before we get this tightened down with the included 17 millimeter nuts. Now if I just put this on here for a test fit like that, you could see these studs are just a little bit too long and we're talking millimeters here that they stick out on top of this spacer. Now we're gonna have to grind that little bit off so this makes a flush contact. So what I'm gonna do is I'm gonna remove the spacer for now and I'm actually gonna thread on the 18 millimeter nuts we just removed. Now reason being that I grind the top of that off. If I catch any of the threads on there, removing these nuts is just gonna clean that up and it's gonna make it exponentially easier to get the included 17 millimeter hardware back down onto those studs. So I'm just gonna thread those down.So now we're ready to go. Again, all we need to do is take off just a little bit off the top of each of these three studs, put on some safety glasses, grab the cutoff wheel and we can start working.Now be careful with the tip of that thing because that is definitely hot. But get that out of the way. Now you do the same thing for the other two as well.Now we can remove those three nuts, clean up any threads that we might've impacted here.And these are gonna be a little bit warm. Pull that away.Now at this point, we can put our spacer on and as you can see, at this point, none of those studs are over the top of the spacer. So we'll get a nice, flush mount on the surface up here. Now we can take the 3 17 millimeter nuts included in the kit and we're just gonna thread those on.Now these holes are a little bit small so I'm using the standard chrome socket to get in there. The impact socket might be a little bit too wide so thin walls are the way to go.So those are all threaded on, no cross threading there. So I'm just gonna put that 17 millimeter socket on the impact gun here and tighten those down.Now one more thing we need to do on our strut assembly here, we gotta pry away these two nut clips at the bottom. We're just gonna be replacing those with a nut and bolt included in the kit from Supreme Suspensions. I'm gonna use a trim panel removal tool to pry those off.So now we're gonna put our strut assembly aside. At this point, this is pretty much ready to go back onto our truck. We're gonna get the other side completely caught up off camera and then we can move on to our differential drop.So we have the other side completely caught up now. We're gonna move underneath and start on this differential but first we have to remove the skid plate here. It's held on by a couple of 15 millimeter bolts and 4 10 millimeter bolts so we're gonna remove all those now and drop that out of the way.One right there. And another one right here. And moving forward, there's 2 more 10s and on the very leading edge, there's 2 15s.I'm also going to remove this plate right here. This is right under the diff. I'm only removing this so I can get a pole jack securely underneath of the diff. it's held on with 2 15 millimeter bolts.So now I have a pole jack under the differential right where we removed that plate. I have that just kissing because we're gonna loosen up where the differential mounts to the frame. That is right here. There's another three, one in each corner. Now this is a little bit tough to get to. This bolt right here on top is a 15 millimeter. You can see I have the ratchet up in there and that is pretty tight. You're gonna have to find a way to grab onto that bolt head. The nut is an 18 millimeter. Once you have that still, we can back that off. Now we're gonna do the same thing to the other side.So now we have both of the rear mounts loosened up here. Now like I said earlier, you are going to need new hardware if you have the LTZ or Z71 models which we already have in hand and all we're going to do is slide in that spacer which it is a tight fit. And we can take our new bolt which is a little bit longer and come in from the top.It's gonna go up a little bit on the pole jack. And this is the same thread pitch as before so we're just going to use that factory nut to tighten this back down.Now we're gonna come back to the other side and do the same exact thing and then we'll hit the front two mounting points as well.Now this diff mount is in a little bit of a tight spot here. It's tough to get the socket in there. I have the ratchet on the top side of this bolt. So we're just gonna come in here with the 18 millimeter ratcheting wrench and loosen that up.So now we're gonna come over to the other side and do the same exact thing. And loosen that up. And then I'm just gonna come around the top again. Hold the bolt still.Now we can lower the pole jack a little bit. I'm just gonna come around with another spacer puck, get that situated, get our bolt through and then tighten this down again using that factory 18 millimeter nut.Now again, we're gonna come over to the other side and do the same exact thing.Now to wrap up our diff drop and install, we're just gonna reinstall the skid plate reinforcement with the 2 15 millimeter bolts and the skid plate itself with the 15 and 10 millimeter bolts.Now again, the 2 at the front are gonna be 15 millimeter bolts and the other 4 are all gonna be 10s.So now we're ready to put our strut assembly back in. you wanna make sure those threaded holes on the top our spacer line up with the holes in the bucket. We're just gonna sit this on the lower control arm.So now we're just gonna lift up on the strut assembly, insert this lowered spacer and get our hardware started finger tight.Now we're gonna take these three bolts that come included in the kit as well as the flat washer and lock washer. We're just gonna run these through the bucket and into our spacer. These get tightened down with an eight millimeter Allen key.So now that we have the hardware started on the top, we can jump back down to the bottom. We're just gonna tighten these bolts down with a 17 millimeter socket and a 16 millimeter wrench.So now we have the strut assembly into the truck, tightened down, in the bucket at the top and the lower control arm at the bottom. Now what I'm gonna do here is we're working on the upper control arm ball joint here and what I'm gonna do is put some upward pressure on the lower control arm to try to bring the knuckle in a little bit closer so we can pull down on that upper control arm, get the ball joint through the knuckle and then tighten down with the 18 millimeter nut. And to do this, I just lower the truck all the way to the ground. I have the rear tires resting on the ground. So that way it just gives us something solid to push off of.So next what I'm going to do is I'm gonna get our pry bar in on one of the coils of the spring. Just gonna let that sit for now. Then I'm gonna take our assembly down here and I'm just gonna work that axel in. now once I have that in, now I'm gonna get the two lined up. Then pull down on the pry bar. Get that ball joint through and then come in with an 18 millimeter nut. Get that on finger tight. And release. So now we're gonna just lift the truck back up into the air. Then we're gonna come in here with the ratcheting wrench and tighten down that nut on the ball joint.So now we're just gonna reinstall our sway bar. I'm just gonna put this plastic portion in between the lower control arm and the sway bar like that. You wanna make sure the tapered sides of the bushings are touching the lower control arm and the upper sway bar just like that. Then we're gonna come through with the bolt. Reinstall that top bushing, taper side down. And then we can put our nut in place as well.And then we can tighten that down, 15 millimeter wrench and socket.Next we're gonna reinstall our tire rod by turning the rotor assembly and getting that back into its collar. Then we can secure that with the factory 21 millimeter nut.Now as you can see, this ball joint is spinning a little bit on me if I go like that. You can see the threads are spinning in there so what I'm going to do is I'm just gonna take a 21 millimeter ratcheting wrench, put that on the nut, hold this with a pair of vice grips and tighten that down the rest of the way.So now that's at the point where the taper is gonna hold the ball joint still. I'm just gonna hit it with the impact real quick to give it the final tight.So our front suspension is starting to take shape here. All lifted and good to go. There's one last thing we have to do and that is reinstall these brake and ABS line brackets using the 10 millimeter bolts that I threaded back into the suspension earlier in the install. Now before we do that, one thing I did wanna touch on here. This ABS line should be over top of the upper control arm. If yours is underneath when you tighten this ball joint down, you could unclip it here and just feed it back over top so it looks just like this. And once you have it situated, I'm just gonna remove the bolts I installed earlier and reinstall those brackets.So that's gonna be it for the install on the front. If you haven't done so already, head over to the other side. Get that buttoned up. And then the front will be completely done. We already had that taken care of off camera and with that, we can jump to the rear of our truck which is going to be exponentially easier. What we're going to do first is we're gonna take the wheel off, obviously. Then I have a pole jack just kissing the accent tube right there. If you don't have one of those, a floor jack will work just fine. And the first step in disassembly here just like the front. We're going to loosen up our ABS line. I have a trim panel removal tool. It's held on with a plastic clip right up here.The next thing we're gonna disassemble is the bottom shock mount. This is held on with a 21 millimeter nut and bolt. We're gonna leave the top in place here and we're just gonna swing this out of the way.So that shock is gonna be good to go as long as you have the ability to do that right there and the mount can pull away from the shock itself. Because we're gonna be lowering that axel tube, you'll be good to go. And with that being said, we can jump to the 4 21 millimeter nuts that hold on our factory U-bolts here. We're gonna remove all those, pull out the U-bolts and the factory lift block.Now I'm just gonna pull that mount out. And then take out the U-bolts as well. Now that we have our U-bolts out of the way, we're just about ready to lower the axel a little bit. But first, we're gonna have to remove this e-brake cable bracket to allow us to get the drop on the axel tube that we need to slide in our new lift block.So now we have our axel lowered. We can pull out this old lift block and we could throw that aside. Now we're going to install our new lift block here and it actually comes in two pieces. There's this tapered shin piece here. That's gonna get installed on the bottom. The taper is going to point toward the front of the truck as well. Now that we have that situated, we could just put that in place. So our lift block is in. we're just going to get our U-bolts around.Then once those are roughly in place, I'm gonna get them started into our bracket on the bottom. Now we could take the washers and 22 millimeter nuts that come in the kit and get those started on the ends of our U-bolt.Now just by looking at this, I can tell these studs are just a little bit too long for my 22 millimeter socket. Especially back here, I think. So what I'm going to do is just tighten these down most of the way and then we're probably gonna take the cutoff wheel and cut these in half a little bit just so I could get the socket all the way up to get these tightened all the way down.Now we're not doing the final tighten right now but whenever you tighten these down, you wanna make sure it's in a cross pattern.And as you could see right there, that nut is just running away from my socket.So what we're going to do now is take the cutoff wheel and we're just gonna cut those U-bolts in half. Just take down that extra that we have here so I can get the 22 millimeter socket onto those nuts to give them the final tighten. Now we're missing one nut on there. That's because I cross threaded it. That's my fault. But it doesn't matter because we're gonna have to cut the cross threaded part off anyway so I'm gonna do that right now.So a couple of things I wanted to hit after we just finished up that first one there. Obviously, good idea for safety glasses at this step. And we won't have to clean that one up because the nuts are already on there. If anyone ever backs that off, it'll just clean up those threads. Obviously, that doesn't apply for this one because I cross threaded it. We're just gonna have to cut that part off and try to thread on the nut. If we need to, we'll break out the tapping bad kit to clean up that cut. But that most likely won't happen.So we have all four of the studs cut. We were able to get this nut started as well with no cross threading so we're just gonna go in and tighten these down. Again, 22 millimeter nuts. And we're gonna tighten these in a cross pattern.Now we can come up with our pole jack. We're just gonna get our shock seated and then we're gonna hit that e-brake cable bracket and the ABS line bracket that we removed at the top.And again, to tighten this shock mount down, it's gonna be a 21 millimeter socket and 21 millimeter wrench.Next is going to be our e-brake cable bracket. And again, that gets tightened down with a 13 millimeter socket. And now we can move up to the top and clip in that ABS line.Now the install for the rear is going to be the same exact thing for the other side minus that e-brake cable which is gonna make it just that much easier. Now after that, once you have this all buttoned up, you wanna take your truck to the alignment shop and make sure everything is nice and straight before you hit the trails. But that's gonna do it for my review and install of the Supreme Suspensions three inch Front, three inch Rear Pro Lift Kit fitting all '07 to '18 Silverado 1,500s. Thank you for watching. Subscribe for more videos like this one and as always, keep it right here at American Trucks for all things Chevy.
Subscribe to our YouTube Channel
Features, Description, Reviews, Q&A, Specs & Installation
Brand | Supreme Suspensions |
Lift Height | 3.50 Inch |
Lift Kit Type | Spacer Lift |
Lift Kit Max Tire Size | 33 Inch |
Lift Kit Includes Shocks | Shocks Not Included |
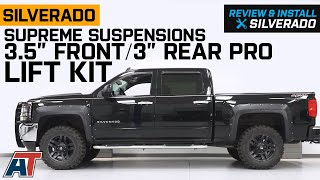
Enhances Off-Road Capability. With the Supreme Suspensions 3.5 in. Front / 3 in. Rear Pro Lift, you’d make your Chevy Silverado 1500, which is already primed for superior off-road performance, even more formidable. The 3.5-inch clearance it provides on the front and the 3-inch clearance it provides at the back keeps the truck’s undercarriage further away from potential damage. And the added aggressive stance gives you a firmer ride that makes you feel like you are in greater control than ever before. All this is achieved without adversely affecting your factory ride quality and comfort.
Durable and Corrosion-Resistant. This lift kit consists of parts that are C.N.C. machined from solid blocks of t6 billet aluminum. So, you can forget about it prematurely wearing out, compressing, or breaking. In addition, it is protected by hard anodized coating, thus keeping away rust.
Installation. Prepare for up to 4 hours for installing this suspension lift kit. You’ll need a car jack to lift the Silverado, as well as a host of home tools to remove parts and get to the suspension.
Covered by a Limited Lifetime Warranty. This kit is warrantied to be free from manufacturing and material defects for as long as you own the vehicle.
Application. The Supreme Suspensions 3.5 in. Front / 3 in. Rear Pro Lift Kit fits all 2007–2018 Chevrolet Silverado 1500 trucks. It is sold as a kit.
Please Note. If you have a Silverado that is equipped with a Factory Lift Block, if you replace the Factory Lift Block with the Lift Block from Suspreme Suspensions, you will not achieve the full 3 inch lift for the rear. You will have more of a 2 inch lift in the rear.
Shop All 3 to 5 Inch Truck Lift Kits
Shop All Truck Parts And Accessories
Shop All Truck Lift Kits
Fitment:
Supreme Suspensions CHSL07FK3530
CA Residents: WARNING: Cancer and Reproductive Harm - www.P65Warnings.ca.gov
Installation Info
Installation Time
(approx) 4 Hours
Difficulty Level:
Mechanical expertise or professional installation required.
What's in the Box
10 More Questions