Talk to a F-250 Sales Tech
1-888-706-1096
M-F 8:30A-11P, Sat-Sun 8:30A-9P
$20K Sweeps! 10 Chances to Win! Enter Daily >

PRO-Series Projector Headlights; Chrome Housing; Clear Lens (11-16 F-250 Super Duty)

Item SD3658
Verify parts fit and get product recommendations.
F-250 Sales Techs: Connect Now M-F 8:30A-11P, Sat-Sun 8:30A-9P
$0.00
Our Price

$544.99 (pair)

FREE Shipping Market Price $627.99 You Save 13% ($83.00) Up to 10% off for Military & First Responders! See Details

Will this fit your Vehicle?

Select a different vehicle Help?
Update or Change Vehicle
Ship to: Ashburn - 20149
Sorry, please enter a valid US or CA postal code
We're sorry, zip can't be updated at this time.
Recommended Install Shops
How It Works
Install Shops are available near Ashburn - 20149

Add Local Shop Installation

Total cost of service $174.99
    Create a list
    Add to New List

    Saved - View your saved items

    We're sorry. We couldn't save this product at this time.

    or use

      Product Videos

      Merideth: So if you like the styling of the factory lighting, but wish they brought a little bit more to the table, these PRO-Series Projector Headlights with the Chrome Housing and the Clear Lenses will be a set to check out for your 2011 to 2016 F-250 Super Duty. Now, this will be an affordable choice for headlights if you're looking to keep the classic OE look, but upgrade the lighting performance, add a touch of style with the daytime running light, and overall, just get a more modernized look for the front end.Now, these headlights will feature projector lenses with H7 series halogen bulbs for both the high beam and the low beam, which will create a very consistent beam pattern for better visibility at night if you're currently struggling with that. These will also feature a large center cutout for your turn signal, but what I really like about this choice is the LED daytime running light that surrounds the lighting on the inside. That's gonna have a switchback feature that will illuminate amber whenever your turn signal is actuated, giving you a little bit of extra styling. Not only will these look good, but these will also be tough for wherever you're taking your truck with an impact-resistant polycarbonate lens on the front, you're getting a very rigid polypropylene housing as well here. Now, this set will even meet DOT standards, so you can have some peace of mind when adding these to your bill.Now when it comes to price, these are going to come in at roughly $600, which isn't bad at all for a new set of upgraded headlights. Now, when comparing these to some other choices, I do like the fact that this keeps the classic look but still offers a little bit more even when comparing to some other choices, considering that this is going to have that switchback function on the daytime running light. Now, if you do take a look at some of the pricier choices, you will usually see some extra bells and whistles like a full LED setup, or even a completely plug-and-play setup, as to where this is going to have halogens and require a little bit of wiring. Now, I personally think if you're willing to compromise a little while still getting some good lighting performance and a totally refreshed look to the front end of your Super Duty, then this is gonna be a great choice.Now, when it comes to install, I did mention that this will require some minor wiring, so I am gonna give it a two out of three wrenches on the difficulty meter, taking you about an hour or so to get the job done with some basic hand tools. And one of our guys in the shop is gonna show you what that process looks like step by step. That wraps it up for me. Let's go ahead and get into the install.Male Speaker: For this install, you will need a ratchet, quarter-inch to 3/8 adapter if needed, an extension, 10-millimeter socket, long flathead screwdriver, wire strippers and crimpers, needle nose pliers or a fuse puller, a fuse tap with buck connector on the end, male and female spade connectors, and some wire. What's up, guys? Today we're gonna be installing some headlights on our F-250, so let's get started.So now that we have our hood popped, our first step is gonna be to remove our grille. And to do that, we're gonna remove the four 10-millimeter screws holding the top of the grille in place using our 10-millimeter socket on our ratchet. And once we have that done, we can go ahead and pull back on our grille a little bit, and it has tabs down at the bottom that you may need to use a long flathead to kind of push down on the tab to get it to release out of its slot. So we have the top of our grille pulled back to show, and we're gonna use our flathead to go ahead and push down on our tab a little just to get that to release. And once you have that released, the rest should pull out, but you can do the same thing for the rest of the tabs, and then your grille should just pop right out. So now we can go ahead and lift our grille up outta place, and set that aside.So now we can go ahead and remove our bottom 10-millimeter screw on our headlight and our two middle ones. And then for this top one, all you have to do is loosen it because it will be slotted just to set it in place. So we'll go ahead and loosen this one first, then we'll go ahead and remove our two middle ones. Now, ours does not have the bottom 10-millimeter screw due to previous removals and installation, but factory, you should have a 10-millimeter belt rate in the middle of your headlight, and you can go ahead and reach that, again, with your 10-millimeter and your ratchet. So next we can go ahead and grab ahold of our headlight, and you want to grab by this top outer edge here because it does have a locator tab up top. And we'll just go ahead and pull that right outta place. And then we can go ahead in here, and unplug our connectors to our headlight, and remove our factory unit. And once you have this done on this side, you can go ahead and repeat the process for the other side.So for this set of headlights, it does come with an LED adapter harness to which we are going to have to do some light modifications, as we are working on our gas-powered F-250. If you're working on your diesel F-250, you will not need to do this as the fuse box and battery are located on the driver's side. But for gas-powered, ours is located on the passenger side, so we need the wire to reach to the driver's side fuse panel. So, what we're gonna need is a male spade connector, as well as a female, as well as a buck connector, and a fuse tap. All of these are available at your local auto parts store for very cheap, but you will need those to access full functionality of this set of headlights. So to extend the gray wire that we need to reach across to our fuse panel, we're gonna go ahead and crimp on our male side connector here, and just give that a few good crimps just to make sure it has a good connection using your wire stripper and crimpers. And once you have that crimped on, you wanna just give it a little tug just to make sure it has a good connection. And if you need to go back and squeeze on it a little bit more, you can.Okay, now that we have that side done, we're gonna take our additional wire that you also need, again, available at your local auto parts store, very cheap, go ahead and strip an end off here. And to this side, we will add our female connector, so maybe a good idea to give your wiring a little bit of a twist so it goes into the connector a little bit easier, and make sure that wire's good and seated. And then, again, go ahead and crimp your connector on, give it a little tug just to make sure it's nice and secure. So then we can go ahead and plug these two sides in. So now we have our harness extended. And to the other end of our wire here, we're gonna add our buck connector that will attach to our fuse tap. So once again, we'll strip off our end, just give it a slight little twist, nothing crazy, allows it to go into the connector easier, make sure that it gets nice and seated. Then we'll crimp this end on, it's good enough to hold it for now.Now we can grab our fuse tap. Now a lot of times these will come with a buck connector crimped onto this end. In our case we didn't have one, so we'll just go ahead and add our buck connector on. And again, we'll go ahead and insert this, we'll go ahead and crimp this side, and give both sides a little tug just to make sure you have a good connection. Now, these are heat-shrink buck connectors, so if you want to heat-shrink them down, give them a nice seal around, you can do that with a heat gun, or even a lighter, or something like that, just give it a few nice little passes with any kind of heat, and they will shrink up through your wire. So now that we have our harness extended, we can go ahead and move onto the truck, and get this part installed.So now we have our harness ready to install into the truck, and then we're gonna come to our battery, and we're gonna start with our positive terminal here. We're gonna use our 10-millimeter socket and our ratchet to just loosen up our terminal nut just enough to slide our connector underneath the nut, seat that in, and then we'll go ahead and tighten that right back down. We can come to our negative terminal and do the same thing, get that seated, and tighten it right back down. So now we come to our driver's side fuse box, go ahead, and pop the lid off, and we are looking for fuse number 50. So that's two away from our relay here, which should be this 10-amp fuse right here. So we'll use our needle nose or fuse puller if you have it, go ahead and just pop that right out. We can install our fuse into our fuse tap here, make sure that's seated nicely, and we'll go ahead and place our fuse tap right back in to where fuse 50 was, [inaudible 00:10:32.697] nice and tight, and pop our fuse cover back on. So now we can route the rest of our wiring down to where our headlights are. We'll drop down our passenger side right there, and we'll route our driver's side over here, and tuck it down into our opening, so then we'll be able to plug it into our new headlight.So before we can go onto the truck with our new headlights, we're gonna need to swap over a few things from our factory housing. So we'll come up here to the back of our headlight, and the first thing is gonna be our marker bulb socket. So we're gonna go ahead and give that a quarter turn counter-clockwise to release it, as well as our turn signal socket. Again, quarter turn counter-clockwise, and it comes right out. Now, for the turn signal, we're gonna leave the bulb in, that's a direct swap over. And for our marker bulb, we're actually gonna remove the bulb from the socket. We are gonna come to our new unit here, and we can go ahead and insert our turn signal socket right into place, and give that a quarter turn clockwise, and that'll go ahead and set it. Now, for our marker bulb where we removed our factory bulb, we're gonna plug in this LED connector, and it can be a bit stiff at first, just give it a good push, and that should seat down nicely. Then we can go ahead and tuck our wiring back in, and seat our marker bulb socket again with a quarter turn clockwise. So once we have all that done, we can go ahead and do the same thing for the other headlight, and then we're ready to move on to the truck.So now we're gonna go ahead and make all of our connections, and we're gonna start with our white wire and male end of our bullet connector to go into the female side of our harness. Go ahead and get that in place. And then we can go ahead and take our female end of our conversion harness and plug that directly into our turn signal bulb here, and take the male end and go into your factory end of your turn signal bulb here. And then we'll get our other connector here, our black one. And lastly, we can connect our marker light socket, there we go. And once we have all those connected, we can go ahead and set our headlight in place, and it does have these locators here at the upper right to go in these slots. Go ahead and slide that in, go ahead and set that. We can go ahead and put our two 10-millimeter screws back in our middle brackets here using our 10-millimeter socket and our ratchets. And then you would want to go ahead and put your bottom 10-millimeter screw in, again, ours does not have it due to previous modifications. And then once you have that in, we can come to the top here and tighten down our last 10-millimeter screw. And once you have your other three screws in place, we can come up top here and tighten down our last 10-millimeter screw. And once you have this complete on this side, you can go ahead and repeat this process for your other headlight.Now we can go ahead and reinstall our grille. So we'll just line this up with our bottom mounting tabs here, slide that into place, and clip our tabs back in on the bottom. And once we have that done, we can go ahead and reinstall our four 10-millimeter screws at the top of our grille using our 10-millimeter socket and ratchet. Then once you have this done, you can go ahead and clean up your wiring for your harness, whatever you'd like to make it your own, zip tie it up outta the way, just make sure it's out of the way of any hot rotating parts or anything like that, just to make sure there's no damage to your harness.All righty, guys, that about wraps up our review and install of our PRO-Series Projector Headlights and Chrome Housing with Clear Lenses for your '11 to '16 F-250 Super Duty. Thanks for watching, and as always, for everything F-250, keep it right here at americantrucks.com.

      Product Information

      Features, Description, Reviews, Q&A, Specs & Installation

      Features & Specs

      • Projector-Style Headlights
      • Increases Road Visibility and Front-End Conspicuity
      • Progressive Design
      • Employs H7-Series Halogen Bulbs for the High and Low Beams
      • Impact-Resistant Polycarbonate Lens
      • Rigid Polypropylene Housings
      • Chrome Housing Finish with Clear Lenses
      • Features with Switchback LED DRLs and Sequential Turn Signals
      • Meets DOT Standards
      • Efficient Installation
      • Sold as a Pair
      • Fits All 2011-2016 Ford F-250 Super Duty Models

      Description

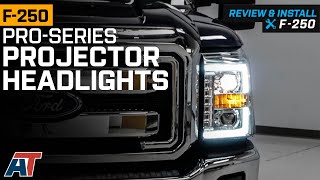
      Progressive New Style and Function. If you’re looking to upgrade your Super Duty’s front end style and function, these PRO-Series Projector Headlights; Chrome Housing; Clear Lens are the way to go. These headlight assemblies combine a progressive design and a chrome finish to give your truck a fresh look that’s both familiar and new. Additionally, these headlights are designed to project light in a more focused manner courtesy of projector-style lenses. This setup increases driving visibility in low light and nighttime conditions, improving safety.

      Vivid Halogen Lights. These headlights employ H7 halogen bulbs for the high and low beams to give your truck vivid illumination, especially when combined with the aforementioned projector lenses. What’s more, these components feature switchback LED daytime running lights (DRLs) and sequential turn signals that help make your truck more visible to other motorists. This is especially helpful when you have to make emergency stops along the road.

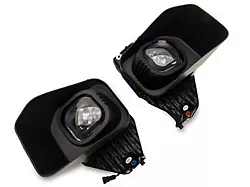
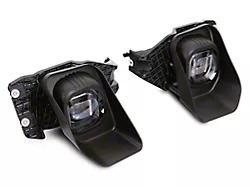
      Rigid Build Quality. The headlights’ lenses are constructed from high-grade polycarbonate that’s also treated with an anti-fog and anti-oxidation coating. These features make for lenses that are extremely durable and efficient in optimizing light output. Additionally, their housings are made from high-grade polypropylene featuring a classy chrome finish on their outside-facing surfaces. Finally, these housings are completely sealed together with the lenses, providing ideal all-weather performance.

      Efficient Install Procedure. These projector headlights install efficiently into your truck’s factory headlight locations. No drilling or modifications to your truck are needed. However, some wiring may be needed to connect the DRLs and sequential turn signals with your truck’s electrical system.

      Meets DOT Standards. These headlights meet DOT standards FMVSS-108. This factor makes them completely street-legal.

      Application. These PRO-Series Chrome Projector Headlights fit all 2011-2016 Ford F-250 Super Duty models.

      Bulb Application. These headlights use H7 halogen bulbs on both the high and low beams.

      Fitment:

      CA Residents: WARNING: Cancer and Reproductive Harm - www.P65Warnings.ca.gov

      Installation & What's in the Box

      Installation Info

      What's in the Box

      • (2) Headlights - Driver and Passenger Side
      4.6

      Customer Reviews (122)

        Questions & Answers

        10 More Questions