


Installation Time
(approx) 1 Hour
Difficulty Level:
Light to Moderate mechanical skill required.
Installation Guides
No guide available for this part yet.
 FREE 1 to 3-Day Delivery on Orders $149+ Details

$379.00 kit
CONFIRM THIS FITS YOUR VEHICLE!
Saved - View your saved items
We're sorry. We couldn't save this product at this time.


Airaid PowerAid Throttle Body Spacer (14-26 5.3L Silverado 1500)
 478
478
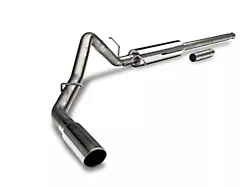
C&L Single Exhaust System with Polished Tip; Side Exit (14-18 5.3L Silverado 1500)
 251
251
J&L 3.0 Oil Separator; Black Anodized; Driver Side (14-18 V8 Silverado 1500)
500+
Features, Description, Reviews, Q&A, Specs & Installation
| Brand | S&B |
| Cold Air Intake Type | Cold Air Intake |
| Tuning Requirements | No Tune Required |
| Cold Air Intake Tube Material | Plastic |
| Cold Air Intake Filter Type | Dry |
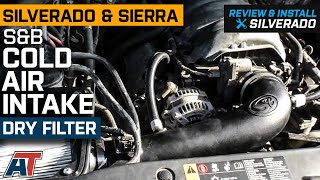
For Improved On- and Off-Roding Capabilities. If your 5.3L Chevrolets Silverado 1500 needs more power to tackle the toughest driving conditions, then replace its factory cold air intake with S&B's Cold Air Intake with Dry Extendable Filter. This high-quality cold air intake system is crafted to increase your truck’s airflow by 40.16%, increasing your vehicle’s horsepower and torque gains as a result. Plus, it can efficiently keep your Silverado 1500’s engine clean and cool, allowing you to take on the most challenging terrains with greater peace of mind.
No Tuning Needed. This Cold Air Intake System features a properly mapped Mass Air Flow Sensor, which means it’s already calibrated to run with stock or enhanced setups. Thanks to this, you won’t have to re-tune or check your engine’s lights once the product is installed.
Uses a Dry Extendable Filter. S&B's Dry Extendable Filter is designed to keep contaminants away from the engine while providing a cooler airflow. It’s also made for easy cleaning, so you can extend its service life by simply blowing it out with compressed air.
Comprised of Durable and Long-Lasting Components. This Cold Air Intake is specifically designed to keep up with your extreme driving needs. It features a heavy-duty airbox that protects the air filter from engine heat, as well as a durable intake tube that can handle massive airflow levels. What’s more, it comes with an airtight seal that won’t degrade over time, so you can rest assured that you’ll gain increased power and performance no matter where you take your truck.
A Hassle-Free Installation. All of the system’s necessary hardware is included in the kit, so installing it will be an easy task. In fact, the entire procedure will take no more than 2 hours to complete.
S&B's Million-Mile Warranty. A million-mile warranty is included with every Cold Air Intake with Dry Extendable Filter sold. Visit S&B's website to get more details on the warranty’s terms, conditions, and exclusions.
Application. S&B's Cold Air Intake with Dry Extendable Filter is compatible with all 2017-2018 5.3L Chevrolet Silverado 1500 models.
Shop All Truck Parts And Accessories
Shop All Cold Air Intakes For Trucks
S&B 75-5116D
CA Residents:  WARNING: Cancer and Reproductive Harm - www.P65Warnings.ca.gov
Installation Info
Installation Time
(approx) 1 Hour
Difficulty Level:
Light to Moderate mechanical skill required.
Installation Guides
No guide available for this part yet.
What's in the Box
