Talk to a F-150 Sales Tech
1-888-706-1096
M-F 8:30A-11P, Sat-Sun 8:30A-9P
$20K Sweeps! 10 Chances to Win! Enter Daily >

Roush Performance Power Pac; Level 2 (15-17 5.0L F-150)

Item T539666
AmericanTrucks no longer carries the Roush Performance Power Pac; Level 2 (15-17 5.0L F-150). Please check out 1997-2003 Ford F-150 Power Packages for an updated selection.
Verify parts fit and get product recommendations.
F-150 Sales Techs: Connect Now M-F 8:30A-11P, Sat-Sun 8:30A-9P
$0.00

    Product Videos

    Hey guys, Joe, from American Trucks, and today we're going to be working with the Roush Performance Power Pac-Level 2, fitting all '15 to 1'7 5.0 F-150s. Something like this is going to be perfect for the F-150 owner who might be new to modding their truck. They're starting from scratch and they're looking for a baseline set of reliable mods. This kit is going to include a Roush 304 stainless exhaust, intake, and tune voucher. So, we're going to start our video here diving into the exhaust. It's made out of 304 mandrel bent stainless steel and features an awesome set of dual slash-cut 4-inch tips that are both embossed with the Roush logo. Right smack dab in the middle we have Roush's straight-through muffler design, which is going to severely enhance our sound. That mandrel bent tubing is also going to promote the smoothest exhaust flow possible by ensuring that the walls of the tubing are smooth throughout the length of the bend. That 304 stainless is also going to ensure that this kit is looking good and making noise for years to come.As you guys just heard, this is not going to be your sleeper exhaust kit. It easily gets a four out of five on our wake-the-neighbor scale. Up next, let's talk a little bit about our new Roush cold air intake. It's going to have a reusable high flow dry filter and features a nice open box design that looks good in the engine bay of our F-150 here, but it also allows you to keep a close eye on that filter if you do need to take it out to clean it off and then put it right back in. Another really nice thing about that cold air intake and a feature that I personally really like here is that it keeps that factory Ram air scoop, which is going to allow your engine to be fed with the coolest air possible, cooler air is more dense with oxygen. More oxygen for the engine to burn is what's going to give you those horsepower numbers.So, let's get down to the good stuff here, the meat and potatoes in my opinion of this kit, the tune voucher. Now, what this is going to do is remap the shift points on your F150 and allow the engine to advance in timing just a little bit, which is going to lead to a more sporty driving feel. Now, one thing I wanted to stress right up top with the tune is this is not going to be a tuning device. This is going to be what's called a tune voucher. So, what that means is you're going to get a little slip of paper in the box with these parts. You would take that and your truck to a Ford dealership, or even better, a Roush-authorized Ford dealership. They would have the hardware and software needed to get your truck up to date with a tune to better take advantage of these mods we have on the truck here.Now, one thing about the mods, these are not tune-required mods, so you can easily install them on your truck, head over to the Ford dealership, no problem, have them reflash the engine, and be good to go. Another great thing about the software specific to the power pack too, is this is going to allow you to run anywhere from 87 octane fuel all the way up to 93. Now, you're only going to see the best gains with 93, but if you're in a pinch, you're at a gas station, for instance, that only offers 91, this is going to allow you to run whatever you want.So, at this point, you're probably wondering what I have hiding underneath the rear wheels of our F-150 here. So, let's get down to the numbers. We saw horsepower gains jump from 324 all the way up to 339. And we saw torque jump from 333 all the way up to 354. That's peak gains of 15 horsepower and 21 torque, and curve gains of 18 horsepower in 22 torque. Based on that, pretty good gains, to be fair to the truck, those are wheel numbers. And also when we got this thing, it did have about a third of 87 in the tank, which we did top up with 93. So, not the best fuel mixture there. I'm sure if we had a nice fresh tank of 93, this would have performed even better. While we're on the topic of gains, two giant things to mention here, with a name like Roush, you could be assured that these are reliable gains. Roush even offers an optional three-year 36,000-mile powertrain warranty to back these parts up. They're also going to be CARB-certified gains. So, if you live in one of those more emissions-restricted States, this will come with a CARB sticker to ensure that you'll pass inspection every time.Pricing for the Roush Power Pac-level 2 is going to come in at around 1500 bucks. Now, that is a pretty big chunk of change here, but you're really establishing a great baseline for any '15, '16 or '17 5.0 F-150. Again, if that was a little bit too much, you can always pick these parts up individually on our website, americantrucks. Install isn't going to be too difficult here either. We're looking at an easy two out of three wrenches on our difficulty meter. It is a little bit time consuming, but it should only take you about three hours to get this hooked up to your truck. So, without any further ado, let me show you what tools you need and how to get this installed on your truck.Tools we use for this install are going to be an impact, U-joint, ratchet, breaker bar, extensions, a basic socket set ranging from 24 millimeters all the way down to 8 millimeters, PB blaster and a rag, trim panel removal tool, dead blow hammer. And if you have anything other than a SuperCab with the 8-foot bed, you will need to make a cut to your inlet pipe on the exhaust. For that, we use safety glasses, a tape measure, Sharpie, and a die grinder to deburr. Obviously, also not pictured in this shot, is going to be the saw.So, for the first step here, obviously, we have to get our factory stuff out of the way. Now, that is going to be pretty easy. We're going to start with these two bolts on this flange right here. They're 13 millimeters. I'm also going to use a U joint to make those a little bit easier to get at. Now, with those two bolts removed, the only thing that's going to be holding our exhaust onto the truck is going to be the rubber hanger isolators. We're going to spray those down with some spray lubricant, then take a pry bar and drop this whole exhaust out in one piece since we're on a lift. If you are working on the ground, you might need to use a saw to cut this up into little pieces to get it off your truck.Now, if these do fight you like the last one we removed, you can hit these with some penetrating oil or spray lubricant as well. There are three rubber isolators that we're going to lubricate. One in front of the muffler here, one behind, and one on the tailpipe. Now, with all those hangers lubricated, give them a minute or two to soak in, then you should be able to push straight back on this exhaust and drop the whole thing outSo, with our factory catback off the truck, I just wanted to put it next to our new Roush exhaust and point out some of the key differences. And we're going to start up here at the inlet pipe and work our way down. And the first improvement is going to come in terms of diameter. We're ditching this factory 2-1/2-inch diameter piping in exchange for Roush's 3-inch diameter. And again, our Roush kit is 304 stainless throughout. That brings us to our resonator, which we're completely ditching in exchange for a straight-through pipe. From there, we continue with our 3-inch diameter inlet pipe, and that brings us to the muffler. We're ditching this big restricted factory muffler in exchange for Roush's polished straight-through muffler, which, just like the resonator, is going to severely enhance our sound. From there, we continue with our 3-inch diameter piping into the over axle pipe and onto our tailpipe, which is going to split into two. And we're going to end in some awesome chrome 4-inch slash cut tips, both embossed with the Roush logo.So, now we're ready to install our new Roush exhaust, but before we head back to the truck, there is one last thing we have to take care of. And it's regarding that inlet pipe. Out of the box, our Roush kit is tuned to fit on the longest wheelbase F-150, which is going to be the SuperCab with the 8-foot bed. If you have anything shorter, you will have to make a trim to that inlet pipe, but there is a helpful reference with each wheelbase and the corresponding length that inlet pipe has to be trimmed to in the install guide. And since we're working on a SuperCrew with the 6-1/2 foot bed, we're going to grab our inlet pipe and head to the saw. And at that wheelbase, we'll be trimming our inlet pipe to 54 inches in total length.Now, after the saw your pipe will probably have a little bit of a burr on it. I'm just going to use a sanding wheel to grind that away. So, our inlet pipe is all cut and ready to go up on the truck, but there is one last thing I'm going to do on the ground just to make it a little bit easier on myself, and it would make it easier on you as well. I'm going to install this coupler pipe here, tighten that clamp down with a 15-millimeter socket. This is just going to prevent us from working in opposite directions here, once this is up on the truck.So, now, we have this one big assembly and this can go right up onto the truck. I'm going to get it started in that rubber hanger, and then bring it up to our factory flange here, and tighten it down with the factory 13-millimeter hardware. Now, as far as these bolts go, and this is going to apply to the rest of the hardware in the kit as well, I'm only going to snug these up for now. That's going to give us some adjustments when we need some wiggle room at the end of our install, to make sure everything's seated correctly. Then we'll come back and give these the final tight.Next up is going to be our muffler. This is going to secure with another 3-inch clamp, and we're going to snug that with a 15-millimeter socket. And just to give us a little bit more clearance, I'm going to turn this up and out of the way. Next up is going to be our over axle pipe. And now, this is going to get a clamp of its own, obviously, but before we go and put this in place, we're actually going to drop down this hanger right here next to our spare tire. Reason being, it's difficult to get this installed with the spare tire in place. We're going to use a 10-millimeter socket to drop that hanger out, we're going to install it on the over axle pipe on the ground, then get this seated, and reinstall that hanger.The next step in our installation here is going to be this tailpipe. Now, there is a special step required to get this installed. If I mock it up, you can see that we have a hanger here with no isolator for it to go into. And in my other hand, I actually have the new hanger supplied by Roush. It's going to get installed under this leaf spring bolt right here. Thankfully, it is notched. So we only need to loosen that up and slide this underneath. Now, we're going to loosen it up with a 21-millimeter socket on this side and a 24-millimeter socket on this side. Now, one thing in particular about this bolt, you don't want to tighten it down until the vehicle is on the ground and under its own weight. Otherwise, if you do it before that, you might be tearing this bushing right here. So, again, we're going to loosen this up, get this all in place, and then wait to tighten that down near the end of the install. Now, as I'm getting the tools in place. One thing about this bolt here is it is underweight right now. So, as we loosen it up, this leaf spring is going to jump. So, just make sure you clear the tire.Now, thankfully, that loosened up toward us. But if that does loosen up toward the inside of the truck, you can easily just put a pry bar in through this hole here and push the whole bolt toward the outside of the truck. But once you have enough room in there for your new hanger, you can get it installed on your tailpipe as well as the last 3-inch clamp in the kit and get it in place. And for the last step here, we're going to use our two smaller clamps to get our tips in place. So, now the exhaust is hung on the truck and roughly held in place. Now's the perfect time to make any adjustments as needed, then you could run through and tighten down all the hardware. Again, all the clamps are 15 millimeters, the factory hardware up by the flange at the inlet pipe is a 13-millimeter, the hanger we removed is 10-millimeter, then we're going to lower the truck, and very crucial component here, hit that leaf spring bolt. That's a 21, and a 24-millimeterAnd now we're back on the ground for our leaf spring bolt. Now, with the exhaust all buttoned up, we can now turn our focus toward the intake and first things first, obviously, we need to get our factory stuff out of the way. So we're going to be loosening up that clamp around the throttle body using a small extension and a 7-millimeter socket. There's a couple of breather hoses we have to disconnect as well. Then we're going to unclip the top half of our airbox to start and pull out the top half. With the intake tube now disconnected from the throttle body. We can focus on these three hoses right here, one here, one here, and one here. Starting here, pull up on this. I'm just going to get it fed around that soundbox there, just to get it started. Next up for this one, there's a release tab on the bottom. You push in on that, up and then back, that should release. And then you can pull straight out on that one. And as far as this one goes, this just has a black release tab right on top. Push straight down and pull right out.Next up is going to be the airbox lid that's held on with these two clips right here, pull straight back, they'll release, and then you can pull out the top half and the intake tube. And also, obviously, the paper filter. From here, we have to remove the bottom half of the airbox as well. And this Ram air scoop is attached to the bottom half. So we're going to use a trim panel removal tool to get these two push pin clips out of here. And then there's a 13-millimeter bolt on the lower portion of the airbox that we're going to be with moving as well. And that bolt we need to remove is right here along the fender, right in front of the driver side hood strut. At this point, pull straight up on the box and Ram air and it should come right out.Now we can move on to the table and start building up our new Roush cold air intake. And we're going to start with these two fittings right here and right here, but first, we need to install the grommets. You want to make sure that the tapered edge on those is toward the inside of the intake tube. So, next, we're going to take the other rubber grommet and install it in our intake tube. Now we can press our two fittings. Now, you want to make sure you get this right when you press these in, they are barbed so they're pretty tough to get out. This end is going to be the throttle body side, and you want the bigger fitting to go closest to that. This smaller fitting is going to go toward the airbox. Now, if you do have some trouble getting these seated in the grommet, a little bit, and just a little bit of WD-40 will help immensely. Now, for now, this is all we're going to need to do to the intake tube. We're going to join this up with the airbox in just a second.So, let's get started on the airbox. We're going to start with this rubber seal, that starts at the top wraps all the way around and ends right back up top. And it looks like they do give you a little bit extra. So, I'm just going to use my knife to trim the rest of that off. All right, so now we have our seal in place. We're going to grab our filter coupler and the 10-millimeter hardware included in the kit and install this on the box as well.Next, we're going to grab our air filter and the largest band clamp in the kit and get that installed. You can see on the face of the filter here, there's an arrow pointing down, just make sure that's pointing toward the bottom of the box. All right. So, once that pops into place, you can tighten down that clamp with an 8-millimeter socket. So, next, we're going to take this large rubber coupler here, and two band clamps, and conjoin our intake tube with the airbox. And just like the band clamp on the filter, I'm going to tighten those down with an 8-millimeter socket. Now, a couple of things I'm watching out for here. You want to make sure that your throttle body is going to be oriented to line up with the intake tube. And also, I hid some of the hardware on the band clamp on this side of the intake tube. Cleans up our engine bay a little bit nicer. I won't be able to do that for the throttle body, but it'll look good up here. I'm going to do the same exact thing for the throttle body side, and obviously, leave one of the clamps loose to go around your throttle body.So, there's one last thing we need to prep our new Roush cold air intake, and that's this factory Ram air scoop. That's going to get transferred over to our new airbox. To get that off, we're going to be removing this 8-millimeter bolt right around here, and then transferring all of the hardware over and securing it with that same 8-millimeter bolt. With that bolt out of the way the Ram air is just held in with some clips, pull straight out, and this should come with you. And like I said earlier, this guy right here is the same 8-millimeter bolt from the factory one.So, we're ready to head back to the truck with our new Roush intake. But before we do, I just wanted to put it on the table next to our factory intake and point out some of the key improvements. And the first one is obviously going to come in the looks department, we're ditching this factory closed box design in exchange for Roush's open box. That's going to give you a couple of benefits. Number one, when the hood's closed, that's going to create a nice seal around your filter, shielding it from any warm air in the engine bay. When the hood's open, it's going to allow you easy access to that filter, which is washable and reusable. It's also a dry filter, so you don't need to oil it. When you do clean it and reuse it, take it out, clean it off, put it right back in. You'll also be saving some money on filters.Speaking about that filter, obviously, what we're all worried about here with something like this is going to be performance, and it should also give you a nice upgrade in terms of flow over that factory paper filter. Another great thing about this kit that I personally really like is it reuses this factory Ram air scoop right here, which makes sure that filter is fed with the coolest air possible. Cooler air means denser air, more oxygen for the engine to burn. That's what creates power. Moving down the intake, we're also ditching this factory soundbox right there. Now, all that's there for is to cut down on a little bit of induction noise and quiet down the truck. Without that on there, we're definitely going to hear some more induction noise. And with the loss of that, it'll probably help clean up some turbulence as well.So, we're going to need our factory hardware to secure the airbox and Ram air intake, as well as that 8-millimeter socket for our throttle body plant. We can take this over to the truck and drop in our new Roush intake. So, before we get started with our intake, there is one last thing we need to do in preparation to drop that in. We're going to scavenge this bushing and the 13-millimeter bolt that was securing our airbox before, we're going to tighten that down now, and since our Roush airbox is slotted, we can tighten that all the way and then just drop our Roush airbox on top of it.So now we can grab our intake, feed it underneath that one hose, and get this in place. With everything lined up, give the box a firm push down, and you should hear it click into place. From there, we can move to our Ram air scoop and reinstall those two push pins from earlier. Now we're going to push back in these two breather hoses. For the last step of our install here, we can push the intake tube onto our throttle body and tighten that clamp down with an 8-millimeter socket.And that is going to do it for my review and install of the Roush Performance Power Pac-Level 2, fitting all '15 to '17 5.0 F-150s. Thank you for watching. Make sure you remember to subscribe for more videos like this, and all things F-150.

    Product Information

    Features, Description, Reviews, Q&A, Specs & Installation

    Features

    • Produces a Sporty, Aggressive Sound
    • Drastically Enhances Cold Air Flow
    • Improves Torque and Horsepower
    • Increases Throttle Response
    • Cat-Back Exhaust Design
    • Three Inch Mandrel-Bent, T304 Stainless Steel Tubing
    • Four Inch 304 Stainless Steel Tips
    • Features Cold Air Intake
    • Comes with Reusable High Flow Filter
    • Straightforward Installation
    • CARB EO Number: D-418-28
    • Fits All 2015-2017 5.0L Ford F-150s

    Description

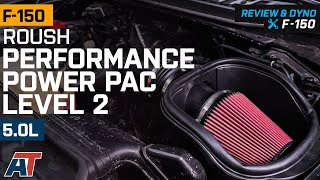
    Sporty Sound. If you're looking to match your 2015-2017 5.0L Ford F-150's sound to its impressive performance, look no further than Roush's Power Pac Level 2. This impressive kit contains a high-end cat-back exhaust system that adds a sporty, yet aggressive sound to your truck that will ensure your F-150 turns heads wherever you decide to venture.

    Hardcore Performance. Not only does this kit offer a dramatic boost in your truck's noise, but it also upgrades its overall performance by utilizing the exhaust system and the included flash pack voucher and cold air intake to enhance the cold air flow. This, in turn, dramatically enhances your truck's torque and horsepower, as well as its throttle response for a drive that can't be beat on the trails or in the streets.

    Stainless Steel Construction. This kit's exhaust system is created from non-tarnishing, 3 inch mandrel-bent T304 stainless steel tubing and features 4 inch, 304 stainless steel tips with a bright chromed finish that are guaranteed to add a high-end accent to your truck's superior look. The kit also features a heavy-duty flash pack voucher as well as a textured black air box/heat shield that is injection-molded from tough polyethylene and a hardcore cold air intake that comes with a reusable high-flow, high-strength filter.

    Installation. Installing this kit takes about 3 hours from start to finish. Those with moderate mechanical skills will have no problem with the installation.

    Application. Roush's Power Pac Level 2 is created to perfectly fit all 2015-2017 5.0L Ford F-150s.

    Shop All Truck Parts And Accessories

    Shop All Truck Engine Parts And Accessories

    Shop All Truck Performance Power Packages

    CA Residents: WARNING: Cancer and Reproductive Harm - www.P65Warnings.ca.gov

    Installation & What's in the Box

    Installation Info

    What's in the Box

    • (1) Cold Air Intake
    • (1) Flash Pack Voucher
    • (1) Pipe and Flange
    • (1) Front Inlet Pipe
    • (1) Muffler
    • (1) Over-Axle Pipe
    • (1) Y Pipe for Tips
    • (2) Exhaust Tips
    • (1) Exhaust Clamp Kit
    • (2) Tip Clamps
    • (4) Pipe Clamps
    • (1) Y Pipe Hanger Bracket
    4.8

    Customer Reviews (24)

      Questions & Answers

      10 More Questions