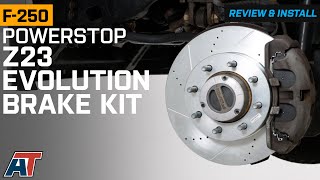
Talk to a F-250 Sales Tech
1-888-706-1096
M-F 8:30A-11P, Sat-Sun 8:30A-9P
$20K Sweeps! 10 Chances to Win! Enter Daily >

PowerStop Z23 Evolution Sport 8-Lug Brake Rotor and Pad Kit; Front and Rear (13-22 4WD F-250 Super Duty)

Item SD4072
Verify parts fit and get product recommendations.
F-250 Sales Techs: Connect Now M-F 8:30A-11P, Sat-Sun 8:30A-9P
$0.00
Our Price

$1,436.31

FREE Shipping Market Price $1,651.76 You Save 13% ($215.45) Up to 10% off for Military & First Responders! See Details

Will this fit your Vehicle?

Select a different vehicle Help?
Update or Change Vehicle
Ship to: Ashburn - 20149
Sorry, please enter a valid US or CA postal code
We're sorry, zip can't be updated at this time.
Recommended Install Shops
How It Works
Install Shops are available near Ashburn - 20149

Add Local Shop Installation

Total cost of service $349.00
    Create a list
    Add to New List

    Saved - View your saved items

    We're sorry. We couldn't save this product at this time.

    or use

      Product Videos

      Jake: Jake here for AmericanTrucks. In this video, we're taking a look at the Power Stop Z23 Evolution Sport Front and Rear Brake, Rotor, and Pad Kit, fitting 2013 to 2022 F-250 Super Duties.Brakes are some of the most important components of your truck, especially if you're really using yours. This all-inclusive kit is gonna be the right setup for a Super Duty owner who daily-drives and maybe does some light off-roading or hauling with their truck and is looking for an affordable upgrade over the stock brakes. There are a few places on my own vehicles where I really make doubly sure to spend the money and get the good stuff, and brakes are one of those places.I've personally run PowerStops on several of my own vehicles now, and while this video is not sponsored by them, the brakes are always impressive, and I feel it's worth noting, especially when you compare them to your stock brakes. And brakes is all that PowerStop does, so you can be sure that these are gonna be more than up to the task.So let's start with the most obvious difference from your stock brakes, and those are gonna be the rotors. These are obviously of the drilled and slotted variety. Despite being the same diameter and size as your stock brakes, these are gonna be much better at dissipating heat than your stock solid rotors. Keeping heat off of brakes is really important. There's nothing scarier than cresting a hill, only to feel the pedal go all squishy because brakes got hot.So these channels and the holes in the faces of the rotor are gonna help channel that heat off of the rotor and away from your pads. You also have central vanes here too, so everything has plenty of places through which to escape. Those channels and holes are also gonna help get rid of moisture, so if you're driving in a heavy rainstorm or something like that, water's not gonna sit on these and you don't have that weird initial nothingness when you press the pedal after you've been driving for a while.Now, rotors are, of course, super important, but your braking system is only gonna be as strong as your pads. Now, in this kit, you get a set of PowerStop's Z23 Evolution Sport Pads. These are made using a proprietary carbon fiber ceramic compound that only PowerStop uses. These are also gonna be really good at dissipating heat while maintaining everyday drivability.They feature chamfered edges and they're thermal scorched for a faster break-in. You also get rubberized shims on the back here to help keep noise at bay. Now, lots of uprated brake pads lead to a compromise when it comes to regular use, such as when you're just driving around town with the family.Sometimes that might be in braking feel or it might even be in noise. So the initial bite may come on a bit later than it did with your stock brakes, or they might make more noise, or they produce a ton of brake dust, despite good initial bite. However, that is not the case here. There is virtually no compromise in brake performance or feel, and in fact, PowerStop claims that these are nearly dust-free.Now, let's be honest, no brake is gonna be entirely dust-free due to the nature of how they work. But I can tell you from experience, these are a super low-dust formula. It's gonna help keep your wheels a lot cleaner, which is especially nice if you've got some cool aftermarket wheels on your truck, or if you're like me and you just can't stand cleaning wheels at all.Jumping over to talk about construction, the rotors we were talking about earlier are made using G3000 metallurgy. So that is just a fancy way of saying that this has a higher percentage of carbon in the metal itself. And like the vanes and holes in the face of the rotors that we talked about earlier, that composition is extremely helpful in dissipating heat. As you can see, the rotors also have a really nice silver-zinc plating over top of them, which is gonna help prevent against rust and corrosion.So these are gonna look as good as they perform for a long time. The pads, again, as we were talking about earlier, use that proprietary carbon-fiber ceramic compound that's designed for, again, excellent heat dissipation, consistent performance and feel, and low dust. Now, what other thing that we have included here are new shims and new boots for your caliper sliders.PowerStop includes all-new premium stainless-steel hardware in these kits. So short of brake lines and calipers, this has got basically everything you need for a total brake overhaul. And it's all high-quality stuff as well. So you're getting good value for your money.Speaking of which, about the only compromise here, in fact, is gonna be the price. Coming in around $1,100. No, this is not exactly an inexpensive kit. However, good brakes rarely are, and this is not a place you wanna skimp if your truck sees a lot of usage.Now, it's worth reiterating that there is a lot of good science and technology baked into the rotors and pads. Plus, again, this comes with everything you need to get the job done to improve the braking performance on your truck. And it's one of the less expensive ways to get drilled and slotted rotors and upgraded pads on your truck as well.So for $525, it's really a pretty good value for a kit like this. You're getting something that's really nice quality that doesn't break the bank with a focus on quality and heat dissipation and a lot of good science and R&D baked in behind it.Now, that said, if you've got some seriously upsized wheels and tires on your truck, or if you're doing really heavy-duty off-roading or towing, it's worth your while to check out a bit more of a heavy-duty setup. And we do have an option, specifically one from PowerStop and a few others as well on our site.So if you put your truck through the wringer on the regular, that might be a better option for you. But for a truck that sees a good mix of daily driving use, plus some light hauling and towing, this is gonna be a nice upgrade over your stock brakes without compromise that you really should consider.Installation is gonna come in at a two out of three on the difficulty meter, and getting all of this stuff installed is definitely a job you can accomplish at home. Expect it to take you around three hours to complete, and even if you've never done brakes before, this really isn't a difficult job. Just requires some time and patience, especially when you're doing these rears. These guys are super hefty. But it is well worth the time and energy to do this job yourself, and it's very satisfying when you get it done and hit the pedal for the first time.Now, one thing I will caution you all about is that you're gonna wanna make sure you follow the break-in procedure or the bed-in procedure for these pads and rotors. Now, it is written right there on the box, and we'll talk about it a little bit more as we get into the install. But just make sure that you do that, so that way everything is gonna function as intended. With that, though, not much more I can say. So let's hand things over to the guys out in the shop, and they'll show you how to get this installed on your Super Duty.For this install, you will need an impact, a ratchet, 16-millimeter, 21-millimeter, and 24-millimeter sockets, a caliper hanger tool, a bungee cord, various hammers, a breaker bar, a small pry bar, and a caliper compressor tool, and also not shown here is a jack and jack stands. What's up, guys, today we're gonna be doing some brakes on our F-250, so let's get started.All righty, guys, so we're gonna start off by removing our caliper bolts to get it off the bracket. And for that, we're gonna use our 16-mil socket on our ratchet, and we'll go ahead and pop those off. Start here with our bottom one. Sometimes you got to break it loose. Before we pull this one all the way out, we wanna break our other one loose as well. Then as we pull our caliper off, we're gonna set our caliper hanger tool up here on our spring. It's gonna hold the weight of the caliper so it's not on our line. Then we can support our caliper and pull these bolts out. Set those aside. We can go ahead and pull our caliper off of our bracket.Sometimes these things can get a little stuck, so we may need a small pry bar. So we'll go ahead and grab that. We'll go ahead and work this off of here. And remember to always support your caliper. You don't want this just flying off. Go ahead and pop this off. Then we'll hang our caliper on our hanger. We may need to bring that up a little bit.Once we have that off, we'll come to our caliper bracket bolts here. So after we have our caliper removed, we can go ahead and pop our pads out. Those are just gonna push out like so. We can do the same thing for our outer pad here. Set those aside.Now we can go ahead and come to our caliper bracket bolts. So we'll grab our 21-mil socket and go ahead and pop those off. So we'll go ahead and use a breaker bar first to get these loose. Once we have them loose, we'll go ahead and switch out to our ratchet. Pop that one out. Now we'll support our bracket as we get this upper one off. You may need to move your caliper a little bit. Once we have that out, we can go ahead and pull our bracket off and set that aside.So a lot of times from factory, if these rotors have been on for an extended period of time, a lot of miles, and especially where we live in the northeast, we get some salt and rust, they do tend to get kind of stuck on the hub. So what we're gonna do is grab one of our lug nuts. We're gonna thread that on to one of our studs here. That's just gonna prevent the rotor from flying off as we hit it with our hammer.So what we're gonna do is take our ball-peen hammer first and tap around the hat of our rotor just to kind of help shock that corrosion into breaking free around the hub here. Then we're gonna take a dead blow, kind of smack it from behind here as you don't wanna damage your rotor surface if you do plan on saving these or keeping them as spares if they're not bad as it is. So we'll go ahead and tap this first, see what that gets us, switch out to the dead blow, and give it a few smacks.So, again, you only wanna hit the face of your rotor with a dead blow mallet that's not gonna damage it at all. And we can even try hitting it from the backside. You just don't wanna hit your slash, your dust shield, or anything. So now that we have that loose, we'll go ahead and pull our lug nut back off. Then we can slide our rotor off and set it aside.So now that we have everything apart, we can go ahead and start by installing our new rotor. So go ahead and slide that onto our lug studs. Then what we're gonna do is grab one of our lug nuts, run that back on. And this is gonna help keep the rotor straight, make for an easier install if everything is lined up as best you can have it. Just remember to take that off before you try to put your wheel back on or obviously, you won't be able to get it off.So we've gone ahead and replaced our clips for our new pads. Now, again, these just pop right off. The old ones, just pull them right off. And the new ones are just gonna go ahead and pop right back on. They're simply just clipped into place like that. Just make sure they get fully seated like so. You wanna make sure these ears that are facing out are on the outside of your bracket so they're not gonna hit your rotor. So we'll go ahead and throw our bracket on.So we'll go ahead and get our bracket in place, line that up with our mounting points. We're gonna reuse that factory 21-millimeter hardware. Go ahead and grab our 21-mil socket on our ratchet and tighten these down. So now we'll go ahead and get our pads installed. So we're just gonna line our ears up with our slots here. Get those in place. And these can be a little tricky when brand new, so just have some patience. Sometimes they get snagged. So now that we have our inner pad on, we'll do the same thing for our outer pad.So now we're gonna need to compress our pistons back into our caliper to make room for the new pads. So we've got our caliper compressor tool. We're gonna go ahead and lock that on. Get that in place. So now, once we have our caliper compressed, we can go ahead and slide that back into place now that we have room for our new pads. And we'll go ahead and reinstall that factory 16-millimeter hardware. And we'll tighten that back down with our 16-mil socket on our ratchet.Now, you always wanna refer to your manufacturer torque setting for all of your hardware. Then once you have everything done on this side, you can go ahead and repeat the same process for the other side. So now we've come to the rear of the truck, and we're gonna start by removing our rear caliper here. So again, we're gonna grab our 16-mil socket on our ratchet, and go ahead and pop our caliper bolts off. Before we take this one all the way off, we'll make sure we loosen the lower one. Like that. Just record our caliper. We'll go ahead and remove our caliper.Sometimes these tend to get a little jammed on here too, so again, we'll grab our small pry bar. Just give it a little extra motivation. Now that we have that off, we'll go ahead and set our caliper up here out of the way. It's a little easier to kind of just put this on the rear differential than to hang it somewhere, or you can hang it if that's your choice, but now we have clear access to our bracket bolts and everything's out of the way. So again, we've got our breaker bar and now we've got our 24-mil socket. We're gonna go ahead and pop this loose. That one loose, we'll do the same thing for this one.So we have those bolts broken loose. And before we actually remove our bracket, we're gonna go ahead and remove our pads. So just like the front, they'll just pop right out. And we'll set those aside. And we can grab our 24-mil socket with our impact now and run these out. To support our bracket and get our bottom one out. Go ahead and remove our hardware and remove our bracket. So once we have that off, we can go ahead and pull our rotor off.Now, again, these tend to get a little jammed up on here, so we may need to grab our hammers. So before we go out this rotor with our hammers, we're gonna again install a lug nut onto one of our studs. It's gonna prevent this rotor from flying off and breaking or causing damage in any way. We're also gonna grab a bungee cord and secure our caliper so that that doesn't fall. Go ahead and wrap that around.Put that in just like so. And with our ball beam, we're gonna give it a few taps around the hat to kind of shock that corrosion loose. Just watch your studs, definitely don't wanna hit those. We're gonna grab our dead blow mallet and we're gonna come to the back here in the open section where our dust shield isn't. We're gonna give that a few taps. Hopefully, it comes off. That sounded like it moved. So now that it's loose, we'll go ahead and remove our lug nut, slide our rotor off, and set it aside.So now we can go ahead and install our new rotor. So we'll slide that onto our lug studs. Get that seated. Make sure you work that all the way back. So now we're gonna go ahead and replace our pad clips here. So these old ones just pull right off. Set those aside. And we can go ahead and install our new ones. And you notice these have a wider ear on the lower part, that small one there. And you want that facing the outsides of the bracket so that it doesn't interfere with your rotor. Get those seated. All right. Now that we have those on, we can go ahead and reinstall our bracket, reusing our factory 24-millimeter hardware.Now we'll go ahead and get our bracket back in place. We can reinstall our hardware. Now we have it started. Go ahead and run those back down with our 24-mil socket on our impact. Now we can go ahead and install our new pads. We'll slide those ears into our new clips. Now, this can be a little bit finicky with the new clips and new pads, so just be patient with it. Line everything up. Now we've got our inner pad in. Go ahead and do the same thing for our outer pad. All right, we've got our pads on.The next thing we're gonna need to do is compress our caliper pistons to make room for our new pads. So now we've got our caliper compressor tool. We're gonna go ahead and line that up with our pistons here. Go ahead and set that as low as possible on the flat spot of your caliper. Go ahead and squeeze these pistons in. You might need to adjust it a little bit. See if that gave us enough room. So now that we have our pistons compressed, we can go ahead and get our caliper back on. Line that up.Reinstall our 16-mil hardware here. Get this started. And we'll again grab our 16-mil socket on our ratchet and go ahead and tighten these down. Now, you always wanna refer to your manufacturer's specific torque setting for all of your hardware. Then once you have this done for this side, you can go ahead and repeat these same steps for the other side. And also, once you've finished installing all of your brakes, make sure to pump your brake pedal to regain your brake pressure after installing and before trying to move your vehicle.All righty, guys, that about wraps up our review and install of our PowerStop Z23 Evolution Sport 8-Lug Brake Rotor and Pad Kit for the Front and Rear of your 13-22 4WD F250 Super Duty. Thanks for watching. And as always, for everything F-250, keep it right here at americantrucks.com.

      Product Information

      Features, Description, Reviews, Q&A, Specs & Installation

      Features & Specs

      • Enhanced Braking Performance With Zero Brake Fade
      • Applicable for Both Street Driving and High-Performance Applications
      • Cross-Drilled, Slotted, and Vented One-Piece Rotors
      • G3000 Cast Iron and 100% Mill-Balanced Rotor Construction
      • Corrosion-Resistant Silver Zinc Dichromate Plated Finish
      • Z23 Series Brake Pads Made From Carbon Fiber-Ceramic Compound
      • Low-Dust and Low-Noise Operation
      • Direct-Fit Installation for Replacements or Upgrades
      • Complete Front and Rear Brake Kit
      • Comes With a 3-Year or 36,000-Mile Limited Warranty
      • Fits 2013-2022 Models of the 4WD Ford F-250 SRW Super Duty

      Description

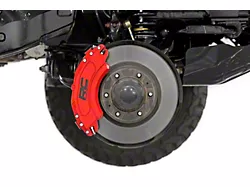
      Superior Stopping Power. Give your Ford Super Duty more stopping power with the help of this front and rear PowerStop Z23 Evolution Sport Brake Rotor & Pad Kit. You can use this kit for both casual and high-performance applications for powerful yet comfortable braking. With the combination of the cross-drilled rotors and Z23 series brake pads, you’ll experience quicker and smoother stopping action compared to stock.

      G3000-Grade Cast Iron Rotors. PowerStop rotors are made from G3000-grade cast iron blanks. This heavy-duty construction ensures long-lasting strength and durability. They are also 100% mill-balanced for a perfect fit and significantly reduced braking noises and vibrations. What’s more, these rotors have a zinc dichromate plated finish to boost their resistance against rust and corrosion.

      Cross-Drilled, Slotted, and Vented Design. To give your truck the best braking performance, PowerStop pulled no stops with these Evolution series rotors. They have vents and precision-drilled holes, which help keep the operating temperatures down especially when you’re braking harder and/or more often. The slots, on the other hand, keep the contact patch clear of debris, gas, and moisture to give the brake pads a cleaner, stronger grip.

      Carbon Fiber-Ceramic Brake Pads. PowerStop Z23 series brake pads feature a carbon fiber-ceramic construction for superior braking performance. They also offer enhanced braking comfort. Meanwhile, the thermal-scorched surfaces result in a shorter break-in period and better thermal stability. Lastly, the powder-coated backing plates make these brake pads longer-lasting and more rust- and corrosion-resistant.

      Minimal Dust and Noise Output. These Z23 series brake pads are chamfered and slotted like the OE pads and come with high-quality rubberized shims. These features allow these brakes to operate almost completely silently. Apart from the quiet operation, these brake pads also produce less dust. This results in cleaner wheels and tires, as well as a cleaner rotor contact surface for a stronger brake-pad bite.

      Direct and Straightforward Installation. PowerStop designed this brake rotor and pad kit as a direct-fit upgrade or replacement for stock and/or worn-out parts. You will need jack stands and basic hand tools to perform the installation, which can be completed in approximately 3 hours.

      Complete Front and Rear Brake Kit. This front and rear PowerStop Z23 Evolution Sport Brake Rotor & Pad Kit comes with (2) front brake rotors and (2) rear brake rotors, as well as (4) Z23 series front brake pads and (4) Z23 series rear brake pads. Also included are stainless steel mounting hardware, a pin bushing kit, and a high-temperature lubricant formulated for ceramic pads.

      Comes With a 3-Year/36,000-Mile Warranty. PowerStop Performance upgrade kits comes with either a 3-year or a 36,000-mile warranty, whichever happens first. This warranty covers both material and workmanship defects. Apart from this, there’s also a separate 60-day satisfaction warranty. You may get in touch with customer service or visit the manufacturer’s website for more details.

      Application. This front and rear PowerStop Z23 Evolution Sport Brake Rotor & Pad Kit can be installed on 2013-2022 4WD editions of the Ford F-250 SRW Super Duty.

      Information on PowerStop's proper Break-In Procedure can be found here: https://www.powerstop.com/brake-pad-break-in-procedure/

      Fitment:

      Details

      PowerStop K6405

      CA Residents: WARNING: Cancer and Reproductive Harm - www.P65Warnings.ca.gov

      Installation & What's in the Box

      Installation Info

      What's in the Box

      • (2) Front Rotors
      • (2) Rear Rotors
      • (2) Driver-Side Front Brake Pads
      • (2) Passenger-Side Front Brake Pads
      • (2) Driver-Side Rear Brake Pads
      • (2) Passenger-Side Rear Brake Pads
      • (1) Stainless Steel Hardware Kit
      • (1) Pin Bushing Kit
      • (1) Ceramic-Based High-Temperature Lubricant
      • Installation Instructions
      4.9

      Customer Reviews (179)

        Questions & Answers

        10 More Questions

        Will It Fit My F-250

        • 6.2L V8 - 13, 14, 15, 16, 17, 18, 19, 20, 21, 22
        • 6.7L V8 Power-Stroke - 13, 14, 15, 16, 17, 18, 19, 20, 21, 22
        • 7.3L V8 - 20, 21, 22