How to Install PIAA High Output White LED High Beam Bulb - 9005 on your Silverado
● This product is a 12V bulb for vehicles. Check the bulb type before use. Do not mount or use the product for different types.
● This product can be installed in lamps that use resin type sockets such as HB3 and HB4 bulbs. Before replacement, verify the indications on the bulb that is being replaced and make sure it is the right type.
● On some vehicles (including imported models) a warning lamp may go on indicating that the bulb has burned out or some other type of abnormal indication may occur. This phenomenon is common to LED products. In addition, in order for the system to sense that a bulb has burned out, a minute amount of electric voltage continues to flow even when the switch is turned off. Therefore, please be aware beforehand that when the bulb is replaced, the LED bulb may light up slightly but this is not a product abnormality. (The amount of voltage that is consumed when the LED lights up is minimal. The amount is equal to what is used to power the vehicle's clock and will not lead to a sudden drop in battery power.
● Because LEDs have a different luminescence process from H.I.D. or halogen bulbs, even if the light color is the same it may look different when seen from a human eye. In addition, depending on the lamp setting, the light color may change. (Even when installing a bulb with the same color temperature as a headlamp and fog lamp, the color variation may vary.)
● With regards this bulb, turn on the light after switching the engine's ignition to the "ON" position. In the case of hybrid engines, switch the engine's ignition to the "READY-ON" position. (If the engine's ignition indicates "Engine-OFF" or in the case of hybrid vehicles, "READY-OFF", the light may not turn on in some cases. The light will go on normally if the ignition indication reads "Engine-ON" or "READY-ON)
● When using this product in vehicles that have idling stop systems or have weak battery power, the light may fail to light up or may flicker when starting the engine.
● If this product is installed and used in a lamp fitting that has deteriorated after extended use, the functional performance of this product may not have the originally intended effect. As a result, there is a possibility that it may not successfully pass the required automobile inspection. If this is the case, replace it with the old bulb.
Precautions for Use
● Do not look directly at the operating lamp for any period of time; this may cause serious eye injury.
● If there is abnormal vibration or sound when the vehicle is in motion, immediately stop the vehicle in a safe location and inspect the vehicle.
● Please do not disassemble or modify the product. Such actions may damage the product or may cause fire and/or bodily injury.
● Keep the product out of reach of infants. Otherwise infants may swallow or break the product, leading to injury.
● When the lamp is lit, the lens becomes extremely hot. Do not wash the vehicle while the lights are on or immediately after turning them off.
● When this bulb/lamp is tuned on, there is a possibility that noise interference may influence the radio or other such devices. Please note that this is not a malfunction of any kind.
● During heavy rain or when putting the vehicle through a car wash, condensation may build up inside the lamp due to the difference in temperature inside and outside the lamp. Please note that is will not affect the overall function of the lamp.
● Do not leave the lamp on for an extended period of time while the vehicle is stopped.
Precautions for Replacement
● As a result of replacing the bulb, the axis of the light may become misaligned. Therefore, after replacement, check the lamp position and make necessary adjustments to the alignment.
● Make sure not to touch the base part or the area that illuminates light. Also, prevent any type of oil or dirt from adhering to the product. If the light is turned on in this condition, it may cause a lighting malfunction.
● Make sure to prevent moisture from adhering to the product. If the light is turned on in this condition, it may cause a lighting malfunction. If moisture is present, let it dry out thoroughly before use.
● Bulb replacement should be done safely in a flat place where a wide space is available. Before replacement, stop the vehicle engine, apply the side brake, place the shift in parking or neutral position, and pull out the key.
● Do not yank on the harness when disassembling. Doing so may damage the harness leading to overheating and potential failure.
● Be careful not to lose the original bulbs by keeping them in a safe place after removal.
● Verify the position of the product as well as the metal base of the connector. Check the proper direction and the install it securely.
● In the case of connector or terminal desorption, hold the connector terminal and straighten it out. Please note that if excessive force is applied to the terminal it may break or it may no longer connect. As a result it may cause damage leading to overheating and potential failure.
● Make sure not to apply excessive force to the light emitting part. If this part is damaged, it may cause a lighting malfunction. Please handle this product with extreme care.
1. Replacement procedure
1. Before starting the installation work, refer to the vehicle's installation manual and verify the place where the bulb will be installed and carry out the installation.
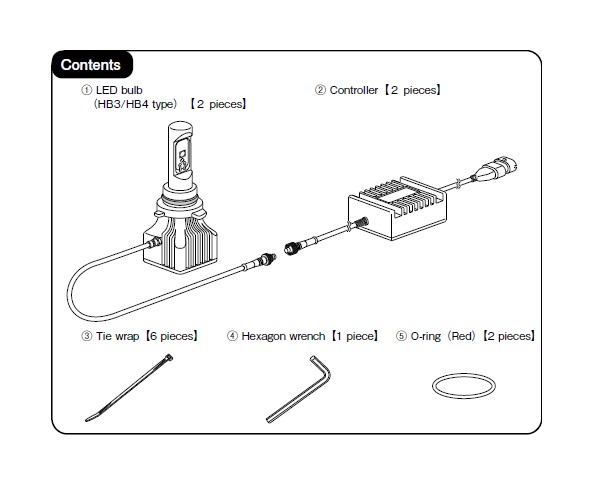
2. First verify that the bulb is currently installed on the vehicle. Replace the O-rings as deemed necessary.
HB4:Black O-ring (The O-ring is installed on the LED bulb)
HB3:Red O-ring (Part ⑤)
Procedures for replacing the O-rings
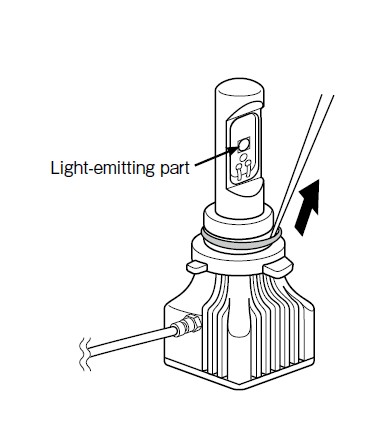
If it is deemed necessary to replace the O-rings, take a tool with a narrow tip to pry loose the O-ring as shown in the diagram at right. Take the correct O-ring and set it in the same groove.
When carrying out the replacement process, do not touch the illuminating part of the LED bulb with your bare hands.
3. Connect the LED bulb (part ①) and the controller (part ②).
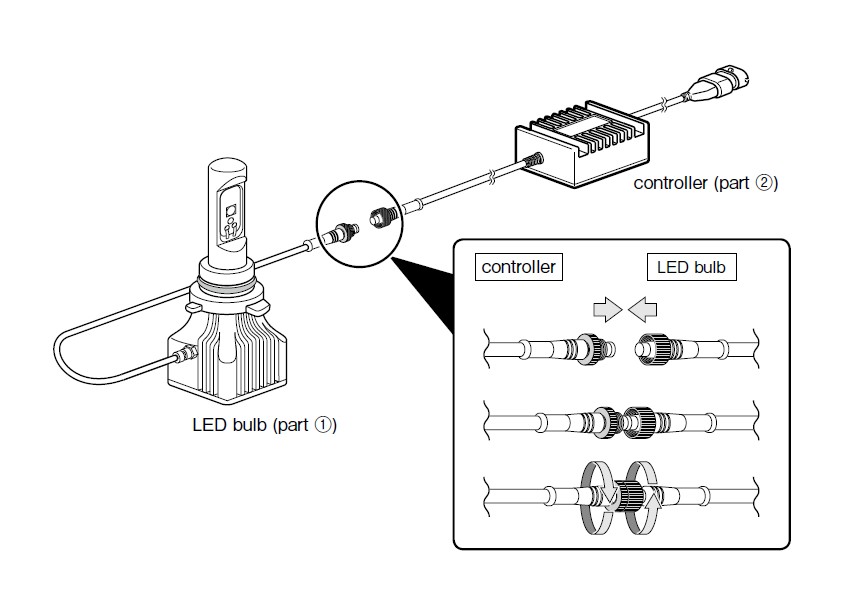
4. According to the position where it will be installed, use the hexagon wrench (Part ④) to loosen the small screw on the LED bulb (Part ①) then to adjust the light-emitting part and set it firmly in place. Refer to the next section describing the installation procedures for projector type, multi-reflector type and fog lamps.
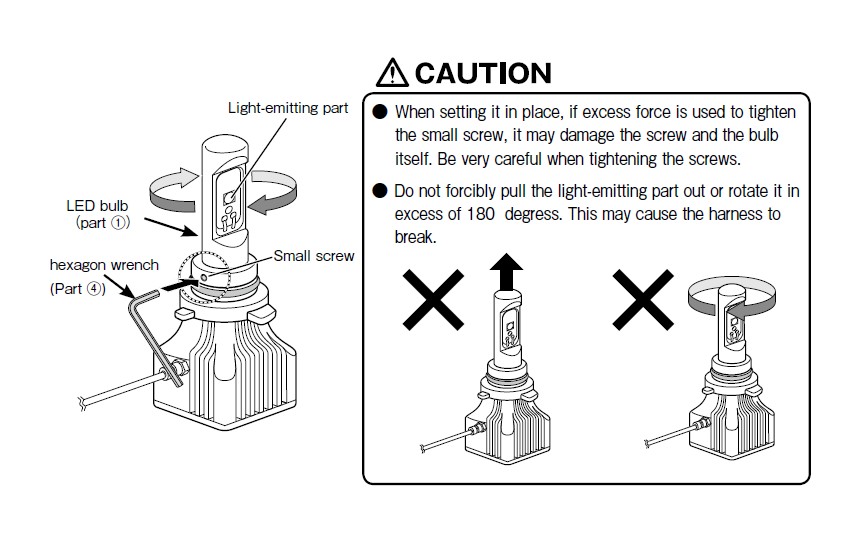
When installing to Projector Type Light
When packing this product, the light-emitting part of the LED bulb was set sideways. Install the light-emitting part without changing this position.
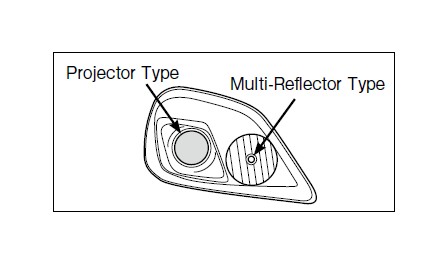
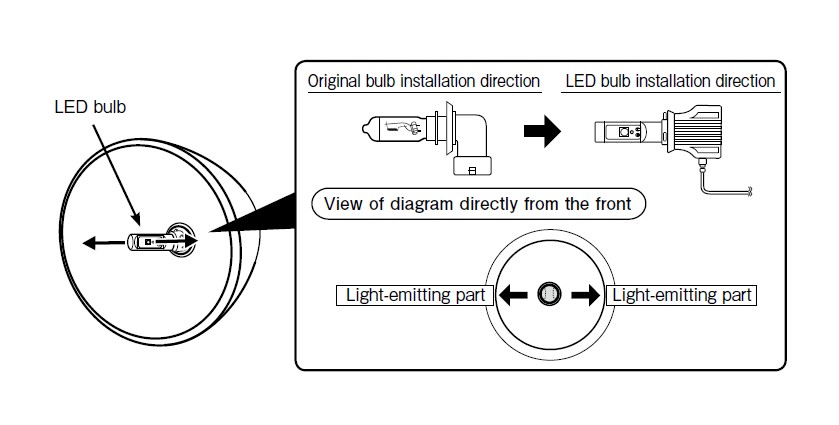
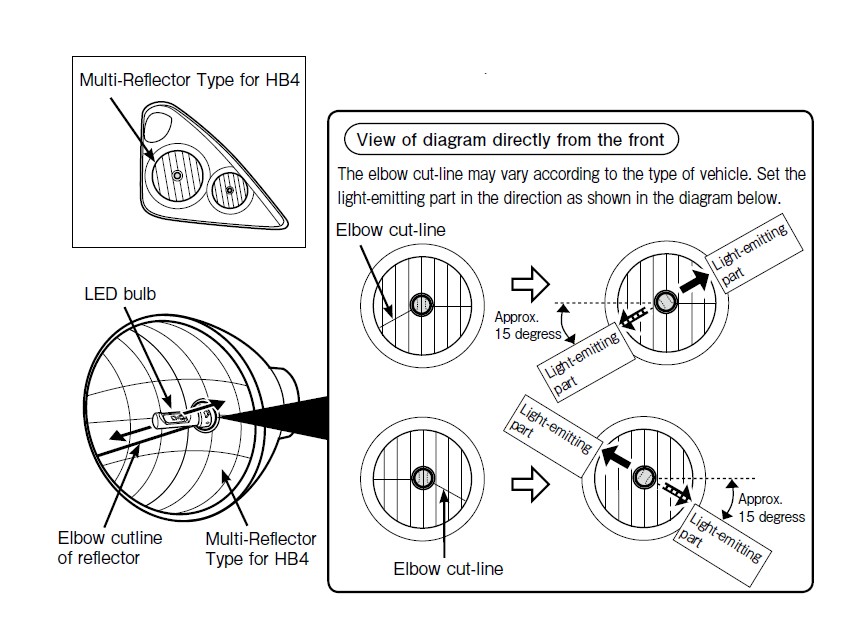
When installing the Multi-Reflector Type for HB4
Take the LED bulb (Part ①) and fit it into the elbow cut-line on the multi-reflector type by rotating the light-emitting part.
When installing to Multi-Reflector Type for HB3
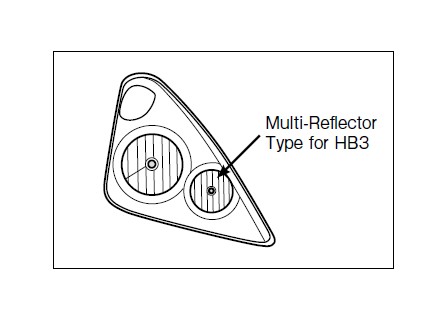
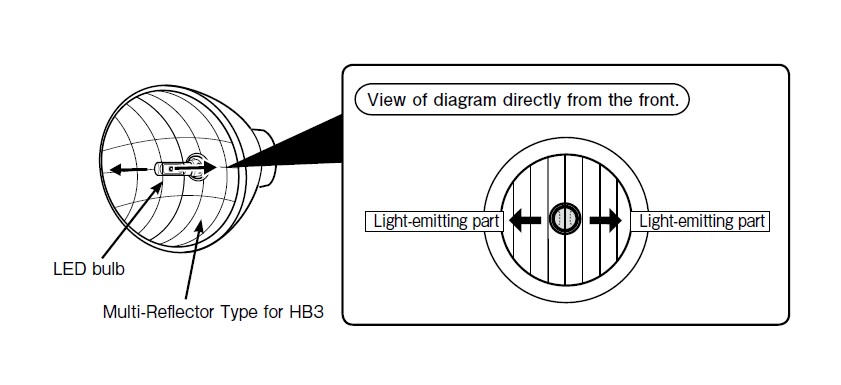
When installing to multi-reflector type for HB3, rotate the LED bulb's (Part ①) light-emitting part so that it faces sideways.
When installing to fog lamp
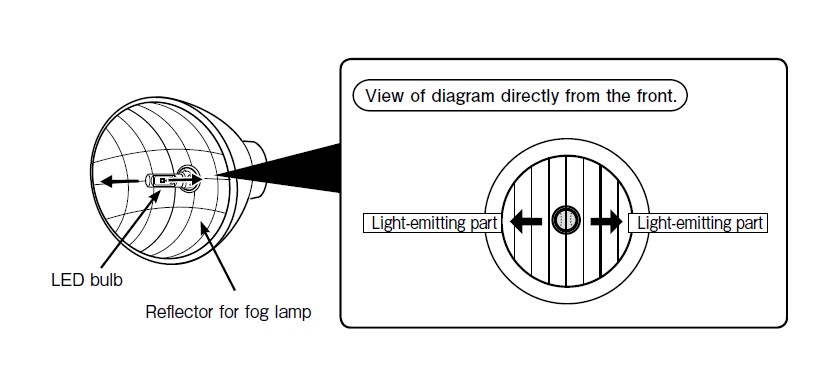
When installing to a fog lamp, rotate the LED bulb's (Part ①) light-emitting part so that it faces sideways.
5. Connect the vehicle's connector to the connector on the controller (Part ②) and make
sure the lamp lights up.

CAUTION
Depending on the type of vehicle, the locking clip on the controller may interfere with the connector on the vehicle, preventing the connector part from going all the way inside. If this is the case, use a cutting tool to trim the locking clip on the connector and try connecting it again.

6. Fix the controller part in place on the vehicle side using the tie wrap (part ③). (7) Check that the LED bulb lights up properly and make sure the light beam is not set too high or too low.
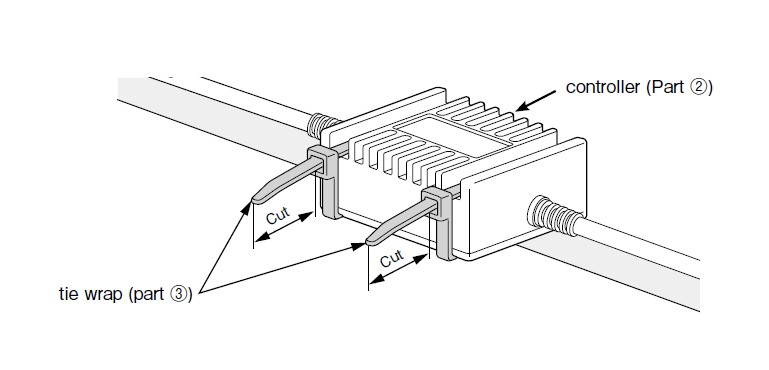
7. Check that the LED bulb lights up properly and make sure the light beam is not set too high or too low. If the light beam is not properly aligned, make the necessary adjustments.
2. Regarding car inspections
● This product complies with JIS standards (Japanese Industrial Standards) D5500 and is set and produced within the white light region defined by the automotive headlamp standards.
Supplement (JIS D5500)
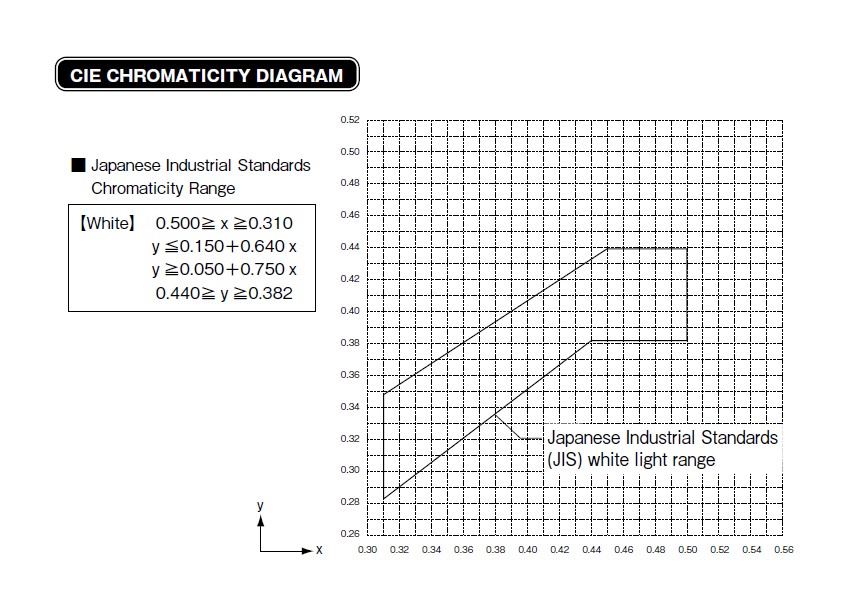
The values for white light defined by the JIS standards are as follows. When these numbers are shown in a graph, the beam widths are indicated in the list below. When the measurement results are within the chromaticity range specified by JIS D5500 it is determined as white light.
Japanese Industrial Standards Chromaticity Range
[White] 0.500≧x≧0.310
y≦0.150+0.640x
y≧0.050+0.750x
0.440≧y≧0.382
