Talk to a F-250 Sales Tech
1-888-706-1096
M-F 8:30A-11P, Sat-Sun 8:30A-9P
$20K Sweeps! 10 Chances to Win! Enter Daily >

Morimoto GEN2 XB LED Headlights with Amber DRL; Black Housing; Clear Lens (17-19 F-250 Super Duty)

Item SD24673
Verify parts fit and get product recommendations.
F-250 Sales Techs: Connect Now M-F 8:30A-11P, Sat-Sun 8:30A-9P
$0.00
Our Price

$1,750.00 (pair)

FREE Shipping Market Price $2,012.99 You Save 13% ($262.99) Up to 10% off for Military & First Responders! See Details

Will this fit your Vehicle?

Select a different vehicle Help?
Update or Change Vehicle
Ship to: Ashburn - 20149
Sorry, please enter a valid US or CA postal code
We're sorry, zip can't be updated at this time.
Recommended Install Shops
How It Works
Install Shops are available near Ashburn - 20149

Add Local Shop Installation

Total cost of service $174.99
    Create a list
    Add to New List

    Saved - View your saved items

    We're sorry. We couldn't save this product at this time.

    or use

      Product Videos

      Jake: Jake here for AmericanTrucks, and today, I'm taking a look at the Morimoto Gen 2 XB LED headlights with amber daytime running lights, black housings, and clear lenses fitting the 2017 to 2019 F-250 Super Duty. If you're looking for the ultimate upgrade to your Super Duty's headlights, look no further than these Gen 2 XBs from Morimoto. These combine all of the best tech from the previous generation XBs with some new stuff in a sleek, stylish package that will turn heads, and show the road ahead in the absolute best possible light.When it comes to automotive lighting, you really can't go wrong with anything Morimoto sells. Now, I make no bones about it in any of these videos. I'm a big fan of their stuff, and that's because they spend a lot of time and effort developing their products. It shows from the moment you take them out of the box. Again, I'm always impressed and genuinely excited when I get to handle a set of their lights because frankly, they're always impressive. These Gen 2 XBs take things even a step further than the originals, providing you with better light output and some additional technology.The first thing you'll notice here is the clean, modern design. You've got four LED projectors at the forefront of the light, and these really make a nice visual statement, and they do a lot to update the look of your Super Duty's front end. Now, you get four low beams per light, so that equates to eight total low beam optics, two of which do double duty as your high beams, so you've got four high beam projectors as well. So, of course, it goes without saying, these are really, really bright. 1,420 lux from the low beams compared to 400 lux from the OEM halogen low beams. So, it's quite a big improvement.Now, the first Gen XBs were already worlds better than the OEM Ford headlights, especially those halogens, and these just take things up another level. Morimoto claims that these have 57% more intensity beyond the Gen 1's output, making them absolutely the category king, bar none, when it comes to headlight upgrades for this Gen of Super Duty. But that's not the end of the story. Around the outer edges of the lights, you get some LED strips, and these are going to comprise your daytime running lights, similar to that on your stock headlights. However, where these differ is that these also have this Y-shaped section of LED in the center between these main beams. Now, all of these are going to light up amber, and accordingly, they will function as your turn signals.And like other offerings from Morimoto, you have the option to run these as sequential or full-on, full-off for your turn signals. Rather easy to change, just a plug or two, should you want to change it up. Another thing worth noting is that there is a version of these lights where these LEDs also light up in white for your daytime running lights, as opposed to the amber here, and then they'll switch the amber for your turn signals. Those are also available on our site, should those be more your speed, so check them out as well. But if you like the amber lighting here, again, this is going to be kind of a more OEM type of look rather than the white versus this, but it's still cool regardless, definitely worth checking out.Now, as with all of Morimoto's headlights, these are fully compliant, so they meet or exceed all SAE, DOT, and FMV SS108 standards, and they've got adjusters integrated into the back too to get everything aimed properly, meaning that they are fully street legal. One other fun feature is that they also have a cool startup sequence. So, when the DRLs kick on, these do a little bit of a light show, which really doesn't do anything for lighting output, but I think it's just cool, and hopefully, you will too.Construction here is all first-rate as well too, with ABS plastic comprising the housings, and UV-resistant polycarbonate lenses over top. With those matte black housings on the inside and all those LEDs, these are going to look and perform great. They're going to continue to do so for years to come. And those main beams that we were talking about utilize Morimoto's proprietary Kuria Optic Bi-LEDs. So, again, these are super bright. They're going to last you a long time. On the bottom of the housings, as you can see right here, you've got these die-cast aluminum heat sinks to keep everything cool and working well.These lights are also designed to be totally plug-and-play. I know this looks like a lot. We'll talk about it in a minute. But these again are designed to be plug-and-play. So, there's going to be no hyper flashing, no flickering, no error codes, no radio interference, and most importantly, no actual wiring that you have to do. You just got to plug some stuff in. And Morimoto includes all the stuff that you're going to need to get these wired up easily too. So, again, very easy to install. You just got to follow some instructions.However, as you might expect, given all we just covered, these do not come cheap. Now the set is going to run you about $1,900, and that makes them about the most expensive in the category. But as with many things, especially when it comes to automotive lighting, you get what you pay for here. And I think that the quality of the functionality and the lighting output really speak for themselves. So, while they are expensive, you are getting a great package, and it's going to be a huge upgrade versus your stock lights.Installation should be no surprise as it comes in at an easy one out of three on our difficulty meter. They should really only take you about an hour to complete the job. Now like I was talking about a few minutes ago, these are designed to be totally plug-and-play right out of the box. So, you don't need to actually do any wiring. You just need to route some wires and plug a bunch of stuff in. Again, Morimoto includes everything here in the kit for you. It's going to take you some time to obviously get your old lights out and plug these ones in. And once you do have these in, make sure you utilize those internal adjusters right here on the back to get everything aimed properly because nothing is worse than a set of headlights that are not aimed properly. But enough of me talking about it. What do you say we head out to the install bay now and we'll show you the process?Man 1: The tools you're going to need for this install include an electric or regular 3/8 ratchet, a 3/8 extension, a 10-millimeter socket, and a flathead screwdriver. What's up, guys? Today we're going to be installing a set of headlights on our F-250, but before we get started, you're going to watch a short video on how to uninstall your stock headlights, and I'll meet you back here for the install.Man 2: All right, guys, now, obviously, before we can get our new headlights installed, we're gonna have to do some uninstall work here and get our old factory headlights out. To do that, we're gonna remove the radiator shroud as well as the grille cover here. And so, let's go ahead and get started with that. All right, guys, now, to get the radiator shroud off, we have a whole series of these locking pins here. If you've never worked with these before, they're basically two pieces. You lift up the center piece, that unlocks it, and then you pull up on the base. All you need is a flathead screwdriver to do that.All right, guys, with all the pins removed, go ahead, and you're going to have to pull out on the passenger side here a little bit to get this tab out from under, and then just lift it away. All right, guys, next up we're going to remove about eight of these bolts here using a 10-millimeter socket. All right, now with those bolts out from the top, all we have holding our grille on is a series of locking tabs that kind of push into slots that are mounted on the frame behind it. So, all we're going to need to do is grab onto the grille and give it a nice gentle but deliberate pull, and we should be able to get our grille off.All right guys, we're going to have a total of four 10-millimeter bolts we're going to have to take out for each headlight, and we're going to start at the bottom here. I'm kind of peeling down this rubber weather stripping here. It's between our bumper and our fender. And I have a 10-millimeter socket on an extension. I'll take this out. All right, guys, now we have two on the inside here, again, a 10-millimeter. All right, guys, now we have the last one up on top here. All right, now the only thing holding in the headlight at this point, now we have those four bolts out, is a little bit of a locking tab. Just kind of pull it out like that. I'm lifting it down kind of gently here. We're gonna unplug all of this before we pull our headlight away. We got a total of four harnesses that we're gonna unplug here.Man 1: So, before we install our headlights, we're going to have to wire up our DRL harness into our fuse box, so let's get started. So, now we can remove our fuse box cover by pressing it on these two tabs and lifting up. Then you're going to locate the number 35 fuse, which is here. We're going to insert our fuse tap into that location. Put our cover back on. Now we can install our headlights. Now you're gonna notice on the DRL harness there is a short wire and a long wire. The short wire is gonna be on the passenger side, and the long wire we're gonna route over to our driver side.So, we're gonna tuck back our short wire. Then we can take our long wire, and I'm gonna route it through the radiator support. And now we can install our headlights. So, all you gotta do for this installation is find the connectors that match. But an important note that I'd like to add, there is a gray and black wires that have identical connectors. We'll not be using this black one, so we can tuck that off to the side. Now we can make our connections. Another important note, there is a orange and purple wire that connect to each other. That is for your sequential turn signals. If you'd like to leave them blank, you can have them unplugged, but if you'd like the cool feature, you can plug them in. So, in our case, we're going to plug them in.Now we can tuck our wires back. Get our headlight lined up. I'm going to pull down on this weather stripping, so it doesn't get caught. Now we can take our three painted bolts and thread them into our locations. Then we can tighten that down with our 10-millimeter socket. Now we can peel down on this weatherstripping between the bumper and the quarter panel, and we can thread in our unpainted bolt. Then we can tighten that down with our 10-millimeter socket. Tuck that in. Now you can repeat that process on the other side.Now that your headlights are installed, we can reinstall our grille. There is tabs down on the bottom of the grille that will line up on this bracket. So, you can get that lined up. Give it a push. Then we can thread in our bolts up top. Now we can tighten these down with our 10-millimeter socket. Now we can install our plastic cover. Now we can get our cover into place. Push this tab under the air duct. First, we can start out with the smaller clip that'll go into the air duct, and the rest are, like, normal. Now there's four more up top. Now your install is complete. So, that's going to wrap up the install on our Morimoto Gen 2 XB LED Headlights with amber DRL, with black housings and clear lenses for your '17 to '19 F-250 Super Duty. Thanks for watching, and for all things F-250, keep it right here at americantrucks.com.

      Product Information

      Features, Description, Reviews, Q&A, Specs & Installation

      Features & Specs

      • LED Headlights
      • Stunning Illumination
      • Extreme Low-Energy Output
      • Minimal Heat Gain
      • DRL-Activated Amber Signals
      • Well-Built Housing
      • Limited 5-Year Warranty
      • Basic Installation
      • Fits All 2017-2019 Ford F-250 Super Duty Models

      Description

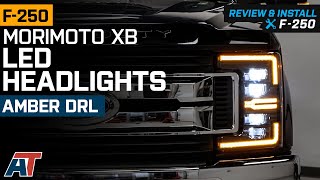
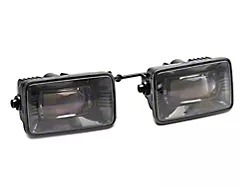
      Stunning Illumination. Need a new pair of headlights but don't want to settle for the cut-and-dry class? Rock a more reliable pair of lights with these Morimoto GEN2 XB LED Headlights with Amber DRL. These high-output headlights provide extensive coverage of the road while also generating clear signals thanks to its sequential DRL amber lights.

      Well-Built Housing. No need to worry about replacing these headlights as they are built to last and designed for long operations, working at over 50,000 hours. The delicate electronics of these headlights are encased in a durable ABS plastic housing sealed against clear polycarbonate lenses that provide ample protection against interior heat and external hazards.

      Installation. This product is easy to install and should take about 1 hour.

      Warranty. There is a 5-year limited warranty on this product.

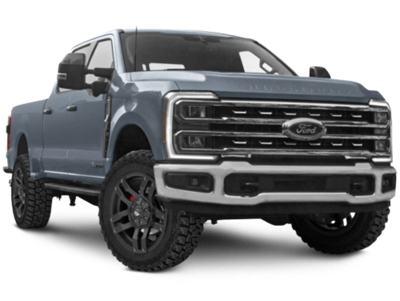
      Application. The Morimoto GEN2 XB LED Headlights with Amber DRL; Black Housing; Clear Lens fits all 2017-2019 Ford F-250 Super Duty models.

      Fitment:

      Morimoto LF503.2-A-ASM

      CA Residents: WARNING: Cancer and Reproductive Harm - www.P65Warnings.ca.gov

      Installation & What's in the Box

      Installation Info

      What's in the Box

      • (2) Headlights
      4.8

      Customer Reviews (302)

        Questions & Answers

        10 More Questions