


Installation Time
(approx) 2 Hours
Difficulty Level:
Light to Moderate mechanical skill required.
Installation Guides
 FREE 1 to 3-Day Delivery on Orders $149+ Details

$424.99
CONFIRM THIS FITS YOUR VEHICLE!
Saved - View your saved items
We're sorry. We couldn't save this product at this time.
or use

Features, Description, Reviews, Q&A, Specs & Installation
| Brand | MBRP |
| Exhaust System Type | Cat-Back System |
| Exhaust Tip Finish | Chrome, Polished |
| Exhaust Tubing Diameter | 3.00 Inch |
| Exhaust Material | Aluminized Steel |
| Exhaust Tip Outlet Style | Single |
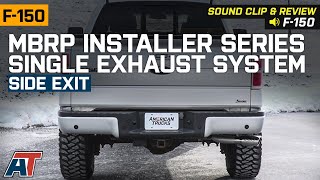
| Exhaust Exit Location | Passenger Side - After Tire |
| Exhaust Loudness | Moderate |
The Sound of Power. Drive around in a loud powerful vehicle when you equip your truck with this Cat-back single side exhaust kit. It's chrome in appearance, features with pipes and few turns to give you the maximum sound through a simple installation. Once installed your truck will never sound the same, and that's a good thing.
Faster Going. Go faster and with more confidence with some help from this exhaust kit from MBRP. It's fitted with huge pipes, a stainless steip and a muffler that's free from xomplexity and wide open enough for smooth flowing exhaust fumes. All these components come together to create an effective exhaust system that can be relied upon to generate added power. By moving exhaust more quickly, this system ups the horsepower of your truck. It can also improve torque figures and even make the engine more fuel efficient. Install this system on your truck and you'll get around more capably than ever before.
Durable Coated Steel. If you take performance seriously, this muffler kit is the one for you. It offers power increases, and it's made from tough materials that are made to last through hard use. Both the tailpipe and midpipe and the muffler are made from aluminum coated steel. The seams and welds are protected by a special coating as well. The tip of the kit is made from stainless steel for even more lasting power.
Bolt Installation. The exhaust system uses a basic bolt-based installation process. It takes between one and two hours generally, and is simple to put into position. If you're looking for a capable exhaust system that isn't difficult to install, this is a good option. It uses the stock hangers that hold up the exhaust system that comes with your pickup, so there is minimal work involved with swapping them out.
Application. This MBRP exhaust kit fits 2009 to 2010 Ford F-150 EC trucks. It's not meant for 8' beds on the EC models, but will fit all bed lengths on crew cab models.
Shop All Truck Parts And Accessories
Shop All Truck Exhaust
MBRP S5210AL
CA Residents:  WARNING: Cancer and Reproductive Harm - www.P65Warnings.ca.gov
Installation Info
Installation Time
(approx) 2 Hours
Difficulty Level:
Light to Moderate mechanical skill required.
Installation Guides
What's in the Box
Tech Guides:
Does Not Fit SuperCabs with a 8 ft. Bed or Raptor Models.
