Talk to a F-150 Sales Tech
1-888-706-1096
M-F 8:30A-11P, Sat-Sun 8:30A-9P
$20K Sweeps! 10 Chances to Win! Enter Daily >

JLT Cold Air Intake with Red Oiled Filter (15-20 3.5L EcoBoost F-150, Excluding Raptor)

Item T543203
Verify parts fit and get product recommendations.
F-150 Sales Techs: Connect Now M-F 8:30A-11P, Sat-Sun 8:30A-9P
$0.00
Our Price

$329.00 (kit)

FREE Shipping Market Price $378.35 You Save 13% ($49.35) Up to 10% off for Military & First Responders! See Details

Will this fit your Vehicle?

Select a different vehicle Help?
Update or Change Vehicle
Ship to: Ashburn - 20149
Sorry, please enter a valid US or CA postal code
We're sorry, zip can't be updated at this time.
Recommended Install Shops
How It Works
Install Shops are available near Ashburn - 20149

Add Local Shop Installation

Total cost of service $175.00
    Create a list
    Add to New List

    Saved - View your saved items

    We're sorry. We couldn't save this product at this time.

      Product Videos

      Justin: Hey, everyone, I'm Justin with americantrucks.com. And today, we're gonna be taking a closer look at and installing the JLT Cold Air Intake with the Red Oiled Filter available for all 2015 through 2020 3.5 Liter EcoBoost F-150s. Now, you should be checking out the JLT if you're looking for a fan favorite, no tune required system that is moderately priced overall and does not require any custom or can tuning. Now, breaking down the features of the JLT and you'll see what is, in my opinion, one of the largest intake tubes here on the market. Now, this system isn't just big for the sake of being big, but rather was computer designed to optimize things like airflow, fit, and finish. Now, even at this size, this intake does not require any aftermarket tuning, therefore, you can bolt this up and go without the need for anything else. Now, maybe one of the biggest features most owners can look forward to and installing something like this is the combination of more power and sound. Now, how much power exactly? Well, that will depend on a few different variables, but in general, the rule of thumb I like to tell people is basically high single digits, low double digits in the neighborhood of, without the use of any custom or can tuning. Now, on top of that, guys, the open filter design of the JLT should lend itself to a little bit more sound under acceleration and you may even hear that factory blow-off valve a little bit more than before. Now finally, EcoBoost owners can also expect a much more modified appearance whenever you pop the hood of your truck.Now, moving into construction and you will find the rotomolded plastic build throughout here, guys, with the JLT, and that is gonna be one of your best materials when it comes to resisting heat soak. Now, that also is going to apply to things like the upper portion of the air box here that is sealed to the underside of your hood thanks to the pre-installed weather stripping. That's always nice. Some of the other kits at this price point give you the weather stripping, they leave you to install it and it can be a bit tricky sometimes. So, the fact that it's already done for you, I like it. Nothing crazy there. Now, staying on the airbox though for a bit, guys, I do also wanna point out that I really like how the JLT option incorporates the bottom portion of the factory air box. Therefore, you are gonna maintain all of the factory-engineered fresh air ducting and that's huge because again, that has been designed and engineered from Ford to be the most effective at getting air onto the filter. So, JLT's not gonna do away with that. In fact, we're gonna utilize that and build off of it. Now, let's get into the filter here because again, absolutely massive. It's a 5" by 7" S&B oiled filter, 5-inch bell mouth at the opening for nice smooth airflow. Now, finally, guys, as you can see, the kit does also include JLT-labeled couplers. All of the clamps and hardware needed for a very simple install.Now, your price point for the JLT is gonna live in that low to mid $300 range, which puts this, I would say, mid-tier as far as price point is concerned. And as far as I'm concerned, it really is a bargain because the JLT consistently offers one of the most solid options in the category. It's something I've used on a few builds in the past and it's something that ultimately you guys will not be disappointed with. And now comes a point in the video where we wanna shift gears and touch on the installation, guys. Site's gonna call this one a pretty solid one out of three wrenches on the difficulty meter. About an hour, I would say, at most to complete from start to finish. But now let's head out to the shop now. Let's check out our detailed walkthrough and tool breakdown.Man: Tools you would need for this install are a flathead screwdriver, a ratchet, and a 5/16 socket. What's up, guys? Today we're gonna be showing you how to install a cold air intake on our F-150, so let's get started. So, to remove our intake, we're gonna start by loosening our host clamps here. There are three, two up top and one lower one, using our flathead screwdriver to loosen them up so we can remove our hose. So, now we can go ahead and loosen up our clamps on our stock intake tube using our flathead screwdriver. You have these two up top as well as a lower one back in here. It's kind of hard to get to. Next, we can go ahead and unplug our intake air temperature sensor, which is located on the back side of our intake tube. Then you wanna push down on your two clips holding your intake box in, pop them out and remove your intake cover. Next, we can go ahead and separate our intake tubes from our turbo pipes. Kind of pop your upper one, and then pull your lower one off. And your intake tube comes right out. Next, we can go ahead and remove our factory air filter, so we can get to the bottom of our air box. Our next step will be to clean off the flat part of the bottom of our factory air box using an alcohol prep pad, so we can go ahead and install our heat shield gasket. Giving that a good wipe. Let it dry out for a second. Okay, once you've let that dry for a second, you can go ahead and grab your heat shield gasket and place it on the bottom of your air box. Now, since ours won't be on here permanently, we're not actually gonna remove the adhesive backing on our gasket here just for removability.Now, your next step is gonna be to remove your engine beauty cover so you can access your driver's side PCV valve located near the turbo. So, to do that we're gonna remove the oil cap and simply pull up on your cover and rotate it out of the way. Now that we have access to our PCV valve, we can go ahead and reach down and pull back on the gray clip until it pops loose and go ahead and pull that out. And once we have our PCV valve out, we can go ahead and install our AFE PCV insert with our slashed cut and facing towards the turbo. This is also labeled on the tube itself, which side faces your turbo. So, now we can go ahead and insert our tube into our PCV valve, sliding it down until it fits flush, and then go ahead and reattach your PCV valve. So, before we go ahead and swap in our new intake, we're gonna need to remove and swap over the intake air temperature sensor from our factory unit to our new one. So to do that, you simply grab onto it, give it a couple twists, and pull it right out. So, we're gonna go ahead and install this into our new intake. And as per the instructions for our particular truck, you're gonna want to use the grommeted hole closest to the intake filter and it's always a good idea to use a little bit of lubricant on your gasket to get it to slide in a little bit easier. Silicone spray, whatever you have works. And then go ahead and insert that into your intake. Now, the kit comes with a grommet plug for the one you're not using. So, we're gonna go ahead and insert that into the one that we will not be using.Our next step will be to install our reducing couplers to our turbo side of our new intake using the provided couplers and hose clamps. So, we'll go ahead and get this straight one on for the passenger-side turbo. And for our particular one, we are using the provided 22-degree reducing coupler for the driver's side turbo. And then we can go ahead and just get our clamps on and get 'em snug enough to not move, but we're not gonna tighten them down all the way yet. Install our other one. All right. Now, we're ready to go onto the vehicle. Now, that we're ready to go back together, we can go ahead and reinstall our engine beauty cover. Simply sliding it back into place, popping it down, and reinstalling our oil fill cap nice and secure. For our next step, you wanna make sure you put your hose clamps on your hoses with your screw in an accessible point. So, when you put your intake tube back on, you can go ahead and tighten them and we can go ahead and install our new intake tube. Now, we can go ahead and slide our new tube on to each side. Recommend your passenger side first and then go ahead and press down your driver's side tube. And you wanna go ahead and line it up so your filter area rests in the middle of your stock air box. Now that we have that done, we can go ahead and install our other hose clamps using our 5/16 ratchet or a 5/16 nut driver. Go ahead and tighten down all of your clamps. And go ahead and move to the driver's side turbo and go ahead and tighten down your driver's side clamps for your turbo and intake tube sides.So, once you have all your clamps in place, you can go ahead and snug them down so they won't move around on you, but don't fully tighten them down yet as we need to install our upper heat shield box onto our factory air box. Now, we can go ahead and install our upper heat shield box using the four slotted tabs on the backside and two holes for the factory clips on the front. Next, we can go ahead and install our new air filter. I went ahead and placed it in the box and kind of slide it down top first. Now, once you have your air filter in place, you can go ahead and tighten down all of your clamps using our ratchet and our 5/16 socket, or you can use a flathead screwdriver if you need to. Next, we can go ahead and reinstall our intake air temperature sensor plug. Go ahead and snap that down back into place. And our last step is going to be installing this upper heat shield grommet. So, first, we're gonna go ahead and wipe it down with our supplied alcohol strip. The kit also comes with an adhesive strip to secure this into place, but again, since ours isn't permanent, we're not gonna go ahead and glue that on, but that is exactly how it goes. All righty, guys, that about wraps up our Review and Install of our JLT Cold Air Intake with the Red Oiled Filter for your '15 to '20, 3.5 Liter EcoBoost F-150 Excluding Raptor. Thanks for watching, and as always, for anything F-150, keep it right here at americantrucks.com.

      Product Information

      Features, Description, Reviews, Q&A, Specs & Installation

      Features & Specs

      • Improves Airflow for More Power
      • Increases Throttle Response and Performance
      • Roto-Molded Plastic Air Intake Tube
      • Reusable High Flow Oiled Air Filter
      • Simple Bolt-On Installation
      • No Computer Re-Tune Required
      • Not CARB-Certified
      • Fits 2015-2020 3.5L Ford EcoBoost F-150s, Excluding Raptor

      Description

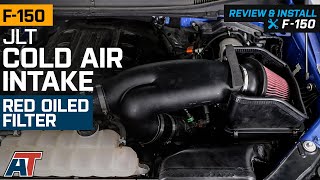
      Better Flow for More Power. A simple way to increase the power and performance of your 2015-2020 3.5L EcoBoost F-150 is by installing a JLT Performance Cold Air Intake. By replacing your F-150's restrictive stock factory intake with a high flow filter assembly you will see and feel a noticeable increase in rear wheel horsepower and torque.

      No Tune Required.
      JLT Performance engineered their Cold Air Intake to improve the performance of your F-150 without the need of reprogramming your computer. By utilizing flow dynamics, this Intake will increase power using the original factory tune. Even though a re-tune is not required for operation, AmericanTrucks recommends a custom tune to reprogram the vehicles computer (ECU) to get the best possible performance from this Cold Air Intake.

      Simple Bolt-on Installation. JLT Performance designed their Cold Air Intake kit to be a direct bolt-on replacement. With no special tools or extra modifications required installation can be completed in under an hour. All parts and detailed instructions are included.

      Not CARB Certified. This JLT Performance Cold Air Intake is not CARB certified, therefore it is not legal for use in California or other states adopting California emission standards. Not legal for use on pollution controlled motor vehicles; not intended for highway use.

      Application.
      This JLT Performance Cold Air Intake fits 2015-2020 3.5L EcoBoost F-150 models, excluding Raptor models.

      Shop All Truck Parts And Accessories

      Shop All Cold Air Intakes For Trucks

      Fitment:

      Details

      JLT CAI-F150EB-15

      CA Residents: WARNING: Cancer and Reproductive Harm - www.P65Warnings.ca.gov

      Installation & What's in the Box

      Installation Info

      What's in the Box

      • (1) JLT Intake Tube
      • (1) Air Filter
      • (1) 3.50-Inch – 3-Inch Reducer
      • (1) 4.50-Inch – 4-Inch Reducer
      • (1) Heat Shield
      • (1) Hear Shield Gasket
      • Installation Hardware
      4.7

      Customer Reviews (119)

        Questions & Answers

        10 More Questions

        Will It Fit My F-150

        • 3.5L V6 EcoBoost - 15, 16, 17, 18, 19, 20
        • 3.5L V6 EcoBoost Limited - 19, 20