 FREE 1 to 3-Day Delivery on Orders $149+ Details
How to Install Magnaflow MF Series Black Cat-Back Exhaust - Split Rear Exit on your Silverado

Shop Parts in this Guide
Warning: When working on, under, or around any vehicle exercise caution. Please allow the vehicle's exhaust system to cool before removal, as exhaust system temperatures may cause severe burns. If working without a lift, always consult vehicle manual for correct lifting specifications. Always wear safety glasses and ensure a safe work area. Serious injury or death could occur if safety measures are not followed.
Step 1:(Carefully read all instructions before installation). To remove the OEM exhaust system, you will first need to cut the pipe behind the muffler before it goes over the axle. You can then disengage the welded hangers from the rubber insulators and remove the tailpipe. Unfasten the inlet pipe assembly from the catalytic converter at the clamp junction. Do not damage or discard the OEM fasteners or rubber insulators, as they will be reused to mount the new system. Disengage the muffler hangers and remove it from the vehicle. Now you can install your new MAGNAFLOW performance exhaust system.
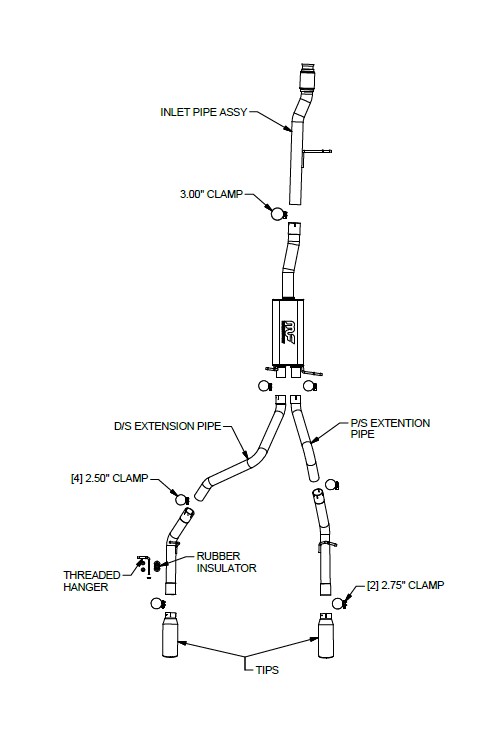
Step 2: Install the new inlet pipe at the ball flare using the OEM fasteners. Leave all clamps and fasteners loose for final adjustment of the complete system. Working rearward, install the muffler, extension pipes, and tailpipes using the supplied hardware as shown in the system diagram. A hanger bracket and mounting fasteners are supplied to hang the driver's side tailpipe from a pre-drilled hole in the frame as shown in Figure 2. Adjustable tip assemblies are provided to fit a variety of aftermarket bumpers and rollpans. Once a final position is chosen for the tips, it is recommended to have them welded to the tailpipes.
Step 3: With all components mounted loosely, adjust the system for overall aesthetics and clearance of frame & bodywork. (MAGNAFLOW recommends at least 1/2" of clearance between the exhaust system and any body panels to prevent heat-related body damage or fire.)


