FREE 1 to 3-Day Delivery on Orders $149+ Details
How to Install ICI Magnum PR Series Front Non-Winch Bumper (15-17 All, Excluding Raptor) on your Ford F-150
Hardware Kit Includes:
(1) 6 —Hex head Nuts (M 12-1.75) Grade 8.8
(2) 6 —Lock washers (M12) Grade 8.8
(3) 6 —Flat washers (m12) Grade 8.8
Components List:
1 — Heavy Duty Bumper (FBM84FDN)
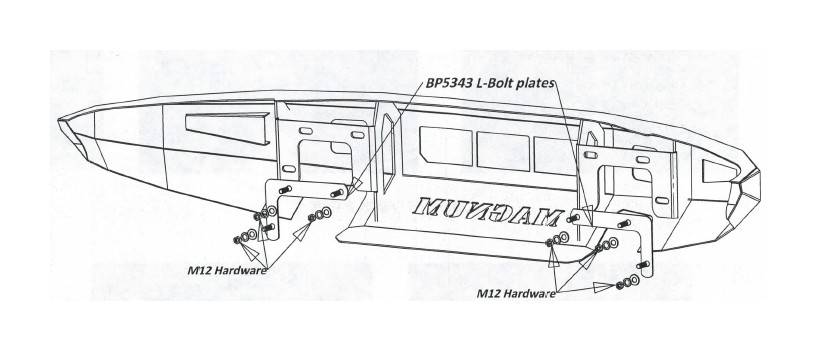
2 —Mounting L-bolt plates (BPS 343 )
STEP 1. Open hood of vehicle and disconnect negative battery terminal. Open instructions, read carefully to get a complete understanding of the installation before proceeding. Inspect hardware kit for completeness before beginning installation.
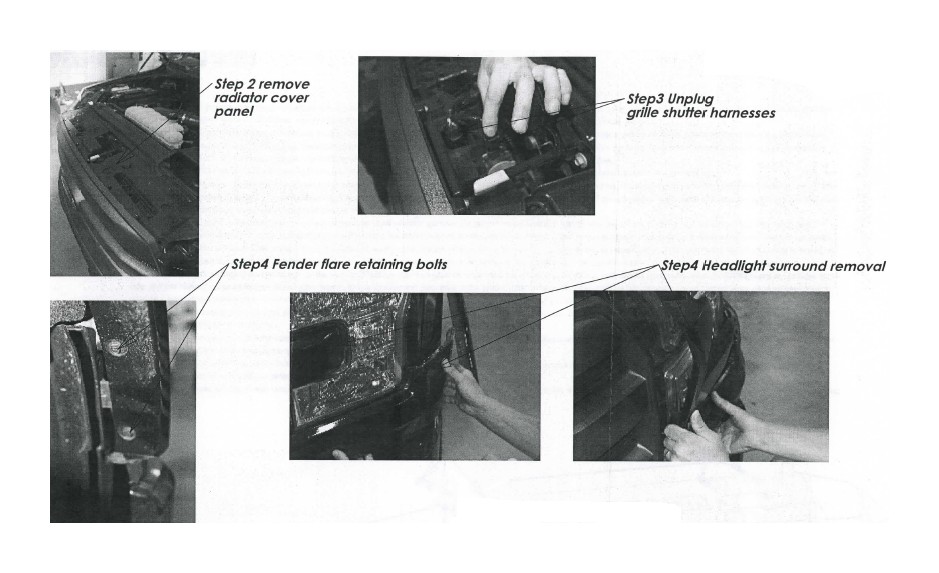
STEP 2. Begin by removing the black cover panel over the radiator and attached to the grille. Using a trim tab removal tool or equivalent remove the plastic push tabs securing the panel, save the panel and tabs for re-installation after the Magnum Bumper has been installed.
STEP 3. Next you will need to unplug the fog lamp plug from the rear of the lamp assembly, (If so equipped) and move the wiring harness out of the way. Unplug the large harness plug near the center and behind the front bumper.
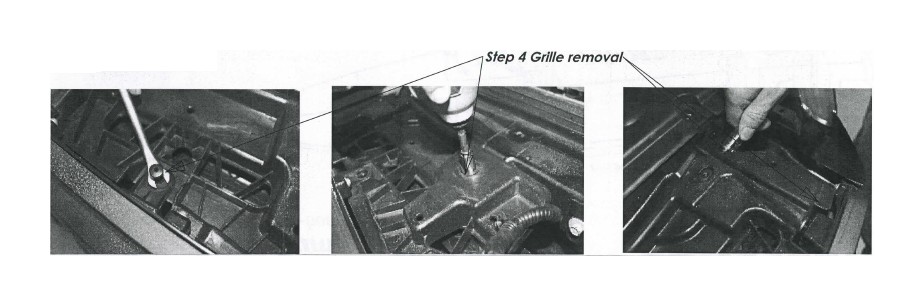
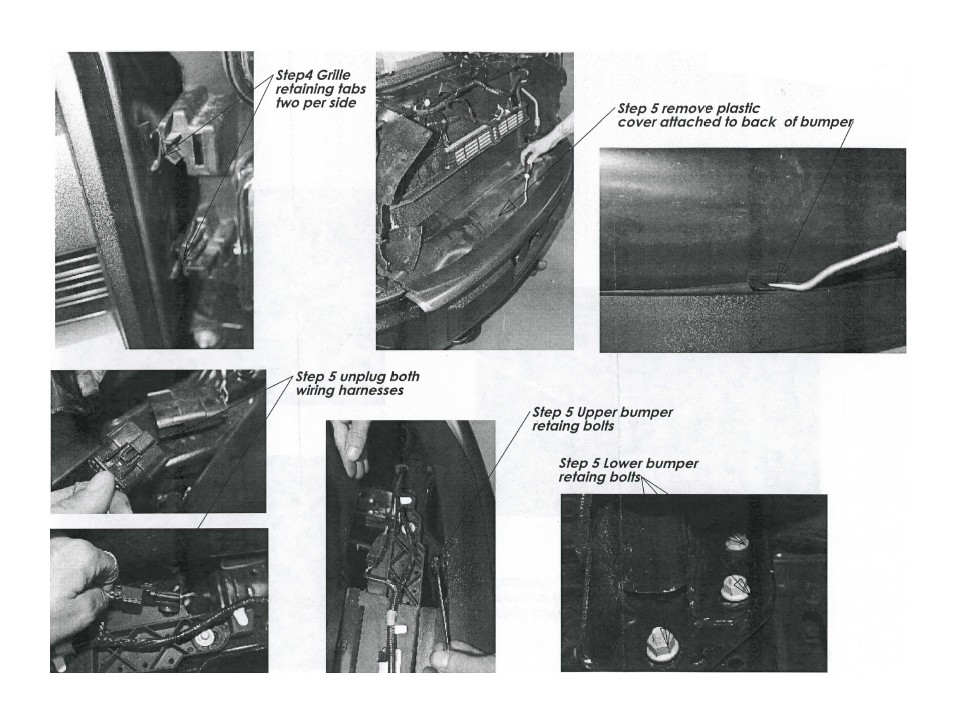
STEP 4. Next remove the factory grille from the vehicle. In order to remove the grille it is necessary to first remove front headlight surrounds in order to gain access to the inside mounting clips. First remove the fender flare retaining screws located just inside of the front fender wheel (if equipped with factory flares) and pull the front corner of the flare away from the vehicle. Now you can unsnap the headlight surrounds from around the headlamps and from behind the fender flare (remove both sides before proceeding). Put surrounds aside for reinstallation later. Next remove the factory grille from the vehicle. Begin by unplugging the wiring harness plugs to the grille shutters (if equipped).re move hex head retaining bolts along the top of the grille at the core support first, then gently pull outward on either side of the grille to release the four inner plastic tabs holding it in place. Use extra care not to damage the tabs or the grille itself.
STEP 5. Next step is to remove the bumper assembly from the vehicle. Remove plastic filler panel attached between the bumper and core support, disconnect wiring harnesses attached at the front bumper. Now remove bumper retaining bolts using a ratcheting style combination wrench or equivalent. Space is very limited so take your time and use patience. Remove the lower inside retaining bolts that must be accessed from underneath the front bumper. Remove the factory splash guard to aide in removal access. Once all bolts have been removed, with help remove the front bumper assembly from the frame and set aside.
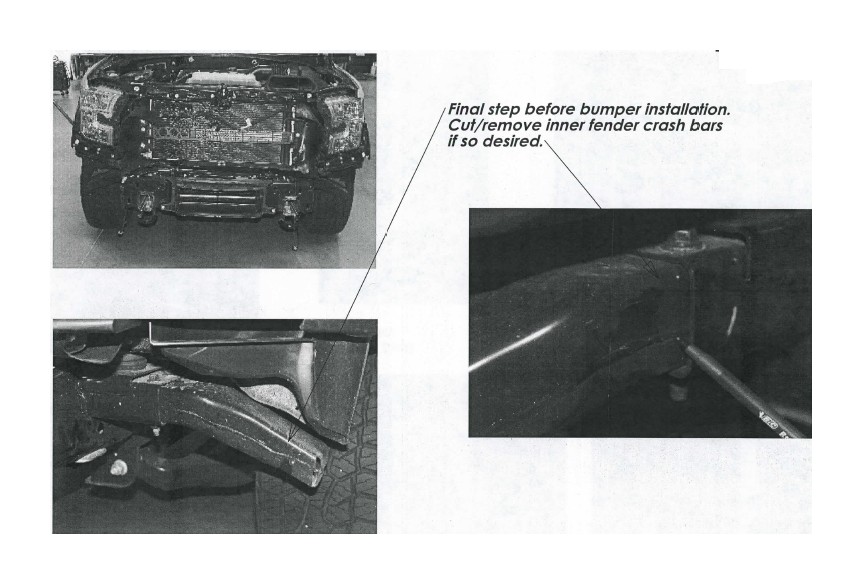
STEP 6. Next re-install the factory grille assembly using all factory hardware from step#4 along with the headlight surrounds. Do this before attempting to install the Magnum bumper. Once the factorygrille and the headlight surrounds have been reinstalled, reconnect wiring harness to grille shutters/bumper shutters and proceed with the bumper installation. Start by placing low-tack masking/painters tape along the bottom edges of the headlamps, grille and fenders to help prevent them being scratched during the bumper installation.
STEP 7. Install lights (not included) into the bumper before installing it onto the vehicle. Leave slightly loose for adjustment later.
STEP 8. Install the two L-bolt plates BP5343 (supplied) into the bumper brackets from the inside out (Fig A). Attach using the 12mm plastic push nuts (supplied) to secure them during the bumper installation. With help lift bumper up and on to frame of the vehicle aligning the L-bolts with the corresponding frame holes. Attach using the 12mm hex head nuts, flat washers and lock washers (supplied). Align bumper from side to side and snug hardware. Check alignment between the headlamp, grille and outer fenders.
STEP 9. Once the bumper is properly aligned to your satisfaction, tighten all hardware completely. Torque 12mm hardware to 35-45 ft/lbs. Re-torque after 100 miles and then periodically.