Talk to a Silverado 1500 Sales Tech
1-888-706-1096
M-F 8:30A-11P, Sat-Sun 8:30A-9P
$20K Sweeps! 10 Chances to Win! Enter Daily >

Flowmaster American Thunder Dual Exhaust System with Quad Black Tips; Rear Exit (19-23 5.3L Silverado w/ Factory Dual Exhaust)

Item S113521
Verify parts fit and get product recommendations.
Silverado 1500 Sales Techs: Connect Now M-F 8:30A-11P, Sat-Sun 8:30A-9P
$0.00
Our Price

$1,020.95 (kit)

FREE Shipping Market Price $1,174.99 You Save 13% ($154.04) Up to 10% off for Military & First Responders! See Details

Will this fit your Vehicle?

Select a different vehicle Help?
Update or Change Vehicle
Ship to: Ashburn - 20149
Sorry, please enter a valid US or CA postal code
We're sorry, zip can't be updated at this time.
Recommended Install Shops
How It Works
Install Shops are available near Ashburn - 20149

Add Local Shop Installation

Total cost of service $299.00
    Create a list
    Add to New List

    Saved - View your saved items

    We're sorry. We couldn't save this product at this time.

    or use

      Product Videos

      Jake: Jake here for AmericanTrucks and today I'm taking a look at this Flowmaster American Thunder Dual Exhaust System with the Quad Black Tips for 2019 and newer 5.3-liter Silverados that are equipped with the factory dual exhaust. If your Silverado is lacking in the sound department and you're looking to get more of that classic V8 rumble, well, Flowmaster has got you covered. This American Thunder system is gonna give you that quintessential V8 sound and turn up the volume pretty significantly. This is a bolt-on kit that's gonna give you the sound you want without blowing the budget either. Now, when somebody mentions the name Flowmaster, I'd be willing to bet that most of us can conjure up exactly the type of exhaust note that the company is famous for, the verbally aggressive V8 rumble, and that is exactly what you're gonna get here.Now, as you heard in the clips at the beginning of the video, this one does have a bit of volume to it though it's not quite wake-the-neighbors loud. For that, we're gonna give it a three out of five on the loudness meter. It is a big difference over stock, but not so much that you're going to disrupt the whole neighborhood on cold mornings. That said, you are also gonna get quite a bit more volume inside the cabin as well, but it is still manageable and you can carry on a conversation while you're on the road. Now that sound is due in no small part, of course, to the muffler. This system uses Flowmaster's famous Super 40 series muffler which is gonna provide that rich, deep tone and keep things in check sound-wise inside the cabin. Roll down the windows, you're gonna get to hear that excellent growl out of the tailpipes.Now this is a traditional single in dual out type muffler and you might be able to see in there, this is a dual-chambered setup as is tradition for Flowmaster. If you've heard any kind of older muscle car or any kind of customized truck, I guarantee you at some point in your life, you've heard one of these or you've ridden in a truck with one of these. Now the whole system is made from 409-grade stainless steel all the way back so it's gonna provide some good corrosion and rust resistance. You're also not gonna sacrifice any flow here, as you can probably see all the pipes are mandrel-bent, so there's no interruption to the flow of exhaust gases because there's no weird curves or creases in the pipes. And these rear sections are designed to perfectly clear the spare tire underneath of your truck too, so there's no need to do any modifications or take that spare out, it's gonna function just like your stock system. And of course, the whole thing is finished off with these super cool 4-inch twin tips finished in a black ceramic coating. It's a really good look and these fit very nicely in the cutouts in your rear bumper as well so it's gonna give the truck a nice subtle update but something that's a definite visual improvement over those factory tips.Now, as far as pricing goes, this whole setup is gonna run you around $975. And while that's not exactly pennies, it does fall about in the middle of the category when it comes to exhaust for these newer Silverados. You are gonna save a bit of money with one of these versus a full 304-grade stainless setup, but it's still a good quality system that's gonna sound better and avoid some of the drone that those cheaper exhausts might have. Installation for this one is gonna get a two outta three on the difficulty meter and should only take you about two hours to get it all done.Now, while everything you need is included in the box, you may be required to make a cut to this big extension pipe here depending on your cab and/or your bed size. However, it is only that one cut to this one pipe, so it's very easy to make and there are measuring instructions included in the kit. Otherwise, this is a pretty simple bolt-on system, and it's gonna utilize all of your factory exhaust hangers, so there's absolutely no modification needed to your truck. And with that, let's turn it over to one of our AT customers who's gonna walk you through the process.Man: Okay. Just a quick run down on all the tools we used. We got a Sawzall with a metal core cutting blade, used to have teeth, 1/2-inch impact, 15-millimeter impact socket, 3/8 cordless impact. We got a 13-millimeter socket on there, some channel locks, this tool we used for the rubber hangers, pretty long 3-inch wobble extension, 13-millimeter deep, 15-millimeter deep, 10-millimeter combination wrench, we use that to get the tips off. 3/8 long ratchet, 1/4-inch ratchet, 3/8 flex, a 4-inch, 1/4-inch extension. This little palm ratchet was handy for the tips to two top bolts from the tips, 10-millimeter 1/4-inch drive socket, flat blade screwdriver. We used some penetrating solvent and some anti-seize.In preparation for this video, we got the truck up on stands and I went around and kind of scouted it out, see what size tools we need and sprayed penetrating oil on the passenger's. Okay, the first step in the disassembly process is remove the stock tips. There's three 10-millimeter bolts, one here, and one on each side here. I've taken these off before so I kinda know what to do. Okay. Took them off to paint them when I should have powder-coated them. The paint didn't last but that's one of the reasons I'm switching it to [inaudible 00:05:57.661] the paint started falling off. Last time I picked up this little palm ratchet in order to get into this. There's one, we're gonna do the same thing on the other side.All right. Okay. The next step we're gonna remove the driver's side tailpipe which is connected at this flange here, the two 13-millimeter flange nuts. I got a flexible ratchet and a 13-millimeter kinda like to break it loose and then use the cord as a ratchet if I can. Did spray penetrating oil on these earlier. Okay.Next, we're gonna remove this 15-millimeter bolt that holds this hanger to the frame. Pop that hanger off, we're gonna reuse that later. That kind of freed up the pipe under the flange. So that's the driver-side tailpipe. Okay. Next step. We're gonna remove the rear isolator from the passenger side. So our 15-millimeter bolt, this pops off. There's a tab right here that goes into the frame. It's off, we're gonna be reinstalling that. Okay. Next step in the process is to cut the pipe just in front of the inlet, which is the front side of the muffler. Got my floor jack underneath the muffler just to keep stuff from dropping down and we got a Sawzall, and we're gonna cut through.That was a little violent, but it got it done. Next step is to get the passenger side tailpipe on the hangers right here and here. Got these pliers from the Snap-on guy, a Blue Point YA3202. Never used them before, but this is what they're supposed to be for, and we'll see how they work. Looks like these things are pretty greasy, maybe they'll slide out of there. They work pretty good actually. All right, we're free. Take it off from underneath this. Okay. I decided to make another cut right here because pretty difficult to get this muffler over the axle and the Y at the back makes it difficult to come out this way, so I'm gonna make another cut right here and the tailpipe will go that way.Okay. The last part of the disassembly is to remove this clamp just forward to this flexible section of the middle pipe. Got a 13-millimeter socket on a [inaudible 00:12:55.155] wrench. I think we have to take it all the way off, but we gotta loosen it quite a bit. So we take it off, it'll come off. These pliers actually work pretty good. Okay. We'll see if I can hold this threaded portion of this clamp. These channel arcs keep it from slipping. That worked pretty well. Okay. I got a smaller flat blade screwdriver to pry this tab up, release this clamp.Okay. Prior to installation of these clamps, we're gonna take the nuts off and put anti-seize on the threads of all these clamps. Got my cordless 3/8 impact with a 15-millimeter socket. And we're gonna repeat that for all these clamps. Okay. So the first step to assembling the new exhaust is to put the clamps we took off from the last step on the new pipe. Okay. Cross-member here to get around. [inaudible 00:15:32.557]. Get this lined up.Okay. So the muffler is ready to go on, I got a clamp on the inlet. Just put the side that says Flowmaster where it will be visible, slip it on. Ensure this clamp is snug up a little bit for now. Position these clamps over the muffler outlets. Okay. We got our right-side pipe that goes over the axle, get started in this hanger over here. Make sure that you can get it started on the muffler first. Start it on the muffler. Just kind of trying to judge by the angle that it sits in the hanger where it needs to be. I'm sure we're gonna have to go back and make adjustments to kind of get everything up there. Sneak it around the spare tire.Okay. We got the last part of the right-side tail pipe plant on there. The mount that we took off, the stock mount that we took off originally, you can get started on there. Start with the bolt back in the place we started. Remember when I started this, the one thing I was gonna be really fussy about was how these tips align in this space, and the bumper. Really like them to be centered in that space so try and be kind of fussy about how that lines up and I'm sure I might have to go back and make some adjustments. Get this 15-millimeter back up there.I plan on going back through with an air impact once I got everything in place and really hammering down on those plants, just kind of snugging them up. Okay. We got the last clamp going on the driver's side tailpipe. The stock mount which on this side goes on from the front side down. Here, it's started. So far, I don't have to the way everything goes together on this. Okay. This is the clamp for the driver's side tail pipe, looks like they're pretty well lined up. Trying to maintain an even gap here between the shield for the spare tire and the shock.Okay. We gotta tighten the driver's side rear mount, 15-millimeter, just the stock mount we removed originally in the stock. Okay. Now I'm just gonna go back through and give a final tighten on everything. I have the 13-millimeter on the cordless impact. This one here is kind of a delicate clamp, and then the rest of them, the band clamps, I'm gonna use the 1/2-inch air impact and just kind of try and not tighten them too much until they're nice and snug.Jake: That's gonna do it for our review and install of the Flowmaster American Thunder Dual Exhaust for 2019 and newer Silverado 1500s. Thank you so much for watching and as always, for all things Silverado, be sure to keep it right here at americantrucks.com.

      Product Information

      Features, Description, Reviews, Q&A, Specs & Installation

      Features & Specs

      • Aggressive Exterior Sound
      • Moderate Interior Noise
      • Designed for Optimum Flow
      • Super 40 Series Muffler
      • Mandrel-Bent 409S Stainless Steel 2.50-Inch Tailpipes
      • Large 4.50-Inch Black Ceramic-Coated Tips
      • Quad Rear Exit
      • Bolt-On Installation
      • Lifetime Limited Warranty
      • Fits 2019-2023 5.3L Chevrolet Silverado 1500 Models with Factory Dual Exhaust

      Description

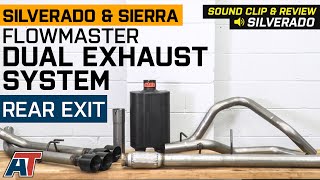
      Excellent Sounds. This Flowmaster American Thunder Dual Exhaust System with Quad Black Tips delivers an aggressive exterior sound. All while keeping the interior sound at a moderate level for comfortable long rides.

      Improves Horsepower and Torque. This Flowmaster American Thunder Dual Exhaust System is designed to provide superior airflow. This straight-through design improves horsepower and torque.

      All-Stainless Steel. This Flowmaster American Thunder Dual Exhaust System features all-stainless steel construction. It’s designed to last with the ceramic-coated quad tips providing a good-looking custom style.

      Backed With Lifetime Limited Warranty. This Flowmaster American Thunder Dual Exhaust System is warranted against defects in material or workmanship. This warranty only applies to the original retail purchaser. Exclusions will apply.

      Application. This rear exit Flowmaster American Thunder Dual Exhaust System with Quad Black Tips is designed to fit 2019-2023 5.3L Chevrolet Silverado 1500 models with factory dual exhausts.

      Shop All Truck Parts And Accessories

      Shop All Truck Exhaust

      Fitment:

      Details

      Flowmaster 817895

      CA Residents: WARNING: Cancer and Reproductive Harm - www.P65Warnings.ca.gov

      Installation & What's in the Box

      Installation Info

      What's in the Box

      • (1) Inlet Pipe
      • (1) Extension Pipe
      • (1) Muffler
      • (1) Driver Side Front Tailpipe
      • (1) Passenger Side Front Tailpipe
      • (1) Driver Side Rear Tailpipe
      • (1) Passenger Side Rear Tailpipe
      • (2) Black Dual Tips
      • Installation Hardware
      4.6

      Customer Reviews (233)

        Questions & Answers

        10 More Questions

        Will It Fit My Silverado 1500

        • 5.3L V8 - 19, 20, 21, 22, 23, 24

        Designed for Double Cab and Crew Cab Models