FREE 1 to 3-Day Delivery on Orders $149+ Details
How to Install Flowmaster Force II Cat-Back Exhaust - Single Side Exit (07-13 5.3L Silverado 1500) on your Chevy Silverado

Shop Parts in this Guide
Removal:
1) Raise the vehicle up on a hoist or rack to working height.
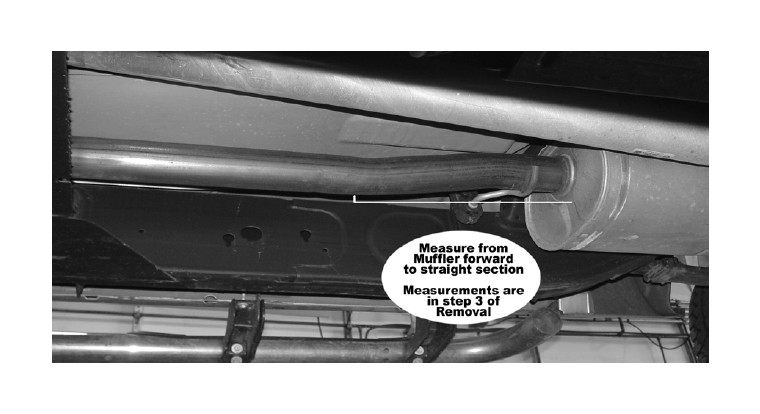
2) Support the muffler with a stand. Using the measurements below, measure from the muffler forward and mark accordingly. Then cut using a hacksaw or sawsall. Please double check measurement before cutting.
2007-2008 Models:
Regular Cab / Standard Bed - Trim 11.50” from muffler forward
Extra Cab / Short Bed - Trim 15.50” from muffler forward
Extra Cab / Standard Bed - Trim 15.50” from muffler forward
Crew Cab / Short Bed - Trim 15.50” from muffler forward
2009-2013 Models:
Extra Cab / Standard Bed - Trim 28.00” from muffler forward
Crew Cab / Short Bed - Trim 28.00” from muffler forward
3) Separate the four wire hanger rods from the rubber mounts that support the system. A lubricant will make removal much easier. Remove the muffler/tailpipe assembly and set aside.
4) The factory ball clamp connection behind the catalytic converter will have to be loosened slightly and the pipe rotated to allow clamp hanger #387HA or 412HA to connect with the factory front rubber hanger properly, see steps 1 and 2 below for these instructions.
Installation:
1a) 2007-2008 Models:
Place inlet pipe #TB477S into position onto the factory inlet flex pipe and place supplied 3” clamp at this connection. Tighten firmly. Next, place the supplied inlet pipe hanger #387HA onto the pipe and into the factory rubber mount on the frame. Note: For Regular Cab - Standard Bed trucks, you will need to trim 4.5” off of inlet pipe #TB477S. Also, 4.8L Engines will need to use adapter #TB526S.
1b) 2009-2013 Models:
Place inlet pipe #26279S into position onto the factory inlet flex pipe and place supplied 3” clamp at this connection. Note: Some 2010 models were equipped with a 2.75” diameter inlet pipe. In these cases you will need to trim 2” off the rear of pipe #26279S, and use the adapter pipe #TB526S in the front.
2) For 2009-2010 models place the supplied inlet clamp hanger #387HA onto the inlet pipe and into the factory rubber mount on the frame. For 2011-2013 models, use clamp hanger #412HA instead of #387HA. Tighten just enough to hold in place as it may need to be moved during final adjustment.
3) Slide a 3” clamp onto the inlet neck of the muffler #853056-Z. Then place the muffler onto the inlet pipe and support with a stand. Tighten the clamp just enough to hold in position, while still allowing for adjustment.
4) Slide a 3” clamp onto the muffler outlet neck. Place tailpipe #26337S into position over the axle and insert the hangers at the front and rear of the pipe into the rubber mounts on the vehicle and slide into the muffler outlet. Tighten the clamp just enough to hold, while still allowing for adjustment.
5) Place the stainless tip #ST429 onto the end of the exit pipe and adjust to the desired location. Then tighten the tip enough to hold, but still allow for adjustment.
6) Adjust the position of all the pipes and muffler to provide a satisfactory fit. A minimum of 3/4” clearance around all parts of the system must be maintained; while keeping suspension travel and vibration in mind. After adjustments have been made, securely tighten all clamps and install the 3 1/2” hanger keepers onto the hanger rods.
7) For a more secure installation, we recommend welding all slip-fit connections.
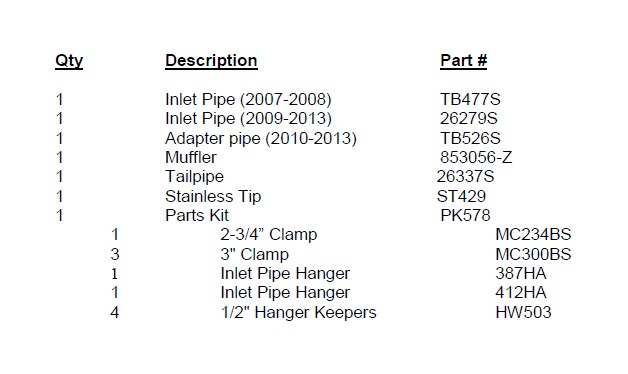
PACKING LIST