Talk to a F-150 Sales Tech
1-888-706-1096
M-F 8:30A-11P, Sat-Sun 8:30A-9P
$20K Sweeps! 10 Chances to Win! Enter Daily >

PRO-Series Projector Headlights; Alpha Black Housing; Clear Lens (04-08 F-150)

Item T566878
Verify parts fit and get product recommendations.
F-150 Sales Techs: Connect Now M-F 8:30A-11P, Sat-Sun 8:30A-9P
$0.00
Our Price

$489.99 (pair)

FREE Shipping Market Price $564.99 You Save 13% ($75.00) Up to 10% off for Military & First Responders! See Details

Will this fit your Vehicle?

Select a different vehicle Help?
Update or Change Vehicle
Ship to: Ashburn - 20149
Sorry, please enter a valid US or CA postal code
We're sorry, zip can't be updated at this time.
Recommended Install Shops
How It Works
Install Shops are available near Ashburn - 20149

Add Local Shop Installation

Total cost of service $174.99
    Create a list
    Add to New List

    Saved - View your saved items

    We're sorry. We couldn't save this product at this time.

    or use

      Product Videos

      Jake: Jake here for American Trucks. And today, I'm taking a look at the PRO-Series Projector Headlights with Alpha Black Housings and Clear Lenses for 2004 to 2008 F-150s. Whether you're looking to replace some old faded lenses or if you just wanna update the look of your F-150, these PRO-Series Projectors are going to fit the bill. Not only do they provide you with updated good looks, but you also get a big-time lighting upgrade with LED daytime running lights and those dual projectors. So, they're a vast improvement over your stock halogens. So, if you're looking for a big improvement in both style and substance, then stick around because I think you're gonna like these.Lighting upgrades are some of the easiest and best ways to improve your truck. Whether you're going for more aesthetics or for lighting performance, opting for a new set of headlights is a great way to make a difference in the overall experience of driving your truck. Now, these projector headlights take the place of your factory halogens, and they provide you with much better lighting than those stock units, and that is thanks to these projectors. So, as you can see, you get two in each light, the inner one for the high beams and the outer one for the low beams. Both of them utilize each seven bulbs for a much cleaner, crisper, and brighter light output than your factory bulbs. Those bulbs are also rated to provide over 50,000 hours of light, so you shouldn't need to change them anytime soon. However, if you do, it's not gonna be a problem as those H7 bulbs are readily available pretty much everywhere, and they're pretty affordable too.So, running costs here are gonna be minimal, but you also get the benefits of LED daytime running lights here too. On the top and bottom of the housing's here, this is an LED strip, so these are gonna shine a bright white when you power on your truck, but they have another cool function in that they act as your turn signals too. And they're sequential turn signals to boot, and I think those happen to be pretty cool. So, when you hit that stalk, these are gonna switch over to an amber color. It's gonna be much brighter than your factory DRLs and signals, and since they're LEDs, they're gonna last a long time too. Now, this set is also DOT and SAE approved, meaning that they meet all the necessary regulations to be deemed street legal. Adjusters are also included so that you can ensure proper alignment for the best lighting output. I think these bring a really clean, modern look to the front end of this Gen F-150, and they really work well with the styling too, especially with those black housings inside. So, they give you kind of an updated modern and even a little bit of a stealthy look because you got that black housing too.Speaking of those housings, they are constructed from polypropylene, which means that they're gonna be lightweight and durable. And the lenses are your industry standard polycarbonate, meaning that they're gonna hold up well to impacts and weather conditions. Each housing is weather-sealed to keep out moisture and dirt too, so it's gonna protect the housings and the electronics inside of them. Pricing is gonna come in at about $550 for the set, placing them in the middle of the pack when it comes to replacement headlights. Not the cheapest, but you are getting some good stuff here and a cool style of the boot. And again, they're fully street legal so there's no worries there either.Installation is gonna get a two out of three on our difficulty meter and it should take you about two hours to get this job done. And the reason for all that is that you are going to need to do a bit of wiring for those daytime running lights to work properly, but everything is pretty much right here, including one of the connectors that you need. Everything else is included in the kit, so it is gonna take you a little bit of time to get that done. But again, everything is set to go here, and everything else is plug and play. And to show you exactly what's involved, let's throw it over to the install bay.Man 1: The tools you'll need for this project are a 3/8 impact gun or a 3/8 drive ratchet, a short extension, and a 10-millimeter socket. Hi, everyone. Today we're installing a set of headlights on our F-150, but first, let's watch a short video on how to uninstall the stock headlights.Man 2: Guys, first up of the uninstall to get our factory headlight off is, of course, pop your hood. Then you're gonna take a 10-millimeter socket. I like to use an extension just to flip this guy over. There's one bolt here, one bolt up top, and then one tucked into this corner. So, grab your 10-millimeter and get all three of them off. All right, from here we can just pull straight back on our headlight. We've got it loose already. Pull and disconnect. Now, what you wanna do is flip her over and we're gonna pinch and disconnect the harnesses from the bulb sockets. So here, just pinch and disconnect. Same here. Pinch and disconnect. All right, now we can set this guy aside.Man 1: Our first step after we've got our old headlights uninstalled is gonna be to run our DRL harness for the new headlights. And I'm not gonna lie to you, this first step will try your patience, but it'll be worth it in the end. So let's go ahead and get started. In order to connect our DRL harness, we have to run a wire through the firewall and tap into the fuse box that's on the passenger side. And to do that, there's a grommet on the firewall back here behind the battery tray that you'll need to access in order to get in there. Now, this is where the trying your patience part comes in. You'll find it is a lot easier to reach that grommet and to get it uninstalled from the firewall if you remove your battery and the battery tray itself.So, to do that, we've got a couple of clips here on the bottom that hold the wire harness to the battery tray. We're gonna remove those. And then there are four 13-millimeter bolts that we need to remove in order to uninstall the battery tray. Now, as obviously you can see, we've already taken the battery out just to make things go a little quicker, but remove your battery and then we'll remove the tray. So, let's go ahead and do that. So, remove this back clip that holds the wiring harness to the tray simply by pulling it away from the tray. Now, the front one is a different style clip. We'll use a pair of needle-nose pliers and just squeeze the clip together on the backside, and then pull it out. Now we'll go ahead and remove the two bolts at the bottom of the tray, and now we'll get the two at the top.All right, now you can go ahead and lift your tray up and away, but before you pull it all the way out, there's a little black vacuum box here that's on the back of the tray. It just clips in. So, go ahead and remove that, and then you can go ahead and lift your tray out. Now, the grommet that we're gonna use to access our fuse panel is right here. It's this really big one. You see that there's two of them coming out of the firewall. The bottom one, which is the largest of the two, is the one where we're gonna run our DRL wire through. Now, you can use a flathead screwdriver, or a large hook, or a trim removal tool, something of that nature to pry that grommet out of the firewall. Now, you're not gonna be able to pull it completely out because, obviously, there are wires on the other side, but once you get it pulled away from the firewall, then you can go inside and run basically a fish wire up through the hole from the inside of the car, and we can attach our DRL wire to it and pull it back through. So let's go see what we have to do on the inside to get to this point.All right, now that we're on the inside of the truck, the fuse panel is down here on the kick panel on the passenger side. So, you need to take that cover off. Ours is already off, but you'll need to pull that cover off. It's a simple, just reach in and grab it and pull it off. It's just held in by plastic clips. And then once you get inside here, what we're gonna do is we're gonna remove one of these fuses and then we're gonna pull that DRL harness through the grommet that we opened up in the firewall and we're gonna plug that into this fuse that we take out., and we're gonna plug that fuse into the fuse tap as well. That way we don't lose power for anything that we're actually running. Now, in order to do that, we're also going to have to pull back the carpet and pull back the firewall insulation to be able to reach our fishing wire up into that grommet hole to pull that harness through.So, let's go ahead and get started. So, the fuse we're talking about is right underneath this single relay right here and it's a row of fuses right below it, and it's gonna be the fourth one in towards the front of the vehicle. So, we'll go ahead and pull that out. Just use a pair of needle-nose pliers, and pull that 10-amp fuse out. Now, with that out of the way, what we can do is go ahead and pull the carpet back to get that out of the way. And then you'll also have to pull back the insulation on the firewall. And once you've got that out of the way, whatever tool that you're going to use to try and fish that harness through, you can insert it up in here. Now, there's no way for us to show you this on camera, we just can't get it in there, but you're gonna have to reach up inside against the firewall and feed that through up to the hole where the grommet is at on the firewall. This is where I told you your patience will be tried in this area.So, let's go ahead. Our fishing tool is already in place and ready to go. So, what we're gonna do is we're just gonna attach that harness to the fishing tool and then gently pull it through. Now, you'll probably need another set of hands to help you do this, to feed that through because you're gonna have to pull the grommet away from the firewall while the harness is being fed through. So, let's go ahead and get that taken care of. So, the wire that we're gonna be feeding through is this gray wire on our harness that's got our fuse tap attached to the end of it. Now, I would suggest removing the fuse that's already in the fuse tap, and we'll put that back in later. And as you can see here, we've already got our tool fished through the hole. And what we're gonna do is we're just gonna tape this on here just to make sure that it's nice and secure, and it's gonna be able to stand pulling through that hole. So, we're just gonna wrap some electrical tape around that, and wrap it pretty tight just to make sure that it stays stuck. And now we can go ahead and start feeding it through the grommet and into our firewall. So, let's go ahead and get that done.All right, now we'll go ahead and start feeding this through. So, you're gonna have to pull this grommet back to make sure that you got enough room to get that fuse tap through. So, this is where I said it's a good idea if you've got a second pair of hands to help pull that through. So, we'll go ahead and pull our grommet back and start feeding it down in through it. One thing you might want to consider if you're making this a permanent addition to your vehicle is to cut a slice on the edge of this grommet here so that you can feed the wire into that slice and help protect it from the sharp edges of the firewall. Now, we're not gonna do that on ours because we're not making a permanent addition to the vehicle, but it's just something for you to consider when you install yours. And we can go ahead and unwrap our wire from our fishing tool, reinsert our fuse that we pulled out of the wiring harness, and also the fuse that we pulled out of the fuse panel. Once you've got both of those installed into the fuse tap, we can go ahead and insert that back into the fuse panel where we pulled the fuse out of it. And once you've got that inserted, you can go ahead and reinstall your fuse cover and replace your insulation and your carpet back in its original position.Now we'll finish running the rest of the harness. Now we can go ahead and reinstall our battery tray. Make sure your wire is out of the way away, reattach the little black box. And using the original hardware, we'll go ahead and secure our battery tray. And now we'll tighten them down with our 13-millimeter socket. Now we can reinstall the battery. Reconnect our positive terminal first, then our negative. And we'll tighten down our terminals. And now we can detach our positive and our ground for our DRL harness to the battery. Now we can go ahead and route the rest of our DRL harness to our headlights on both sides of the vehicle. We'll feed this down, and you'll notice that there's a short wire here for the passenger side and then the longer one will run across the front of the radiator and into the driver's side. So we'll just run this across alongside our hood latch cables. Now I would also recommend after you get this run across to go ahead and zip tie this up so it's nice and secure and it doesn't get tangled up with anything else or cause any interference.And now we're ready to install our lights. Now we go ahead and just plug in our factory harness to the back of our light and attach our newly run DRL harness to the brown wire on the back of the light. And go ahead and reinstall the light using the original hardware. And we'll tighten them down with our 10-millimeter socket. And now you can repeat that process for the other side. And that wraps up our review and install of the PRO-Series Projector Headlights with the Alpha Black Housing and Clear Lens for the '04 to '08 F-150. Thanks for watching. And remember, for all things F-150, keep it right here at americantrucks.com.

      Product Information

      Features, Description, Reviews, Q&A, Specs & Installation
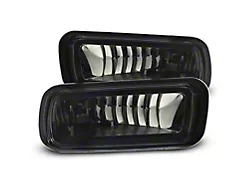
      Features & Specs

      • Sporty-Looking PRO-Series Projector Headlights
      • Boosts Illumination and Offers Sophisticated Style
      • Uses H7 Low and H7 High Beam Bulbs
      • White LED DRLs and Sequential, Amber LED Turn Signals Included
      • Sealed with Impact-Resistant Clear Polycarbonate Lenses
      • Enclosed in Alpha Black Polypropylene Housings
      • Dual Projector Design for Intense Low and High Beams
      • Meets DOT and SAE Standards
      • Direct-Fit Replacement
      • Sold as a Pair, Driver and Passenger Sides Included
      • Designed for All 2004-2008 Ford F-150 Models

      Description

      Sportier Feel and Brighter Lights. Revamp the looks of your early model F-150 with these PRO-Series Projector Headlights; Alpha Black Housing; Clear Lens. This pair of modern headlights add a sportier vibe to your truck. Plus, they bring brighter lighting performance with dual projector lenses magnifying the lights.

      No Conversion Needed. There’s no need for complicated installation and adapters with these headlights. The pair uses H7 bulbs for the low and high beams.

      Sealed and Durable Light Housing. The headlights’ housings are made from durable polypropylene with alpha black coating to blend seamlessly with your truck’s other exterior trims. Sealing the housings are impact-resistant clear polycarbonate lenses. These lenses feature dual rectangular projectors for high and low beams. They intensify the light coming from the bulbs, casting brilliant illumination on the road ahead.

      Direct-Fit Bolt-On. This is a direct bolt-on installation so a professional installation won’t be strictly required. To ensure a correct installation, please read the instructions carefully and check the parts for damages or defects.

      Complies with DOT and SAE Standards. Have peace of mind knowing you are using headlights that comply with all necessary road safety standards.

      Application. These PRO-Series Projector Headlights; Alpha Black Housing; Clear Lens are designed to fit all 2004-2008 Ford F-150 models.

      Bulb Application. PRO-Series Projector Headlights utilize high beam H7 bulbs and low beam H7 bulbs.

      Fitment:

      CA Residents: WARNING: Cancer and Reproductive Harm - www.P65Warnings.ca.gov

      Installation & What's in the Box

      Installation Info

      What's in the Box

      • (1) Driver Side Headlight Assembly
      • (1) Passenger Side Headlight Assembly
      • (2) H7 High Beam Bulbs
      • (2) H7 Low Beam Bulbs
      • Installation Hardware
      4.6

      Customer Reviews (122)

        Questions & Answers

        10 More Questions