Talk to a F-150 Sales Tech
1-888-706-1096
M-F 8:30A-11P, Sat-Sun 8:30A-9P
$20K Sweeps! 10 Chances to Win! Enter Daily >

Rough Country Pocket Fender Flares; Raw (18-20 F-150, Excluding Raptor)

Item T544382
AmericanTrucks no longer carries the Rough Country Pocket Fender Flares; Raw (18-20 F-150, Excluding Raptor). Please check out 1997-2003 Ford F-150 Exterior Trim for an updated selection.
Verify parts fit and get product recommendations.
F-150 Sales Techs: Connect Now M-F 8:30A-11P, Sat-Sun 8:30A-9P
$0.00

    Product Videos

    The raw pocket fender flares that we have here today will be a great option for the 2018 through 2020 F150 owners who are looking to go with a prep and paintable set in order to eventually match his or her truck. Now, this set of four will feature a very durable ABS plastic for the build along with a prep and prime surface, all for that mid to low $200 price point. Installation is not going to involve any drilling here, so I figure a solid one out of three wrenches on the old difficulty meter, and I would say a couple of hours to complete from start to finish as there is a fair amount of work to get everything in place. But if you hang with me for a bit, we'll walk you through that job a little later in the video.All right. So right off the bat here, gang, I just wanna remind everybody that these flares are raw, meaning there's no paint or finish to speak of. Instead, they will need to be scuffed and painted prior to the installation. Now, if you are looking for maybe a matte black set to just slap on right out of the box, these will obviously not be it. Instead, this is gonna be a solid choice again for owners who prefer to match the color of their flares to their truck, which I just think results in a more finished look. But with that out of the way, let's talk about what else you can expect here with these pocket flares. You are receiving four altogether. I know I only have two, but I'm kind of table-limited. And they do also include the simulated rivets and installation hardware. Now, the flares themselves are roughly 6-1/4 inches tall, and when installed will provide roughly an additional 2 inches of tire coverage off of that fender to cover up a wider wheel and tire along with a lower offset. Now, don't get me wrong, I personally really like the look of some poke with my truck, but the reality is some state and local laws mandate that those tires are covered at all times. And if not, well, you could possibly fail inspection or get a fix-it ticket, which is certainly not fun.Now, as far as your build is concerned, the pocket flares that we have here will feature what is called a tri-blend ABS plastic construction, which will be extremely durable and have some flex to it but without breaking. And, of course, the biggie here, no doubt, with these options will be that simulated rivet look around the edges, which I would say some owners will love and others, maybe not so much. The good thing is if you're not a huge fan of that hardware look for the flares, you will be able to find a smooth paintable option here on the site as well.But now let's switch gears and talk a little bit more about that installation as promised earlier. And, again, not a terribly hard job, one out of the three wrenches on the difficulty meter, about a couple of hours or so to complete from start to finish. The reason being is that you have to install all the rivets along the side of each flare, four altogether, and that certainly will drag out the installation a little bit more than maybe expected. But regardless, we wanna show you how it's gonna go down, so check out our detailed walkthrough and tool breakdown right now.Tools I used for this installation include a cordless impact or ratchet, 1/4-inch ratchet, 10-millimeter socket, 7-millimeter socket, 5-1/2-millimeter socket, 3/16 Allen tool, and finally, a pair of scissors. All right. Guys, we're gonna get started with our install here. Again, one big reminder, yes we know these are unpainted. We're operating under the assumption that at this point you've gotten your flares painted and you're ready to throw them on, and we're gonna show you how to do that. Now, first things first, we have to install all of the hardware along with the weatherstripping before we actually move the flares over to the truck. Now, to do so, we have our 3/16 Allen on our 1/4-inch ratchet, along with a 10-millimeter socket. I actually put it on a gun because there are a lot of these little bolts and I don't wanna do them all by hand. So whatever you have laying around the garage will work just fine as long as it's a 10-mill and a 3/16 Allen. So with that said, let's get these bolts in place. So I'm actually gonna flip the flare upside down here. What I like to do with these types of things is get the bolt or screw in place and then just hand-tighten the nut for now. And we'll go back and tighten everything up with our gun, of course, but just to get them all started and then we'll go back and tighten them down.With all of our bolts in and kind of finger tight, for now, I'm gonna go back around again with our 3/16 Allen and kind of hold that in place. And then, again, I'm just gonna use the gun to tighten everything down. Don't need a ton of torque here. I got my gun turned way down. I just wanna tighten them up. With all of our hardware in place, now we have our included weatherstripping. Now, this is not cut to length. They just basically give you one big roll, so you got to take care of that on your own. Basically pretty self-explanatory. You're gonna start at one end. I'm gonna peel a little bit of this off and then just kind of peel it off as I go, getting it in place a little bit at a time. This can be a bit time-consuming, but it is very important as to not scratch the paint on your truck. You're gonna peel a couple inches at a time here just to give yourself a little tab and then start working your way around the edge.With the weatherstripping fully installed on our flare, we got a pair of scissors here. We're just obviously gonna trim off the excess right at the edge. All right. So that's one flare. As you can see, the weatherstripping, I would say, is gonna be your most time-consuming part of this entire install. So to save you guys some pain, we're gonna fast forward things a little bit. I'm gonna slap the weatherstripping and bolts on our rear flare and then we're gonna jump right into the install, starting with our front. We're gonna start up front here with our fender flare installation. And in order to get these new guys in place, we first have to remove a few bolts in our stock fender well. We have two 7-millimeter bolts right here, and then 1, 2, 3, 5-1/2-millimeter bolts we'll remove first.Now I've got my 5-1/2-mill socket and we're gonna remove this bolt first. With all of our factory screws removed, we can now hold the fender flare in place, kind of mock up where our holes are gonna be. And then we actually have to use 2 of these small retainer clips on 2 of the 5-1/2-millimeter bolt holes, which we'll show you right now. Okay. So you get four retaining clips with this kit. We're gonna use two per each front fender flare. I have one in my hand now, and what you're gonna do is insert it into the slot and hold it up to the hole there. And then we're just gonna re-install the 5-1/2-millimeter screw we removed in our previous step. Now we're gonna do the same thing with our second clip on the 5-1/2-mil hole up here. Again, I like to do these just finger tight for now so we can get the rest of our bolts in easily, and then we're gonna go back and tighten everything up with a ratchet.Finally, our two 7-millimeter screws next. With all of our screws in and finger tight, we just have our 1/4-inch ratchet. I'm gonna start with the 7-millimeter screws and tighten them up. And that final screw wraps up the front. Now let's move on to the back. So for the rears here, guys, very easy install. In fact, I was surprised, but instead of screws, we're gonna be using these barb-style clips. There's no screws whatsoever in the rear here, so no drilling. You can put the screwdriver away. What we're gonna do is insert these clips over the edge of the fender flare in the fender well area and we're actually gonna make sure that the barb portion secures in the slot in the fender flares themselves. Let's show you how to do that right now.So we have our flare positioned perfectly here on the rear fender area, we have our clip in hand. What you're gonna wanna do now, let's make sure you're flush with the flare and the fender, grab your clip and just simply insert it over the metal and the plastic of the flare itself, and push the clip until that little barb secures in that slot like so. So now that you know what you need to do, simply repeat that process all around the edge of the flare. And with that last clip secure, our install is complete. Now, we'll be honest, guys, after you get past the bolts and the weatherstripping, it's probably one of the easier fender flare installs I've ever tackled. Again, no drilling, not really a whole bunch of tools needed, a very straightforward day in the garage or driveway.Hey, we hope you enjoyed this brief review and install of the unpainted pocket-style flares, available for your 2018 and newer F150 at home. And as always, keep in mind for more cool products and videos like this, keep it right here at americantrucks.com.

    Product Information

    Features, Description, Reviews, Q&A, Specs & Installation

    Features

    • Pocket Fender Flares
    • Adds a Tire Coverage of 2 Inches
    • Safeguards Vehicle from Road Debris
    • Special Tri-Blend ABS Construction
    • UV-Protected Raw Finish
    • Paintable Fender Flares
    • Flare Height Is 6.25 Inches
    • Simulated Riveted Look
    • Easy Installation; No Drilling
    • Fits 2018-2020 Ford F-150 Models, Excluding Raptors

    Description

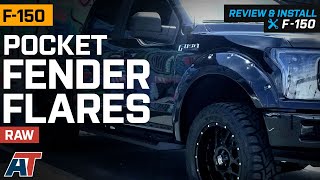
    Excellent Protection. Equipping your truck with these Raw Pocket Fender Flares provides extra protection against road debris. Thanks to their durable build, these fender flares are able to deflect rocks, mud, and twigs away from your vehicle. What’s more, these accessories let your truck run larger tires since they provide an additional 2-inch tire coverage.

    High-Strength ABS Construction. To endure the daily beating from your truck’s tough off-road drives, these fender flares are made of special tri-blend ABS material. This gives the fender flares incredible strength to withstand impacts without cracking or breaking. Furthermore, ABS is known for its high resistance against chemical corrosion, allowing the fender flares to maintain their pristine condition.

    Paintable Raw Finish. These fender flares come in a raw finish and protected by a UV-coating. With this protective finish, these pocket fender flares can withstand the sun’s damaging heat. What’s more, you’re free to paint them with any color you want, so that you can better enhance your truck’s exterior.

    Easy Installation. Installing these fender flares is easy since they are designed to perfectly fit your vehicle application. Unlike other fender flares in the market, these accessories do not require any drilling.

    Application. These Raw Pocket Fender Flares are engineered to fit 2018-2020 Ford F-150 models, excluding Raptors.

    Shop All Truck Parts And Accessories

    Shop All Truck Exterior Accessories

    Shop All Truck Fender Flares

    CA Residents: WARNING: Cancer and Reproductive Harm - www.P65Warnings.ca.gov

    Installation & What's in the Box

    Installation Info

    What's in the Box

    • (2) Front Fender Flares
    • (2) Rear Fender Flares
    4.8

    Customer Reviews (62)

      Questions & Answers

      10 More Questions