Installation Time
(approx) 2 Hours
Difficulty Level:
Light to Moderate mechanical skill required.
FREE 1 to 3-Day Delivery on Orders $119+ Details
$94.99 (each)
FREE Shipping on orders over $119 Market Price $108.99 You Save 13% ($14.00) Up to 10% off for Military & First Responders! See DetailsAdd Local Shop Installation
Saved - View your saved items
We're sorry. We couldn't save this product at this time.
or use
If the front driver side upper control arm on your 2004 and newer F-150 has seen better days, well, then you might wanna consider the affordable replacement here from the gang at OPR. Now, the stock replacement from OPR will be a burly steel build, complete with a new ball joint and two new bushings here on the body side, to basically completely overhaul the driver side upper on your rig. Your price point will be in that $80 to $90 range, and the install will get a middle-of-the-road two out of three wrenches on the old difficulty meter here. It'll take you a couple hours to complete from start to finish, depending on how fast you like to work. But if you hang out with me for a little bit, we'll show you how it's done later in the video.So, this is a simple one here, guys. And, again, it will be for those '04 and newer F-150s out there, two and four-wheel-drive owners who are in need of an affordable factory replacement control arm. And how would you know if you need to replace it? Well, it could be a number of things here, guys, including noise coming from the front end, a rough ride, poor handling, or even the truck really not aligning properly. Now, the culprit, more than likely, is going to be the ball joint itself, but sometimes those rubber bushings connecting the arm to the frame can deteriorate as well and lead to issues. Now, if you've isolated it down to the upper ball joint, well, then you do have to replace the entire arm and ball joint itself, as the ball joint can't just simply be swapped out on the upper control arm. And that's where OPR comes into play. They make a wide variety of factor replacement parts, such as this, of course, and the best part is, a lot of their stuff is very affordable overall. Now, again, guys, keep in mind here, this is the driver side. If you are looking to do the passenger side at the same time, it'd make a heck of a lot of sense, and you can also find that arm here on the side as well for roughly the same price. Now, from a construction standpoint, there really isn't a ton to talk about here, but let's cover what we can. And the centerpiece is going to be this heavy duty steel build, which has been painted black to help prevent any corrosion in the long-term. Now, on the knuckle side, guys, you do have a brand new greaseable ball joint here, already been pressed into place, ready to rock and roll, and nothing needed there. Now, on the frame or body side, you do have two brand new rubber bushings here, in their sleeve, again, already pressed in their place. And this entire thing is ready for installation without any other setup. Now, I have seen some questions about possibly gaining extra clearance in the event of a leveling kit is installed when using these arms. And what you have to keep in mind here, guys, is that this is a factory replacement, it's not a performance part, so any extra clearance you might gain would simply be coincidental and not by design. However, with that said, if you are looking for a little bit more of a performance-oriented upper, then the site does have a number of different options you can check out right here at AT for your gen. But now we wanna show you just what it takes to get the OPR arm installed on your rig at home. And listen, guys, if you have an '05 or an '06 that has seen a lot of north-east winters, then you might be dealing with some rusty bolt, so just keep that mind. On the other hand, if you're dealing with a newer truck that's been in Florida or California most its life, then this install probably will be a hell of a lot easier for you. Either way, here's a detailed walkthrough as promised earlier, along with a quick tool breakdown.The tools required for this install are an automotive floor jack, a 1/2-inch torque wrench, a 3/8 torque wrench, an 18-millimeter ratcheting wrench, 21-millimeter wrench, 18-millimeter wrench, 10-millimeter wrench, an 8-millimeter wrench, a 27-millimeter socket on a 1/2-inch drive, a 21-millimeter socket 1/2-inch drive, 18-millimeter socket 1/2-inch drive, an 18-millimeter socket 3/8 drive, a 13-millimeter 3/8 drive, 13-millimeter 1/4-inch drive, 10-millimeter 1/4-inch drive, 8-millimeter 1/4-inch drive, a pry bar, a hand-held vacuum pump, a dead blow hammer, a 1/2-inch impact gun, a 3/8 power ratchet, and a 1/4-inch impact gun.All right. So, we're gonna get started by just getting our vehicle up in the air, supported with the front wheels off the ground, and remove our front wheels to get access to our suspension. Next, I'm gonna unbolt my ABS line and my brake line off of my knuckle, so that I can get ready to remove the entire knuckle assembly. After that, I'll pull my caliper and rotor. All right. With my two lines unbolted, I can now unbolt my caliper and hang that out of my way to remove my rotor. So, you don't have to do this, but I like to remove my dust shield off from behind the rotor, just so that when I remove this entire assembly, I don't damage my dust shield in the process. With everything out of my way, now I'm gonna use a 5-millimeter Allen socket to remove my ABS wheel speed sensor from the hub. Now, using a 21-millimeter socket, I'm going to disconnect the outer tie rod. Now, I'm gonna remove the cap for my axle nut, I'm gonna do this with a flat-head screwdriver and a hammer. Be very careful not to damage the cap as you will be reusing it later.All right. Now, with a 21-millimeter socket, once again, I'm going to loosen up the nut for the lower ball joint, but I'm not going to remove it completely. Now, I'm using an 18-millimeter wrench to loosen up my upper ball joint. Don't be surprised if you see the studs start to spin, you can use an 8-millimeter wrench to hold the bottom of the stud while you loosen up the nut. Now, I'm just gonna keep a little bit of pressure on the top of the upper control arm while I disconnect the upper ball joint. Now, using a 13-millimeter socket, I'm going to remove the axle nut out here on the outer hub, followed by the vacuum line on the back of the hub. All right. So now, using a hand-held vacuum actuated pump, I'm going to apply 24 inches of vacuum to the large port on the back of the four-wheel-drive axle hub. This is done to disengage the axle splines on the four-wheel-drive IWE.All right. So, since our truck already has a small lift kit installed, I'm gonna use a floor jack to raise the lower control arm, so that I can straighten out my axle angle, so that I can more easily remove my outer hub assembly without damaging the IWE assembly. I wanna make sure that I lift the lower control arm slowly so that I give the spring and the shock time to recoil. Make sure to be very careful so that you don't damage the diaphragm on the IWE, and remove your entire hub. Now, I'm gonna use an 18-millimeter socket to remove my sway bar end link. This is gonna be done so that I can get my lower control arm to lower down far enough to remove my strut assembly. Once again, with an 18-millimeter, I'm gonna remove my 2 lower strut nuts. This will allow me to lower my lower control arm down.All right. So, our lower control arm isn't moving out of the way as nicely as I'd like it to, so I'm gonna use a 21-millimeter wrench and a 27-millimeter socket on an impact gun to loosen up the bolts just enough to get my lower control arm to swing down freely. Now, this is gonna mess up your alignment angle, but that really isn't gonna matter as the upper control arm is also going to mess up your alignment angle, and you're gonna need an alignment when you're finished anyway.All right. As I said before, our truck already has a small lift kit installed onto it, you can see that there's a small spacer in here. Usually, there would be 3 studs sticking up out of the top with an 18-millimeter nut, I'm gonna be using an 8-millimeter Allen socket to get our 3 bolts out, but you would use an 18-millimeter wrench at home. With our upper strut hardware removed, you can remove the entire strut assembly to get access to your upper control arm bolts. Now that we finally have everything out of the way, we can start pulling our upper control arm out, we're gonna use a 21-millimeter wrench and an 18-millimeter socket with a ratchet to remove the 2 upper bolts. Now, we can install our new upper control arm. I'm just gonna snug them so that I can torque them.Now that I have the upper control arm installed with the bolts, I can torque them to 122 foot-pounds. With our new upper control arm installed, now we can start putting our vehicle back together. First step is gonna be to put the strut assembly back in the vehicle. Now that we've got these tight, we're gonna lift our lower control arm back into place, get our nut started on our struts to get everything pre-situated, and then we're gonna start putting our knuckle assembly back in. And now we can throw the nuts back on for the bottom of the strut assembly. Once again, with the 27-millimeter socket and 21-millimeter wrench, we're gonna snug up the bolts for the lower control arm. Perfect. And now, we can tighten up the nut for the sway bar end link on the lower control arm.Now, once again, with 24 inches of vacuum applied to my hand-held vacuum pump connected to my IWE actuator, I'm going to very carefully reinstall the knuckle assembly, simultaneously lining up my lower ball joint with the axle itself. Once I have my lower ball joint through the bottom, get the nut started to hold everything in place while I line the axle up, finally, with the hub. Now that I have the axle fully through the IWE hub, I'm just going to lightly tighten it up before I torque it down later. And now, I can release my vacuum. A good way to check that you've done it properly is that, when you disengage the vacuum, the axle does not spin freely. With the help of a pry bar, I'm gonna push down on my upper control arm so I can see the threads coming out of our upper ball joint nut hole, and then I'm gonna get the nut started by hand. Now, I'm gonna use a 21-millimeter ratcheting wrench to tighten down my upper ball joint nut. Once again, not uncommon for this to spin, just get another wrench to hold this in place. And now, you can reconnect your outer tie rod end. Now that your entire hub assembly is in place and your axle is securely through the IWE, you can tighten up your lower ball joint. Now we can reconnect our vacuum ports and reinstall our ABS line.Next, we can reinstall our previously removed dust shield before we reinstall our caliper and rotor. Now, we can reinstall our caliper before we reconnect our lines to our knuckle. Now, I'm gonna snug up my caliper bolts with a 21-millimeter socket before I torque them to 184 foot-pounds. Finally, we can reinstall our ABS line bolts and our brake line bolts. Before reinstalling your dust cap, make sure to torque your axle nut to 35 foot-pounds. I use a pry bar in between the lug studs, and then put my torque wrench on and click it to 35. Reinstall your dust cap and you're ready to go. Once you got your dust cap reinstalled and everything torqued to spec, throw your wheel on, take it up to an alignment, shop and get a solid alignment done.That'll do it for my install of the OPR front upper control arm and ball joint assembly. And for all things F-150, keep it right here at americantrucks.com.
Subscribe to our YouTube Channel
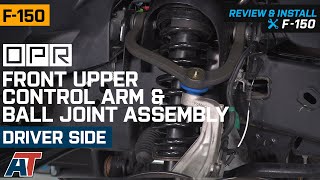
Features, Description, Reviews, Q&A, Specs & Installation
Brand | OPR |
Control Arms Placement | Front Upper |
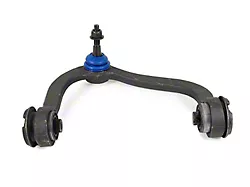
Direct Fit Replacement. Regain the lost handling performance and ride quality of your Ford F-150. Replace that bent or damaged factory front upper control arm with a direct fit OPR replacement complete with ball joint to improve directional stability while offering a smooth ride and agile handling.
OEM Quality. Manufactured to the original factory specifications from heavy duty steel for extra strength and durability, this OPR Driver Side Front UCA features a preinstalled ball joint and rubber bushings to improve ride quality and has been completed in a black painted finished for rust and corrosion resistance.
Application. This OPR Driver Side Front Upper Control Arm and Ball Joint Assembly is designed as a direct fit replacement for all 2004 to 2024 F-150s, excluding Raptor models. Sold individually.
Technical Note. Reuses factory hardware for installation.
Shop All Truck Parts And Accessories
Shop All Truck Control Arms And Accessories
Shop All Truck Suspension
Fitment:
OPR T526142
CA Residents: WARNING: Cancer and Reproductive Harm - www.P65Warnings.ca.gov
Installation Info
Installation Time
(approx) 2 Hours
Difficulty Level:
Light to Moderate mechanical skill required.
What's in the Box
10 More Questions
Not Compatible with SVT Raptors.