


Installation Time
(approx) 2 Hours
Difficulty Level:
Light to Moderate mechanical skill required.
Installation Guides
No guide available for this part yet.
 FREE 1 to 3-Day Delivery on Orders $149+ Details

$824.99 each
CONFIRM THIS FITS YOUR VEHICLE!
Saved - View your saved items
We're sorry. We couldn't save this product at this time.
or use

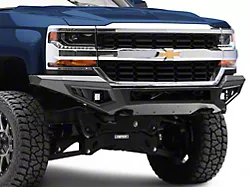
Barricade HD Off-Road Front Bumper with LED Fog Lights (16-18 Silverado 1500)
 500+
500+
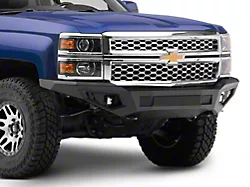
Barricade HD Off-Road Front Bumper with LED Lighting (14-15 Silverado 1500)
500+
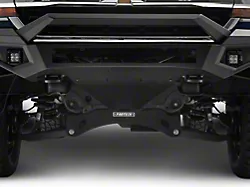
Barricade Skid Plate for Barricade HD Off-Road Front Bumper S112215 Only (14-18 Silverado 1500)
 59
59
Features, Description, Reviews, Q&A, Specs & Installation
| Brand | Barricade |
| Bumper Type | Full Width |
| Bumper Material | Steel |
| Bumper Finish | Black |
| Bumper Winch Mount | No Winch Mount |
| Bumper Fog Light Fitment | No Fog Lights |
| Bumper Location | Rear |
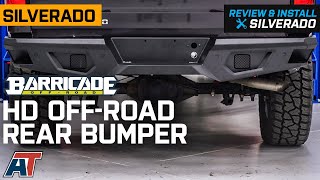
Aggressive Styling. The Barricade HD Off-Road Rear Bumper features aggressive tubular styling that matches tubular off-road front bumpers. In fact, this full width, rear bumper delivers a distinct, rugged look that’s second to none on your Silverado 1500.
Heavy-Duty Construction. Crafted from a heavy-duty, steel pate and tube construction, the high-grade, textured black, powder-coated finish ensures a long-lasting performance. You won’t have to worry about extreme weather exposures causing rust or corrosion. Built with precision and manufacturing excellence, the Barricade HD Off-Road Rear Bumper is guaranteed to make a statement everywhere you go.
Installation. This installation is a simple, bolt-on application that requires basic garage tools and can be completed in 2 hours. For installation ease, quality hardware is included.
Application. The Barricade HD Off-Road Rear Bumper is built to be a direct fit for all 2014-2018 Chevrolet Silverado 1500 models. This Rear Bumper is designed to work with models that are equipped with or without rear mounted backup sensors.
Freight Notes. Freight items can only be shipped within the continental 48 states, no expedited methods. What is freight shipping? Your Answers are Right Here!

Shop All Truck Parts And Accessories
Shop All Truck Bumpers
Shop All Rear Truck Bumpers
Barricade S112214
CA Residents:  WARNING: Cancer and Reproductive Harm - www.P65Warnings.ca.gov
Installation Info
Installation Time
(approx) 2 Hours
Difficulty Level:
Light to Moderate mechanical skill required.
Installation Guides
No guide available for this part yet.
What's in the Box
