FREE 1 to 3-Day Delivery on Orders $149+ Details
How to Install Curt Manufacturing Double Lock Under-Bed Gooseneck Installation Brackets on your Silverado
WARNING!! BRAKE, FUEL, AND ELECTRICAL LINES MAY NEED TO BE LOOSENED OR REPOSITIONED TO PROVIDE CLEARANCE FOR NEW HARDWARE. ALL MODELS REQUIRE MODIFICATION OR REMOVAL OF HEAT SHIELDS. ON SHORT BED MODELS, CHECK FOR ADEQUATE TURNING CLEARANCE BETWEEN THE FRONT OF ALL TRAILERS AND THE TRUCK CAB.
WARNING!! ON TWO WHEEL DRIVE TRUCKS A CLEARANCE CHECK MUST BE PERFORMED WHEN TRUCK IS LOADED AND UNLOADED TO VERIFY THE INVERTED BALL WILL NOT INTERFERE WITH THE TOP OF THE DIFFERENTIAL
INSTALLATION STEPS
**REMOVE ALL REAR WINDOW ACCESSORIES BEFORE TOWING**
BEFORE INSTALLING
An overhead lifting device, such as chain falls, engine hoist, or cable come-a-long, can be used to lift the center section of the hitch in place. Lower a loop of rope or chain through the hole in the truck bed floor and attach it to the round hitch receiver tube in the center section. Use the lifting device to raise the center section until the round hitch receiver tube that protudes from the center section fits in the hole in the truck bed floor. Maintaining upward pressure may facilitate fastening the crossmember to the center section, especially if the truck bed floor has been distorted downward from heavy use. If you use an overhead-lifting device, it should be disconnected before squaring the center section across the frame, installing the sideplates and torquing fasteners.
1) Remove spare tire and heat shield. The heat shield under the bed floor needs to be removed or a section cut out for the hitch assembly to be installed. First, remove the heat shield from in front of the back crossmember. Next, remove the heat shield from the back of the crossmember located near the front of the wheel well.
2) Mark the location for the hole in the truck bed. Measure from the tail gate end of the truck bed, by hooking a tape measure over the back of the truck box and marking the correct location.(NOTE: DO NOT MEASURE FROM EDGE OF TAILGATE) Next, mark the center between the wheel wells. This marks the center point for the drill hole. This hole location is critical for the correct installation of this hitch. Measure, mark, and saw carefully. This location will put the ball 4"-6" in front of the axle.
NOTE: If truck has a plastic bed liner, you may drill through both, but it is more difficult to accurately locate the midpoint between the wheel wells and to keep the bed liner from moving while cutting the hole. Make a 4" hole at this location using a 4" hole saw, or by making a 4" circle and cutting it out with a saber saw equipped with a metal cutting blade.
3) Remove all lines from top of frame rail on driver side. Lower the brake lines by unbolting factory brake line bracket and replace with Curt supplied bracket by using existing bolts, then attach factory bracket to Curt bracket using supplied 8MM bolts and nuts.
4) Install the rear cross arm by sliding it between the frame and truck bed floor above the passenger side rear tire. After spanning the frames, rotate the cross arm vertically with the (4) center threaded holes towards the ground. On short bed applications, the location of the cross arm should be behind the bed rail support towards the rear of the truck. Note: If vehicle is equipped with wheel well liners they may need to be temporarily removed for cross arm installation.
5) Install the front cross arm by sliding it between the truck frame and truck bed above the passenger side rear tire. With the cross arm spanning the truck frame, rotate it vertically with the holes towards the bottom. On Short bed applications, the cross arm will be located in front of the bed rail support towards the rear of the truck. Once vertical, slide the cross arm up against the bed rail support.
6) Install the center section by carefully raising it above the fuel tank from beneath the truck. Insert four 1/2" x 1 1/2" hex bolts with a washer and lock washer through each of the slots on the inside of the center section, and thread them finger tight into the front cross arm. Repeat that process for the rear cross arm. While installing the center section, be sure that the round hitch cylinder that protrudes from the top of the center section fits into the hole in the bed of the truck.
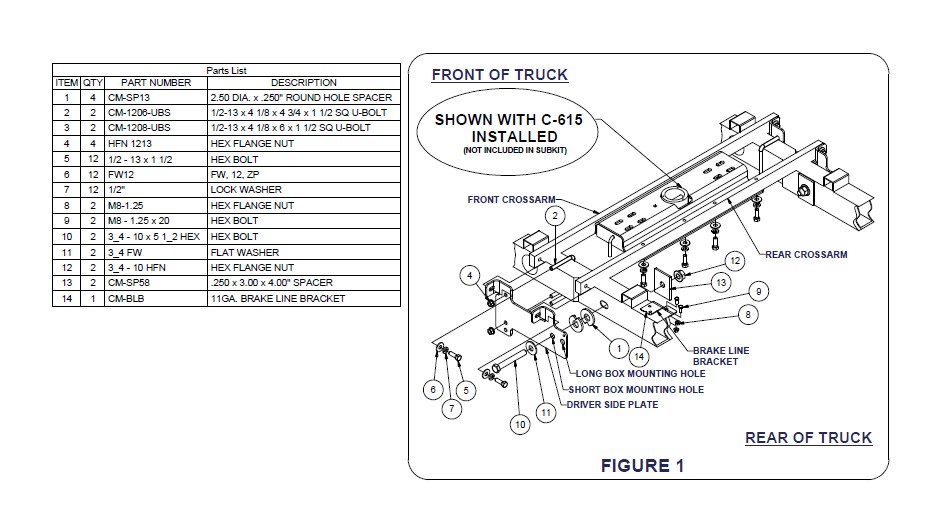
7) Install the sideplates with the large hole towards the back of the truck aligning them with the existing slot in the frame. Refer to Figure 1 on page 1 for directions on which mounting plate hole to use. Attach using a 3/4-10 x 5 1/4" hex bolt and 3/4" washer, pushing it through the frame while putting (2) CM-SP13 spacers on the bolt between the frame and the sideplate, then attach the sideplate with a CM-SP58 spacer and a 3/4" flange nut. Finger tight both sides. With the sideplates mounted at the slot, attach the flanges to the cross arms using two 1/2" x 1 1/2" hex bolts with 1/2" washers and 1/2" lock washers. Thread them through the inside of the sideplate flanges into the cross arms. (Finger tight only!)
8) Finish attaching sideplates to the frame using the provided U-bolts. For long box applications, use the larger U-bolt. The smaller U-bolt is used on the short box applications. Position the U-bolt from the inside of the truck frame, make sure not to damage or pinch the wiring harness or brake lines. Attach to the sideplate using two 1/2" flange nuts. (Finger tight only)
9) With the sideplates installed on both sides, torque all 1/2" fasteners to 110 ft-lbs, and 3/4" fasteners to 380 ft-lbs in the following order:
First: Torque the center section to the front and rear cross arms.
Second: Torque the sideplates to the truck frame on both sides. (When torquing the U-bolts, make sure to tighten them slowly alternating between the top and bottom of the U-bolt until equally tightened to maximum of 40 ft-lbs.)
Third: Torque the sideplate flanges to the front and rear cross arms.
(REFER TO GOOSENECK HITCH INSTRUCTIONS FOR INSTALLATION AND OPERATION PROCEDURES)
Maintenance (Required every 30 days or prior to use)
1. Keep hitch ball lubricated regularly. Use sillicone spray or equivalent to prevent wear and rust.
2. Keep hitch assembly free of dirt and other foreign debris.
3. Check for proper torque on all nuts and bolts before each use. Also check for excessive wear.
4. Check ball wear before each use. (Note: Do not tow trailer with worn or damaged parts.)
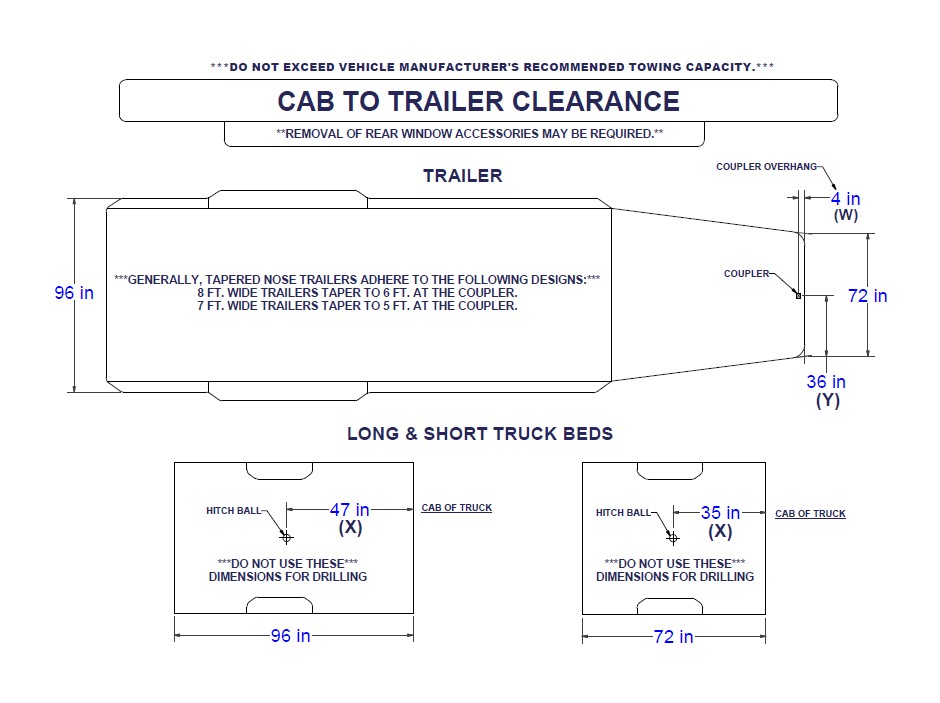
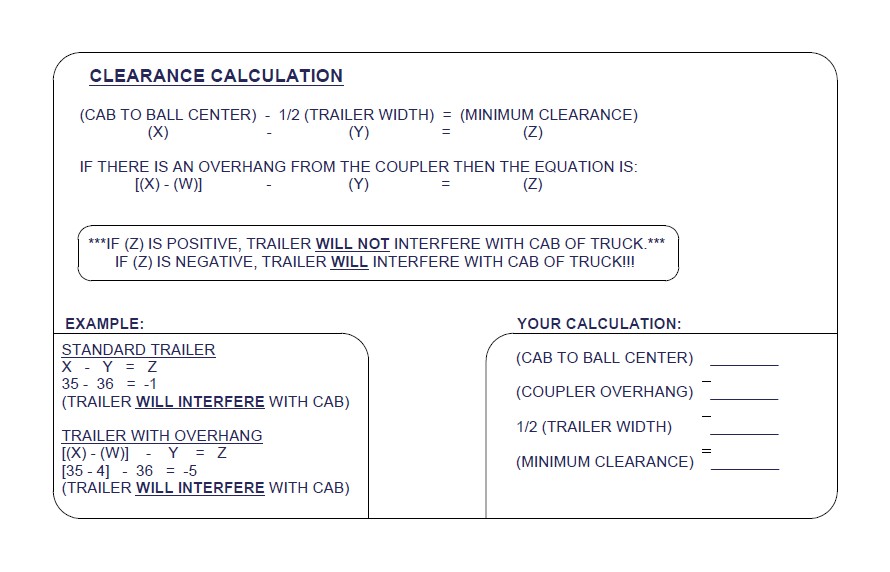
**WARNING REFERENCE CLEARANCE CALCULATOR BEFORE TOWING**