 FREE 1 to 3-Day Delivery on Orders $149+ Details
How to Install Curt Manufacturing Custom 5th Wheel Bracket Kit on your Silverado
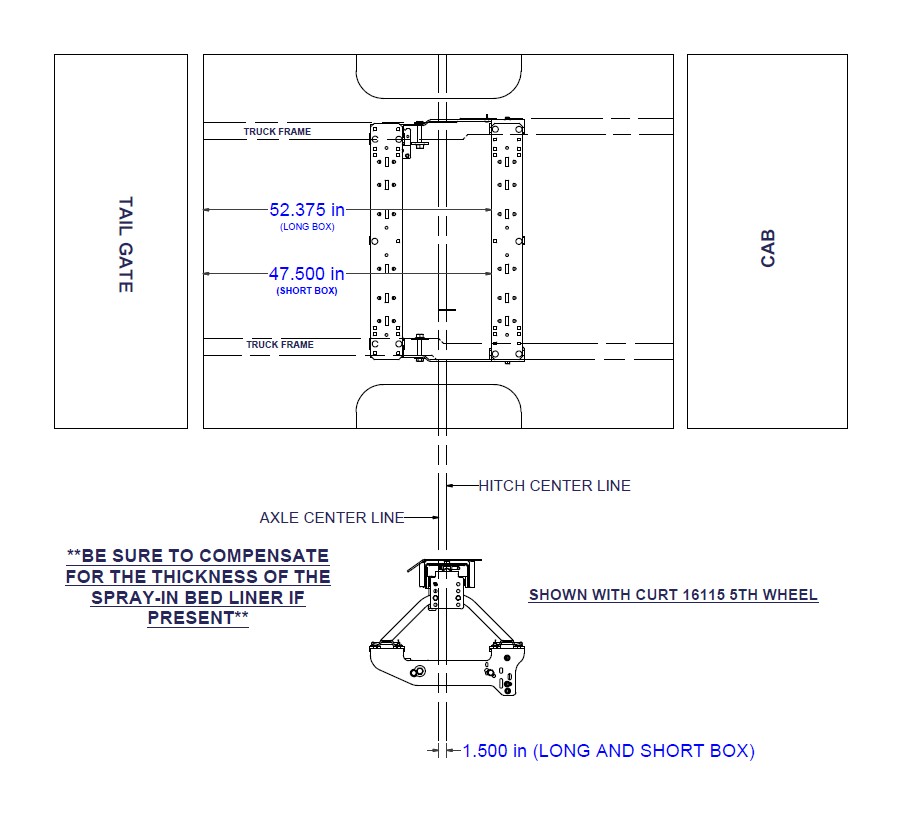
RAIL LOCATION DIAGRAM
!WARNING!
- Do not install mounting rails over plastic bed liners. Plastic liners must be trimmed for metal-to-metal contact. May be installed on spray in liner.
- Use only supplied fasteners for installation.
- Before installing hitch measure to be sure there will be enough clearance between the truck and trailer to allow for turns.
- Frame rail must be clear of any electrical or brake components where side plates attach.
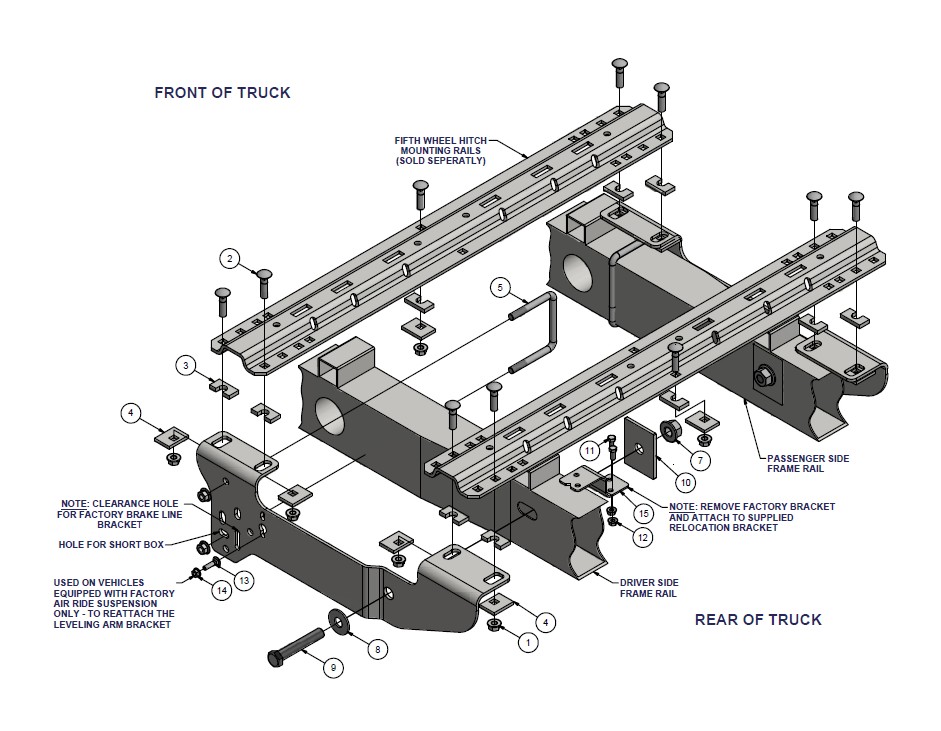
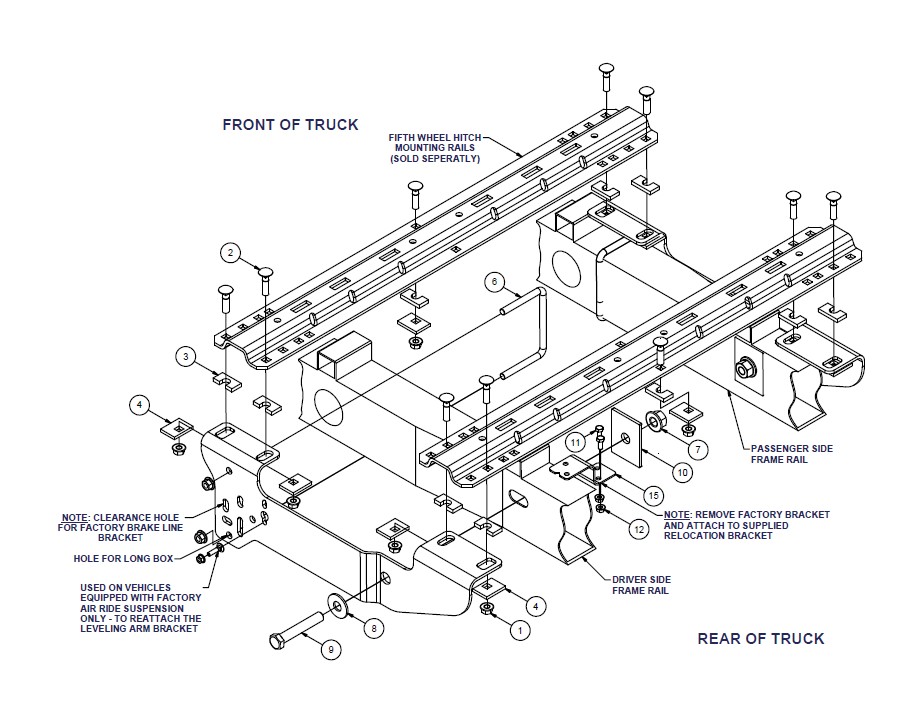
NOTE: Unbolt factory brake line bracket and replace with supplied bracket by using factory bolts, then re-attach factory bracket to the supplied bracket as shown. This is to prevent rubbing of brake lines on u-bolt.
1) Place one mounting rail in the box of the truck, using your tape measure, center the rail on the truck box floor and the proper distance from the rear edge of the truck box as shown on the "rail location diagram" page.
**BE SURE TO COMPENSATE FOR THE THICKNESS OF THE SPRAY-IN BED LINER IF PRESENT**
2) Using a center punch, mark the holes as per the rail location diagram. Move the mounting rail out of the way and drill each position with a 1/8" drill bit.
3) Temporarily position the side plate on the side of the frame and check that the 1/8" drilled holes align with the slots of the side plate. Remove the side plate from the vehicle.
NOTE: Move any electrical or braking components that may be trapped between the frame and side plates.
4) Enlarge the 1/8" drill holes to the 9/16" with a step drill.
NOTE: Depending on the year and box size, the brake cable hanger may need to be attached through the side plate on the diver side. To do this, remove the bracket from the truck and tip the bracket, thread through the long slot and rotate into position. Removing the brake lines from the bracket will be required to do this. To reinstall the brake lines, push the bracket further through the plate and collect the lines with the bracket. be sure lines are in original position on the bracket.
NOTE: Models equipped with factory air ride suspension will need to relocate the leveling arm bracket onto the side plate of the 5th wheel kit with the longer 5/16" carriage bolt and 5/16" hex flange nut.
5) Place u-bolts into position on frame, fasten the side plate to the side of the frame using the appropriate hardware. Tighten hand tight.
6) Reposition the mounting rail over the holes and fasten the mounting rail to the side plates using the supplied carriage bolts. Use the supplied spacers between the frame bracket or mounting rails and the truck box so as to ensure a metal to metal contact and to eliminate "rib crush" of the bed.
7) Place the unassembled 5th wheel / roller / gooseneck hitch into the already installed mounting rail. Position the second mounting rail with the 5th wheel / roller / gooseneck hitch by inserting the tabs into the mounting rail and pushing the mounting rail tight towards the other mounting rail. Ensure that the mounting rail is centered on the truck box floor. This will position the rail in the correct location and ensure that the 5th wheel will have a snug fit to the truck.
NOTE: If more than one hitch product will be used with the mounting rails then both should be used at the same time to align the second mounting rail. This will ensure that one product does not compromise the fit of the other.
8) Repeat steps 2, 4, 6 and 7
9) Starting with the carriage bolts that fasten the rails to the frame bracket, torque all the nuts. Torque all 1/2" fasteners to 110 lb-ft and all 3/4" fasteners to 250 lb-ft.


