 FREE 1 to 3-Day Delivery on Orders $149+ Details
How to Install Curt Manufacturing Class V Xtra Duty Trailer Hitch - Square Tube on your Silverado
Tools Required
- RATCHET
- TORQUE WRENCH
- 12" EXTENSION
- 3/4" WRENCH
- 3/4" SOCKET
- 22mm SOCKET
INSTALLATION STEPS
1. Temporarily lower spare tire for ease of installation.
Note: For 2014 and newer models go to Step 2. For prior years go to Step 3.
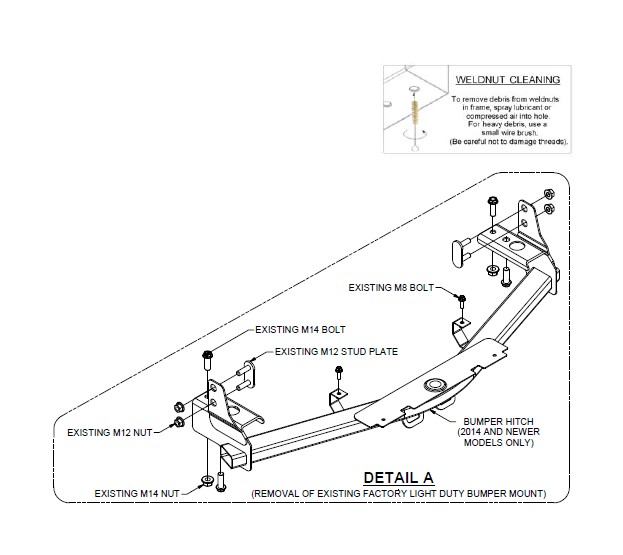
2. On 2014 and newer non-hitch equipped vehicles you will need to remove a factory light duty bumper mount hitch prior to hitch installation. Remove this light duty bumper hitch as follows (See Detail A);
a. Remove (2) M8 bolts connecting the center hitch tabs to the bumper and return to owner.
b. Remove (2) M14 x 80mm bolts and (2) M14 nuts that secure the hitch to the frame rails and return to owner.
c. Remove and retain (2) M14 x 45mm bolts that secure the rear of the hitch to the weldnuts in the frame rails.
d. Remove and retain (4) M12 nuts and (2) M12 x 40mm stud plates that secure the hitch to the side of the frame rails.
e. Remove the hitch and return to owner.
f. Re-install the stud plates and nuts removed in Step 2d and torque nuts to 52 ft-lbs.
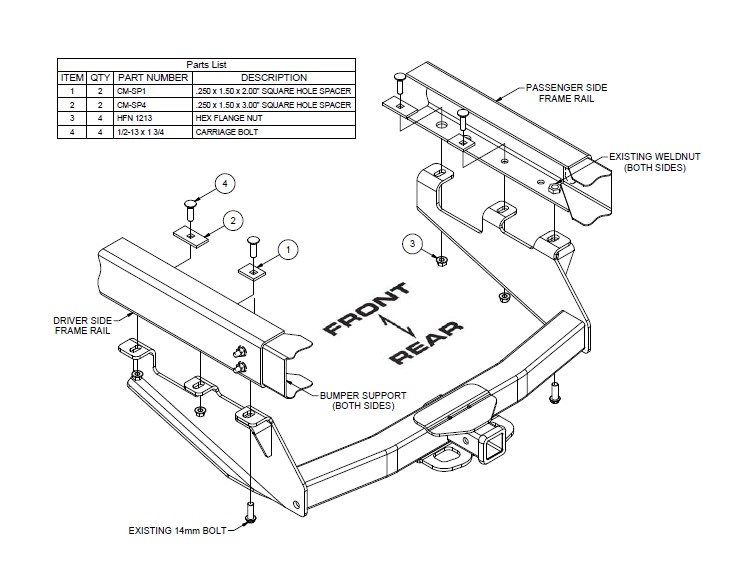
3. Remove (1) M14 bumper bracket bolt from each frame rail (completed in Step 2c). Raise hitch into position by aligning the rear most holes in the hitch with the holes where the bumper bracket bolts were removed. Secure hitch using existing 14mm bumper bracket bolts.
4. Place a 1/2"-13 x 1 3/4" carriage bolt and a CM-SP1 spacer in the forward most hole of the frame and hitch, each side. Secure with a 1/2"-13 hex flange nut, as shown.
5. Place a 1/2"-13 x 1 3/4" carriage bolt and a CM-SP4 spacer in the center hole of the frame and hitch, each side. Secure with a 1/2"-13 hex flange nut, as shown.
6. Torque all 1/2" hardware to 110 ft-lbs. Torque all 14mm hardware to 103 ft-lbs.
7. Reinstall spare tire removed in Step 1.
PERIODICALLY CHECK THIS RECEIVER HITCH TO ENSURE THAT ALL FASTENERS ARE TIGHT AND THAT ALL STRUCTURAL COMPONENTS ARE SOUND.


