FREE 1 to 3-Day Delivery on Orders $149+ Details
How to Install GMS Electronic Exhaust Cutout Single System - 2.5 in. on your Silverado

Shop Parts in this Guide
- Granatelli Motor Sports Electronic Exhaust Cutout System; 2.50-Inch Stainless Steel (Universal; Some Adaptation May Be Required)
- Granatelli Motor Sports Electronic Exhaust Cutout; 2.50-Inch (Universal; Some Adaptation May Be Required)
- Granatelli Motor Sports Electronic Exhaust Cutout; 3-Inch (Universal; Some Adaptation May Be Required)
- Granatelli Motor Sports Electronic Exhaust Cutout System; 3-Inch Stainless Steel (Universal; Some Adaptation May Be Required)
- Granatelli Motor Sports Electronic Exhaust Cutout; 4-Inch (Universal; Some Adaptation May Be Required)
- Granatelli Motor Sports Electronic Exhaust Cutout System; 4-Inch Stainless Steel (Universal; Some Adaptation May Be Required)
Bill Of Materials:
(1) 3" x 10" Polished SS Exhaust Cut Out Piping
(1) 3" x 5" Polished SS Exhaust Turndown
(1) SS V-Band Clamp
(1) SS 3-Bolt Exhaust Flange to V-Band Adapter
(1) 3" Electric Exhaust Gate
(1) Main Harness with Open and Close Switch
(1) Extension Harness, Connects Main Harness to Electric Exhaust Gate
(2) Metallic Exhaust Flange Gaskets
(2) 3/8" x 2" Shrink Tubing
(3) Red Spade Connectors
(3) 10mm - 1.50 x 40mm Bolts
(3) 10mm Flat Washers
(3) 10mm Lock Washers
(3) 10mm Shoulders Nuts
Important Information:
Carefully read these instructions before installing your Granatelli Motor Sports, Inc. Electric Exhaust Cutout System. If you are not qualified or experienced at performing this type of installation, it is highly recommended that you have the Granatelli Motor Sports, Inc. Electric Exhaust Cutout System installed by a qualified automotive mechanic or exhaust shop. These instructions contain warnings that must be observed otherwise your vehicle could be rendered unsafe and not street legal. State and Federal regulations concerning Emissions, Noise Levels, and Safety Standards should be checked in your area.
Never Install this product in front of the catalytic converters, it is illegal.
Never Install the Granatelli Motor Sports, Inc. Electric Exhaust Cutout System upstream of any Oxygen Sensors if so equipped. If not adhered to, a check engine light may occur which could alter the emissions.
Installation Instructions for Electric Exhaust Cutout
The Granatelli Motor Sports, Inc. Electric Exhaust Cutout System is rated up to 800 degrees for short periods of time. To ensure longevity the electric exhaust gates should be installed as far away from the headers as possible but no less than 18" from the collectors.
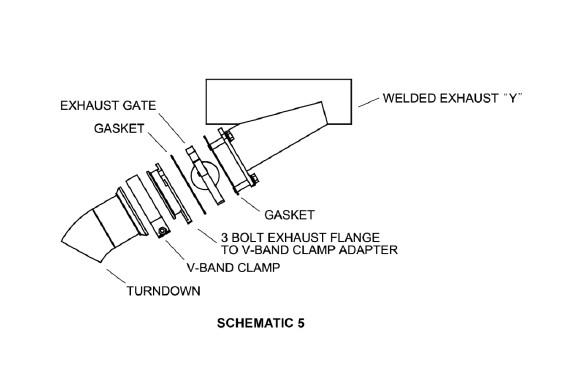
1. While mounting and installing your supplied (2.5" x 10") or (3" x 10") polished exhaust cut out piping, confirm the "Y" shaped portion of the exhaust flows in the direction as the airflows over and under the car. Mount the pipe in such a manner as to create the most ground clearance possible. (See Figure 1 and Schematic 5)
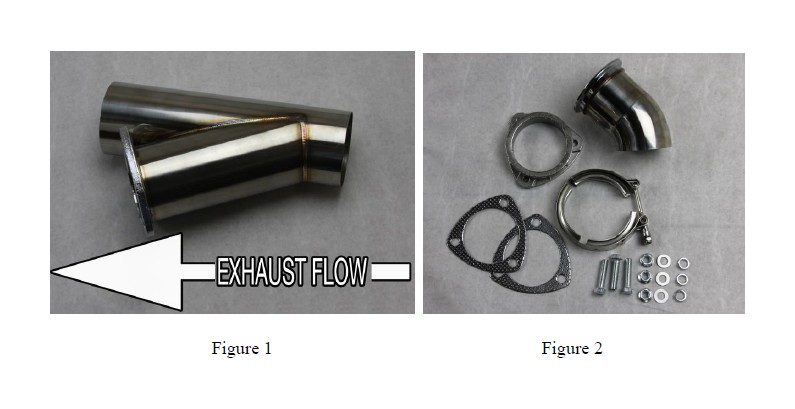
2. Bolt the electric cutout onto your exhaust cutout flange by sandwiching it between the exhaust cutout flange and the 3-bolt exhaust flange to V-band adapter using the (2) two supplied metallic gaskets and the (3) three supplied bolts, flat washers, lock washer and nuts. (See Figure 2 and Schematic 5 on last page)
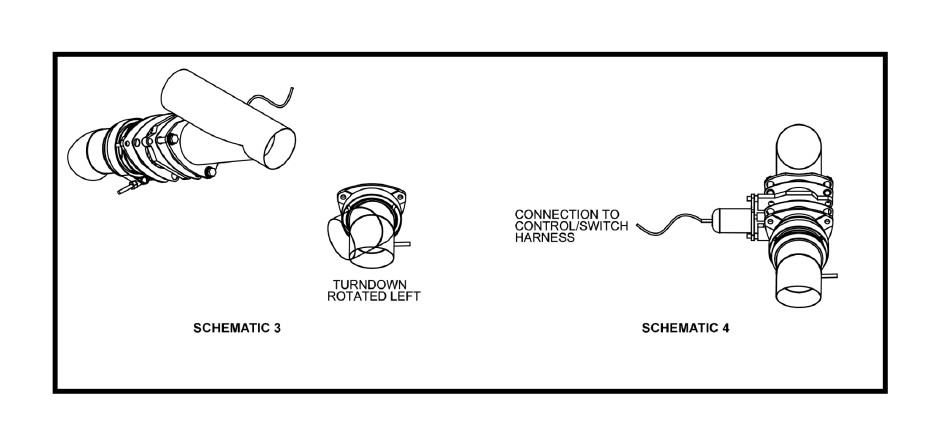
3. Using the supplied V-band clamp, fasten the turn down to the flange adapter. The V-band design allows you to rotate the turn down 360 degrees to accommodate your need to direct exhaust flow. Once you have the cutout positioned on its desired location simply tighten the 10mm nut of the V-band clamp. Please note: Do not over tighten the nut. A 1/4 to 1/2 turn past snug is all it takes. (See Schematic 3 on last page)
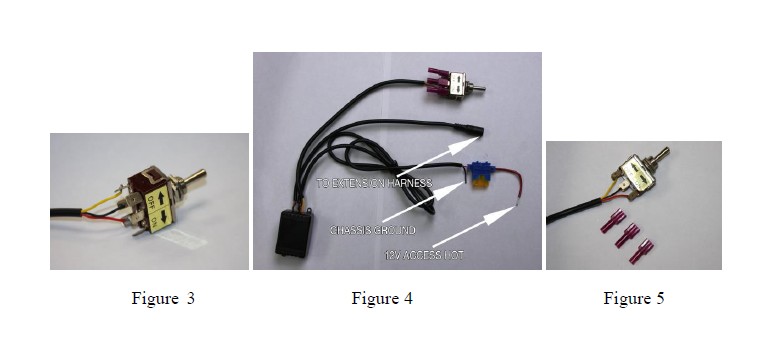
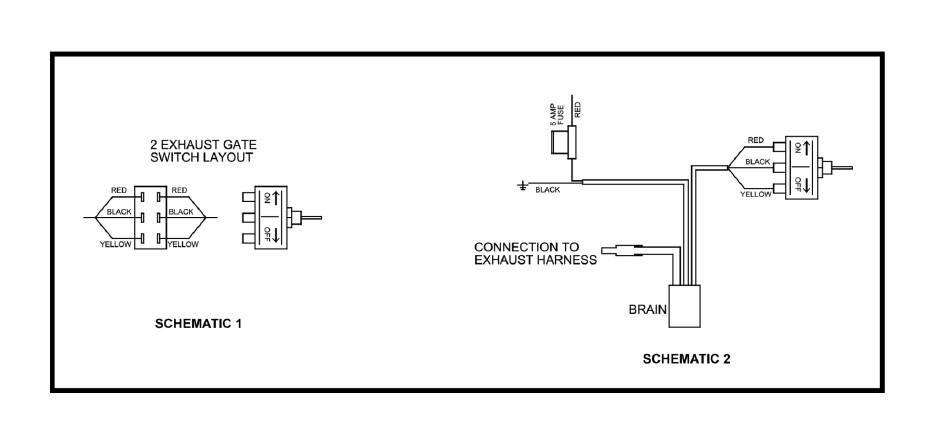
4. Mount the rocker switch in your desired location. Please note: If you have purchased 2 Granatelli Motor Sports, Inc. Electric Exhaust Cutout Systems you have the ability to open and close both gates with one switch if so desired. (See Figure 3 and Schematic 1 on last page) Simply cut the red, black and yellow wire from one (1) switch and connect it to the other using the supplied red spade connectors. (See Figure 5) Pay careful attention to match the wire colors as the originals were soldered on. Yellow should go to the OFF side, Black in the center and Red to the ON side of the switch. (See Figures 4 & 5; Also Schematic 1 & 2 on last page)
5. Connect the black wire from the main harness pictured above to a chassis ground or direct to the negative post on the battery. Connect the red wire with the 5 Amp fused wire to a 12 volt key on ignition source such as the accessory side of the fuse block. (See Figures 4 & 5; Also Schematic 1 & 2 on last page)
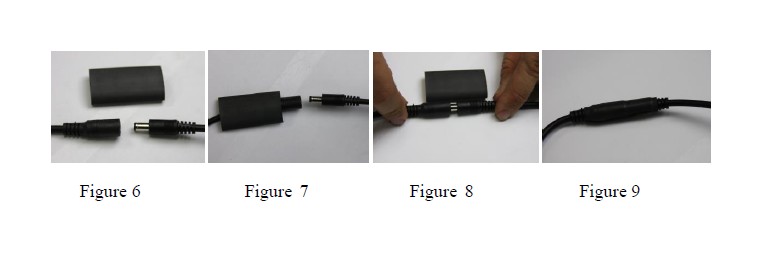
6. Route the extension harness from the main harness to the electric exhaust gate. Make the simple connections, insuring the harness is not too close to any heat source, such as hot exhaust pipes or moving parts. Slide a piece of the supplied heat shrink tubing over each married connection and shrink the tubing using a heat gun or blow dryer on high heat. When routing through any panel be sure to use a grommet to protect the harness from any sharp edges. (See Figures 6, 7, 8, and 9)
7. It is time to test out your completely installed system.
WARNINGS!
• Keep fingers away from the exhaust cutouts when activating. Failure to do so may cause bodily injury. The cutout motor is strong enough to injury your hands or fingers.
• Do not drive vehicle off road where the exhaust components may come in direct contact with grass, brush or other flammable objects with cutouts open. This could create a fire hazard.
• Any altering of the exhaust system may affect various electronic sensors and systems on some newer vehicles.
• RELEASE the switch immediately when the gate is fully open or fully closed. Failure to do so may cause the fuse to blow or over load the cutout motor.
• Summit Racing Equipment makes no warranties expressed or implied as it relates to merchantability, fitness for any particular purpose, or that this product complies with the laws in your area. Please check the regulations and ordinances in the state you reside in.
Please Note: Your Granatelli Motor Sports, Inc. Electric Exhaust Cutout System should be opened and closed at least once every 50 miles or 2 weeks. Opening and closing the butterfly gate ensures exhaust and carbon deposits will not build up and cause the valve to stick in any one position. In the event to butterfly gate begins to stick or drag, simply clean the system with carburetor cleaner followed by a liberal portion of penetrating oil or WD40® type lubricants.
CAUTION! Only clean and/or lubricate the exhaust cutout when the exhaust system is cold. DO NOT use a spray cleaner or lubricate on a hot exhaust system! Doing so can result in a fire!