FREE 1 to 3-Day Delivery on Orders $149+ Details
How to Install aFe Mach Force-Xp 3 in. Cat-Back Exhaust w/ Black Tip - Single Side Exit on your Silverado

Shop Parts in this Guide
- AFE MACH Force-XP 3-Inch Single Exhaust System with Black Tip; Side Exit (09-13 4.3L Silverado 1500)
- AFE MACH Force-XP 3-Inch Single Exhaust System with Black Tip; Side Exit (14-18 4.3L Silverado 1500)
- AFE MACH Force-XP 3-Inch Single Exhaust System with Black Tip; Side Exit (14-18 5.3L Silverado 1500)
Caution: Allow time for your vehicle to cool down prior to installation. When working on or under your vehicle proceed with caution. Exhaust systems reach high temperatures and may cause serious burns. Wear protective safety equipment; eye goggles and gloves to ensure a safe installation.
Step 1: (Read Instructions prior to installation) properly support your stock exhaust system (refer to your manual for specified jack stand positions.) (Note: It is recommended to not fully tighten the clamps until the entire system has been installed.)
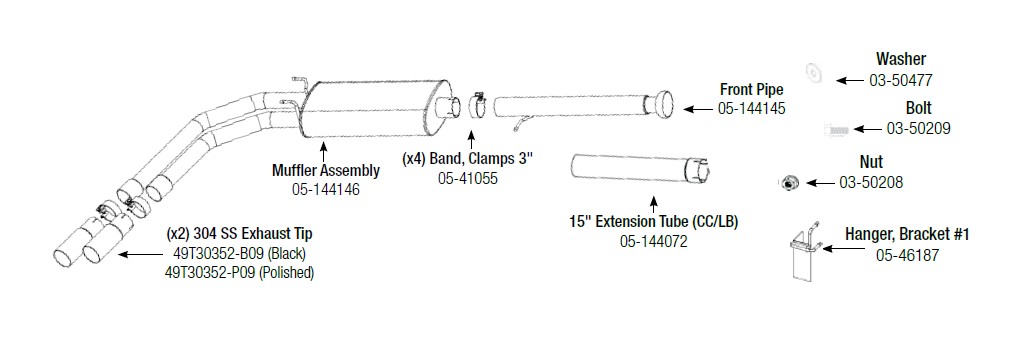
Step 2: For faster installation spread the pieces of the exhaust alongside of your vehicle according to the diagram shown.
Step 3: Remove your stock exhaust system (note: this system is one piece, you may need to remove the bottom bolt of the right rear shock).
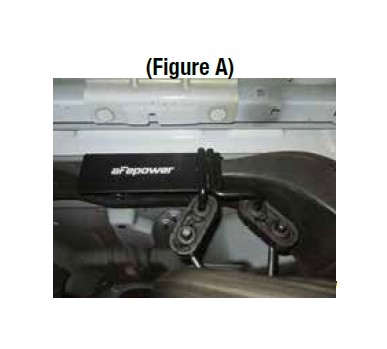
Step 4: Install supplied hanger bracket assembly over vehicle cross member, this assembly will properly slip into place as shown on (Figure A). Secure this assembly by using supplied hardware. Place the washer over the bolt, tighten the bolt to the bracket assembly. Once fully tightened, place provided nut over the bracket on the topside of the cross member. Fasten the nut to the exposed bolt thread.
Step 5: Remove the stock spherical ball clamp from your stock exhaust. You will have to release the locking tab with a small screwdriver. Place the stock spherical ball clamp over the front pipe of your aFe Power Exhaust, and install the front pipe.
NOTE: If your vehicle is a CC/LB (153.5” wheelbase) the 13” extension pipe is required for further installation. CC/SB & EC/SB (143.5” wheelbase) will not require extension pipe.
Step 6: Install Muffler assy. onto front pipe this procedure will require to use jack/stands for support. Use the stock hanger isolation mounts to slip over the hanger mounts.
Step 7: Install tip to desired position and fully tighten the band clamp.
Step 8: Begin to align exhaust system and tighten down all band clamps
Step 9: Congratulations, Your system is now complete and fully installed! It is recommended to re-tighten all clamps and bolts after 50-100 miles.
NOTES:
• aFe recommends that the tailpipe be at least 1/2”-1” away from any body panels to avoid heat related body damage. Tighten and secure.
• It is normal for your exhaust system to emit smoke for the first few minutes upon initial start-up.