


Installation Time
(approx) 3 Hours
Difficulty Level:
Light to Moderate mechanical skill required.
 FREE 1 to 3-Day Delivery on Orders $149+ Details

$509.95 pair
CONFIRM THIS FITS YOUR VEHICLE!
Saved - View your saved items
We're sorry. We couldn't save this product at this time.
or use

Features, Description, Reviews, Q&A, Specs & Installation
| Brand | Zone Offroad |
| Control Arms Placement | Front Upper |
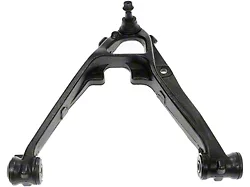
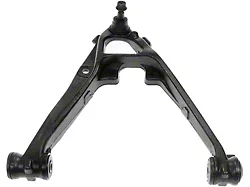
Product Overview. The Zone Offroad Adventure Series Upper Control Arm Kit is engineered to replace factory upper control arms on 2007-2018 Chevrolet and GMC 1500 trucks and SUVs. This upgrade enhances strength and increases suspension droop travel, optimizing wheel articulation and ride quality for lifted or leveling suspension systems.
_x000D__x000D_Construction and Appearance. Made from boxed, gusseted high-strength steel and fully welded for exceptional durability and rigidity, these control arms incorporate OE-style rubber bushings at the frame mount. They include greaseable, high-strength ball joints with protective caps to prevent debris intrusion, ensuring long service life suitable for off-road conditions.
_x000D__x000D_Installation. Installation typically takes 1-2 hours and is of moderate difficulty. This kit is a direct bolt-in replacement requiring no drilling, designed specifically for factory cast steel upper control arms.
_x000D__x000D_Application. Designed exclusively for 2007-2018 Chevrolet Silverado 1500 and GMC Sierra 1500 trucks equipped with stock cast steel upper control arms. This kit is not compatible with vehicles using stamped steel or aluminum control arms.
Shop All Truck Parts And Accessories
Shop All Truck Control Arms And Accessories
Shop All Truck Suspension
Zone Offroad ZONC2310
CA Residents:  WARNING: Cancer and Reproductive Harm - www.P65Warnings.ca.gov
Installation Info
Installation Time
(approx) 3 Hours
Difficulty Level:
Light to Moderate mechanical skill required.
What's in the Box
Sponsored

