 FREE 1 to 3-Day Delivery on Orders $149+ Details
How to Install Westin Sportsman Winch Mount Brush Guard - Black on your F-150

Shop Parts in this Guide
NOTICE/AVISO/AVIS
This tray is designed to accept all major winches manufactured with a 10” x 4.5 bolt pattern and a max capacity of 12,000 lbs Esta bandeja está diseñado para aceptar todos los winches principales fabricados con un 10 "x 4,5 patrón de los pernos y una capacidad máxima de 12,000 libras Ce plateau est conçu pour accepter tous les winches principaux fabriqués avec un 10 "x 4.5 bolt pattern et une capacité max de 12,000 lb
1. Remove contents from box. Verify that all parts listed are present and free from damage. Installation should be performed by a professional installer. Read installation instructions carefully before attempting installation. (ANY EXTRA HARDWARE NOT LISTED ON THE INSTALL SHEET PLEASE DISCARD)
2. If the vehicle is equipped with 4WD, the front tow hooks must be removed prior to installation. Remove the two 15MM bolts from the bottom of the tow hooks. Remove tow hooks and nut plate from the frame rail. Factory tow hooks can not be re-used with winch tray kit.
3. If the vehicle is a 2WD, The lower front bumper valance must be trimmed around the frame rail. Follow the indent on the valance.
4. The license plate and mounting bracket must be removed for installation.
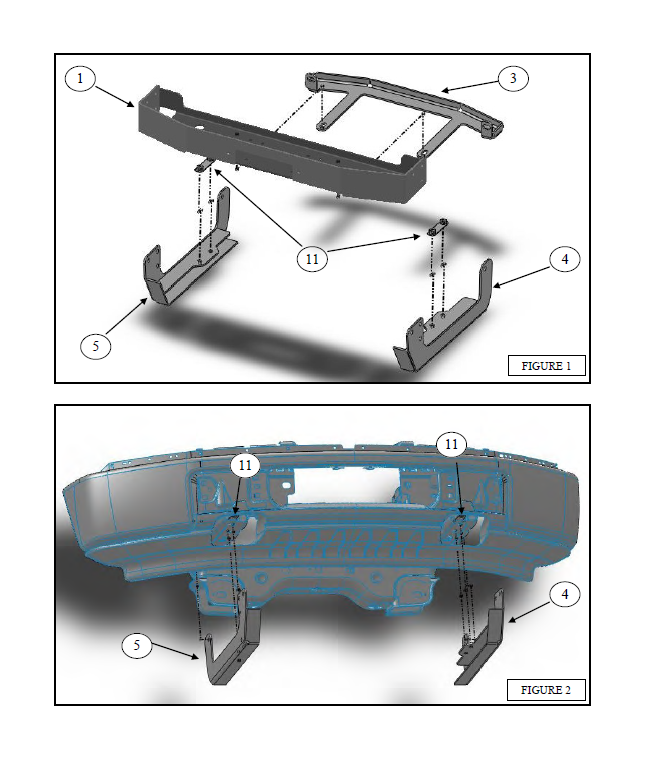
5. Insert one M12 double nut plate (ITEM 11) through each driver and passenger side frame rail. Align the nut threads with the two holes at the bottom of the frame rail. (FIGURE 2)
6. Insert one M12 X 50MM Stud plate into the slot located at the outer surface on each driver and passenger side frame rail; below the most forward body mount. (FIGURE 5)
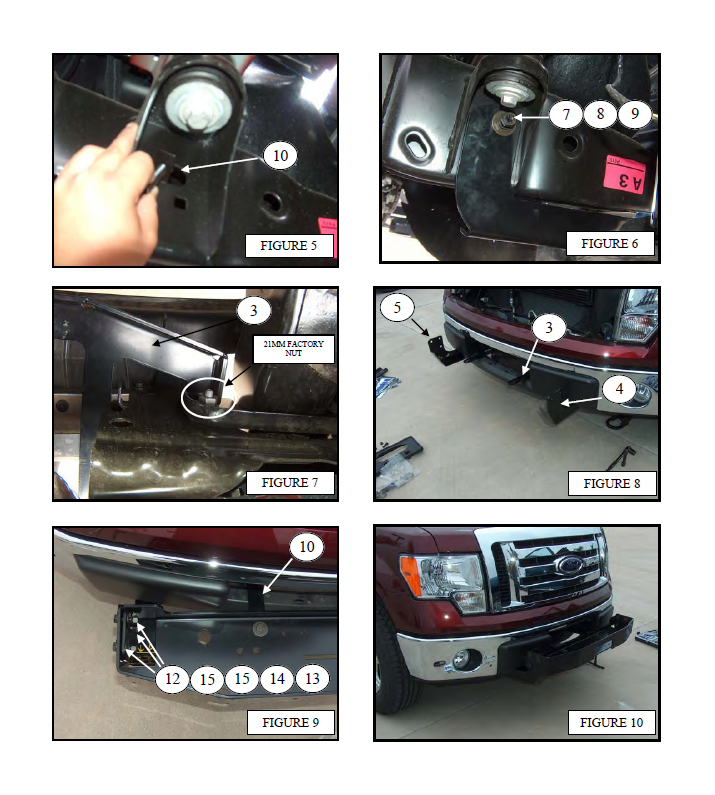
7. Starting at the driver side. Insert the driver side lower mounting bracket through the lower bumper valance slot on the drivers side. Secure the top flange of the mounting bracket to the stud plate that was previously installed. Use One M12 Hex nut (ITEM 7), one M12 spring lock washer (ITEM 8), and one M12 flat washer (ITEM 9). (FIGURE 2,6)
8. Secure the Bottom flange of the mounting bracket to the bottom of the frame rail and the previously installed M12 double nut plate with two M12 X 40MM hex head bolts (ITEM 6), two M12 flat washers (ITEM 9), and two M12 spring lock washers (ITEM 8).
9. Repeat steps 7 and 8 for the passenger side.
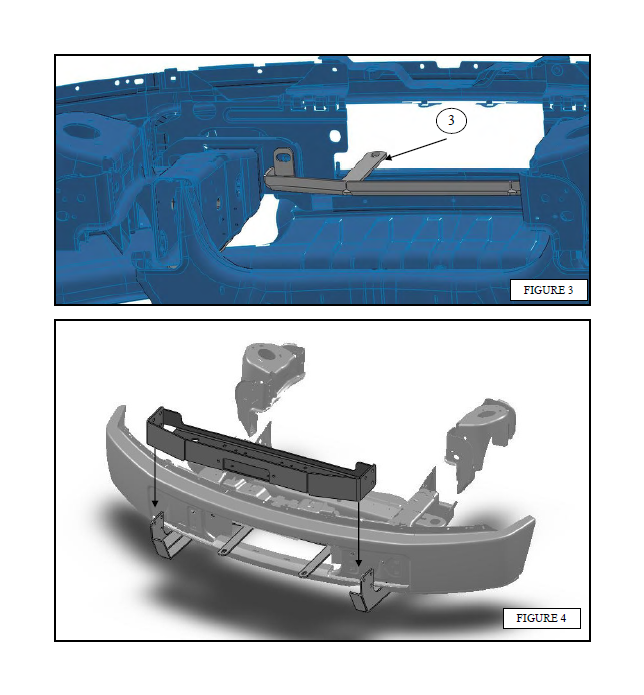
10. Carefully peel back the rubber flap behind the front bumper by pulling the clips from the bumper sheet metal. Having full view of the bumper brackets. Remove the two 21MM factory hex nuts behind the bumper bracket. (FIGURE 3,7)
11. Insert the center mount bracket from the bottom and hook the vertical slots on the factory bumper mount studs. Re install the factory 21MM hex nuts to secure. Do not fully tighten at this time. (FIGURE 3,7)
12. Attach the winch tray assembly to the mounting brackets from the top. The mounting bracket flanges go inside the winch tray assembly. Secure the winch tray to the lower mounting brackets rear holes only with One M12 X 40MM hex bolt (ITEM 12), two M12 flat washer (ITEM 15), one M12 spring lock washer (ITEM 14), and one M12 hex nut (ITEM 13) at each hole location (4 TOTAL). Do not fully tighten at this time. (FIGURE 4,8,9)
13. Take the grille guard and align it with the remaining mount holes in the brackets, attach to the upper holes with, one M12 X 40MM hex bolt (ITEM 12), two M12 flat washer (ITEM 15), one M12 spring lock washer (ITEM 14), and one M12 hex nut (ITEM 13), attach to the lower holes with one M12 X 40MM hex bolt (ITEM 12), four M12 flat washer (ITEM 15) Note two M12 flat washers will be used in between the upright of the grille guard and the bracket to act as spacers., one M12 spring lock washer (ITEM 14), and one M12 hex nut (ITEM 13). Do not fully tighten at this time ( FIGURE 11, 12)
14. Secure the winch tray assembly to the center mount bracket with two M12 hex bolts (ITEM 6), four M12 flat washers (ITEM 9), two M12 spring lock washers (ITEM 8), and two M12 hex nuts (ITEM 7). Do not fully tighten at this time. (FIGURE 9)
15. Align the winch tray as desired and tighten all fasteners. Tighten M12 fasteners to 55-65 lbs-ft. Tighten the factory 21MM hex nut to 50-60 lbs-ft.
16. Install winch per manufacturer instructions.

NOTICE
Westin Max Winch Trays are designed to accommodate a winch bolt pattern of 10” X 4.5”. Closely follow all Westin Installation Instructions for the proper installation of product. Improper installa-tion can result in death, serious injury, and/or product and vehicle damage. In the operation of these products, it is imperative to observe precautions for your personal safety and the safety of others.
WARNING
Failure to follow these instructions could lead to death, personal injury, and / or property damage.
FASTENERS:
All Westin supplied fasteners must be utilized and installed in accordance with the installation instructions and apply torque to the specifications as defined. DOUBLE CHECK ALL FASTENERS BEFORE PRODUCT USE TO ENSURE PROPER FUNCTION AND SAFETY.
DRILLING:
Most Westin products do not require drilling for installation. If drilling is defined as required, use caution when drilling a vehicle. FAILURE TO REVIEW AN AREA TO BE DRILLED MAY RESULT IN PERSONAL INJURY AND OR INJURY TO OTHERS AS WELL AS VEHICLE DAMAGE.
EYE PROTECTION:
ALWAYS WEAR SAFETY GLASSES OR GOGLES DURING THE INSTALLATION PROCESS TO AVOID PERSONAL INJURY.
TOW HOOKS—TOW ATTACHMENT:
During product use, Tow Straps, Tow Cables, and Tow Hooks must only be attached to the Westin Tow Hook Loops as attached to the Max Winch Tray, (sold separately). DO NOT ATTACH TO ANY OTHER AREA OR SERIOUS PERSONAL INJURY OR INJURY TO OTHERS MAY OCCUR.
WINCH SIZING & MAX WINCH TRAY CAPACITY:
The Max Winch Tray is designed for a maximum Winch size rating of 12,000 Lbs. Use of Winch size rat-ings above this limit will void the Westin warranty and MAY RESULT IN PERSONAL INJURY AND OR INJURY TO OTHERS AS WELL AS VEHICLE DAMAGE.
