FREE 1 to 3-Day Delivery on Orders $149+ Details
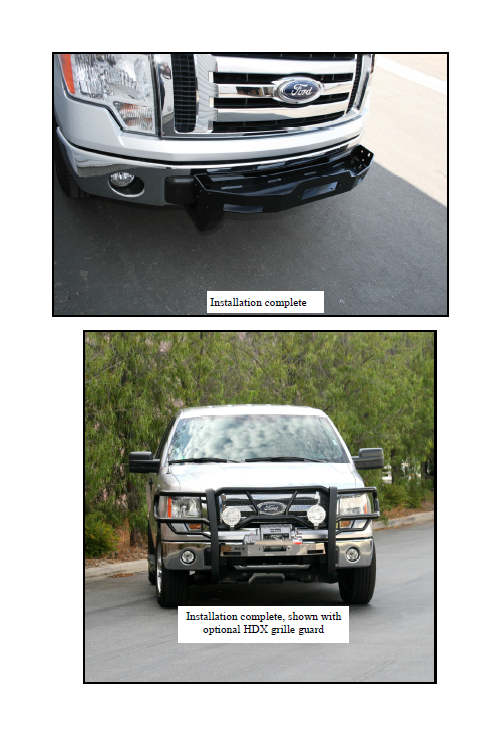
How to Install Westin HDX Winch Mount Brush Guard - Stainless Steel on your F-150
Installation Time
2 hours
Tools Required
- 16MM SOCKET
- 18MM SOCKET
- RATCHET
- ALLEN KEY (INCLUDED)
- TORQUE WRENCH
- FLAT HEAD SCREW DRIVER
- 1/4” 12 POINT WRENCH

Shop Parts in this Guide

ANTI-SEIZE LUBRICANT MUST BE USED ON ALL STAINLESS STEEL FASTENERS TO PREVENT THREAD DAMAGE AND GALLING
1. Remove contents from box, verify if all parts listed are present and free from damage. Carefully read and understand all instructions before attempting installation.
2. Starting underneath the vehicle, remove the front and rear air dam. NOTE: the rear air dam cannot be re-installed with this application and the front can either be removed or trimmed to fit around the mounting brackets. The rear air dam is not included on all vehicles.
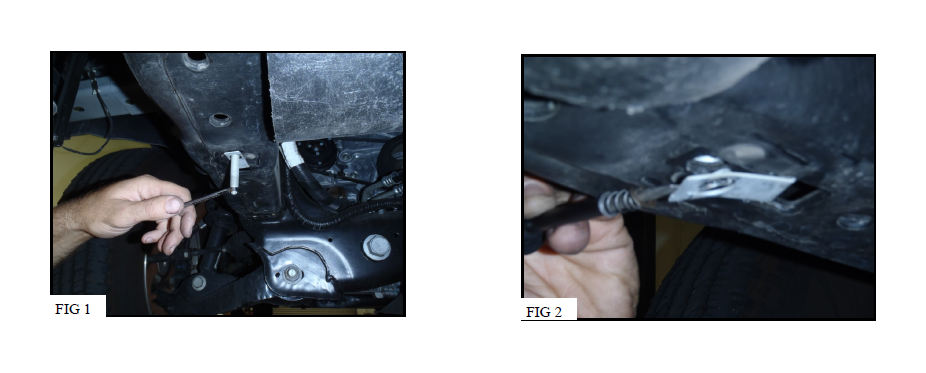
3. Remove the studs from both sides of the frame using a 1/4” 12 point wrench Fig 1, once those are removed pry out the factory nut clips Fig 2. Both of these items will not be re-used.
4. Remove the factory tow hooks. NOTE: these cannot be re-used with this application.
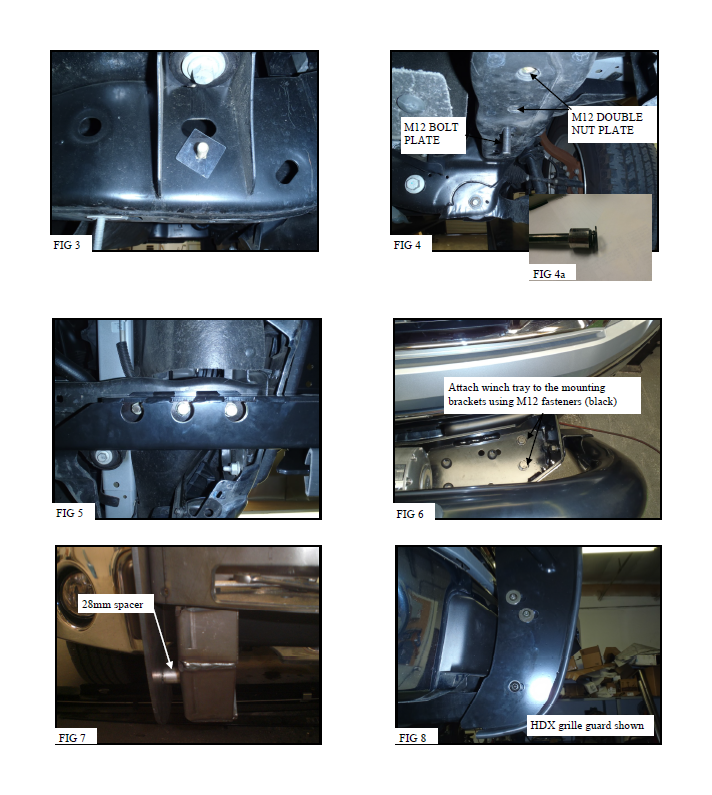
5. Take (1) M12 carriage bolt and insert it through the bigger hole in the frame and into the square hole underneath, place (1) plastic retainer over the threads to keep the bolt from falling into the frame Fig 3. Move to the front of the frame and insert (1) M12 bolt plate into the most rearward hole in the frame. Take (1) double nut plate and place it over the two front remaining holes Fig 4. Take the drivers side bracket and attach it to the previously installed carriage bolt using, (1) M12 flat washers, (1) M12 lock washers, and (1) M12 hex nuts. To attach the mounting bracket to the M12 bolt plate place (1) M12 hex nut, (1) M12 lock washer, and (1) M12 flat washer on top of a 18mm shallow socket and carefully start the hardware onto the M12 bolt plate. Use a deep socket to further tighten the hardware Fig 4a. Attach the mounting bracket to the previously installed nut plate using (2) M12 hex head bolts (2) M12 lock washers, and (2) M12 flat washers Fig 5. Do not fully tighten at this time.
6. Repeat step 5 for the passenger side.
7. Take the winch tray and place it on the previously installed mounting brackets, align the winch tray with the mounting holes and attach using (4) M12 hex head bolts (black), (8) M12 flat washers (black), (4) M12 lock washers (black), and (4) M12 hex nuts (black) Fig 6. Do not fully tighten at this time.
8. Align and adjust the winch tray as needed then fully tighten all hardware at this time. Torque all M12 bolts to 45-50 ft lbs. if installing optional grille guard skip this step.
9. To install the optional Sportsman/HDX winch mounted grille guard. Take the grille guard and place it around the winch tray. Attach the grille guard to the top two mounting locations using (4) M10 button head bolts (8) M10 flat washers, (4) M10 lock washers, and (4) M10 hex nuts. Do not fully tighten at this time. To attach to the bottom mounting location a 28mm spacer must be placed on each side of the grille guard in between the winch and the grille guard, then attach using (2) M12 button head bolts, (4) M12 flat washers, (2) M12 lock washers, and (2) M12 hex nuts. Do not fully tighten at this time.
10. Align and adjust the grille guard as needed then fully tighten all hardware at this time. Torque all M12 fasteners to 45-50 ft lbs, and M10 fasteners to 35-40 ft lbs.
CARE INSTRUCTIONS
REGULAR WAXING IS RECOMMENDED. DO NOT USE ANY TYPE OF POLISH OR WAX THAT MAY CONTAIN ABRASIVES
STAINLESS STEEL PRODUCTS CAN BE CLEANED WITH MILD SOAP AND WATER. STAINLESS STEEL POLISH SHOULD BE USED TO POLISH SMALL SCRATCHES.
GLOSS BLACK FINISHES SHOULD BE CLEANED WITH MILD SOAP AND WATER