FREE 1 to 3-Day Delivery on Orders $149+ Details
How to Install Westin HDX Grille Guard - Black (07-13 Silverado 1500) on your Chevy Silverado

Shop Parts in this Guide
ANTI-SEIZE LUBRICANT MUST BE USED ON ALL STAINLESS STEEL FASTENERS TO PREVENT THREAD DAMAGE AND GALLING.
BLACK ANTI-GLARE TAPE IS PROVIDED TO INSTALL BEHIND THE WING TOP TUBE TO REDUCE POTENTIAL HEADLIGHT GLARE.
1. Remove all contents from box, verify all parts listed are present and free from damage. Carefully read and understand all instructions before attempting installation.
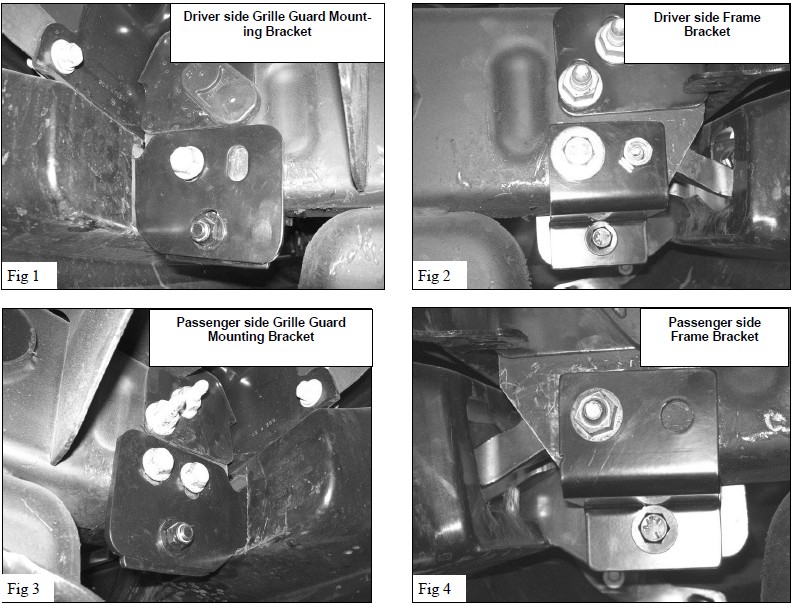
2. To install the two Frame Brackets and two Grille Guard Mounting brackets, remove the tow hook bolts and use them to install the Frame Brackets and the Grille Guard Mounting Brackets. If the vehicle is not equipped with tow hooks use the supplied M12 x 40 MM Hex Head Bolts and M12 hardware to mount the brackets. NOTE: Use a sharp utility knife to cutout an opening to allow the Grille Guard Mounting Brackets to pass through the tow hook cavity. The tow hooks remain in their stock position in the frame rails. Install the Grille Guard Mounting Brackets on the outer side of the tow hooks.
3. Attach Frame Brackets to Grille Guard Mounting Brackets using (1 ea) M12 X 40MM Hex Head Bolt, (1 ea) M12 Lock Washer, (2 ea) M12 Flat Washers, and (1 ea) M12 Hex Nuts. NOTE: The driver side Grille Guard Mounting Bracket mounts to one tow hook bolt (Figure 1) and the driver side Frame Bracket mounts to two tow hook bolts (Figure 2). The passenger side Grille Guard Mount-ing Bracket mounts to two tow hook bolts (Figure 3) and the passenger side Frame Bracket mounts to one tow hook bolt (Figure 4).
4. Open the hood and remove the radiator cover to access the factory grille shell. Use a small flat head screw driver to remove the re-tainer plugs from plastic shroud.
5. Remove the two outer bolts from the chrome grille shell.
6. Using a pair of “needle nose” pliers squeeze the six grille mounting clips. Begin from one end of the grille and insert a small screw-driver into the clips to prevent them from popping back into place. Remove the chrome grille by pulling on it gently and evenly.
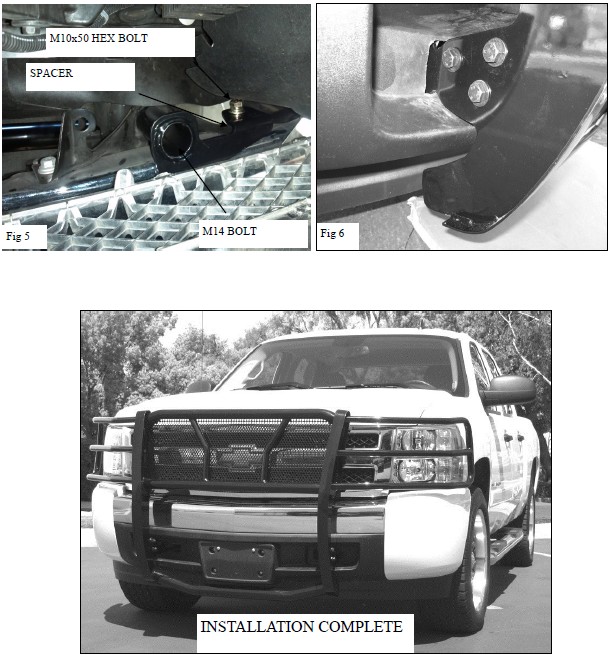
7. Starting on the Driver Side remove the long M14 bolt that secures the bumper to the frame. Next remove the M10 bolt that secures the bumper bracket to the bumper shell. Using the long factory M14 bolt, the supplied M10 x 50mm hex bolt, washer, lock washer and the supplied spacer attach the Support Bracket to the vehicle as shown in Figure 5. Leave this bracket loose.
8. Repeat for the Passenger Side.
9. Reinstall the factory grille shell at this time, line up the clips and gently push it into place. Do not reinstall top co-vers at this time.
10. With help position the Grille Guard on the outer side of Grille Guard Mounting Brackets. Attach Grille Guard to Mounting Brackets using (6) M12x 35MM Hex Head Bolts, (6) M12 Lock Washers, (12) M12 Flat Washers, and (6) M12 hex nuts. (Figure 6)
11. Attach Grille Guard to Top Brackets using the included (2) M10 Button Head Bolts, (2) M10 Lock Washers, (4) M10 Flat Washers and (2) M10 hex nuts. Do not tighten at this time.
12. Level and adjust Grille Guard as needed then tighten all hardware. Torque all M14 hardware to 70-80 ft-lbs., M12 hardware to 45-50 ft lbs, M10 hardware to 25-30 ft lbs. A long extension is necessary to tighten the factory M14 bolts.
13. Re-install the top plastic shroud.
On polished grille guards. Anti-reflective tape is included to help reduce the amount of glare reflected from the headlights. It should be applied on the top tube section of the grille guard wings as shown on the illustration. Tape may need to be cut to correct length.