 FREE 1 to 3-Day Delivery on Orders $149+ Details
How to Install Turbosmart Smart Port Supersonic BOV on your F-150
-1.png)
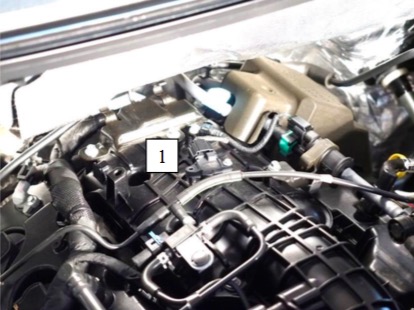
Step 1: Locate the OEM MAP sensor on the top of the intake plenum. Remove the OEM bolt holding the MAP sensor in position, note that the sensor is only secured by using one bolt only from factory. Unplug the MAP sensor plug off of the MAP sensor. Remove the MAP sensor by gently pulling straight up.
Step 2: Install the supplied 1/8” NPT nipple on the MAP adapter. Blank off the second port on the MAP adapter if it is not in use. Use thread sealant. Route the supplied vacuum hose from the nipple towards the front right hand side of the vehicle (OEM BOV location). Use one of the supplied spring clamps to secure the vacuum hose onto the nipple.
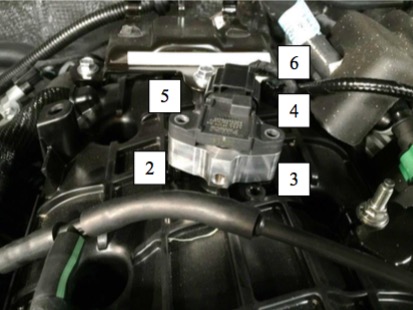
Step 3: Mount the MAP adapter into the intake plenum. Ensure that the O-ring on the MAP adapter is not kinked or damaged during installation.
Step 4: Use the OEM bolt to secure the MAP adapter onto the intake plenum. Please note that the OEM bolt will only fit into one of the screw holes on the MAP adapter.
Step 5: Use the supplied M5 button head screw to secure the OEM MAP sensor onto the MAP adapter. Ensure that the O-ring is not kinked or damaged during installation.
Step 6: Re-plug the MAP sensor with the OEM plug.

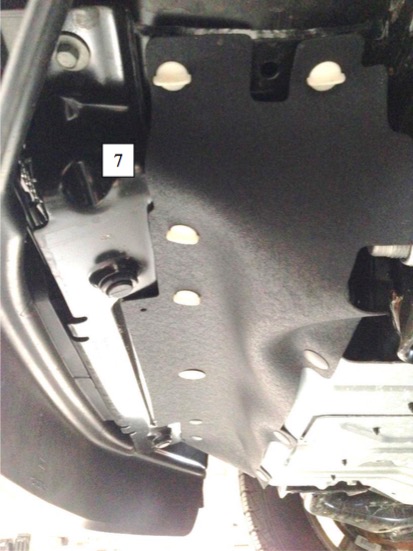
Step 7: Remove the under-tray of the vehicle by removing all of the plastic clips holding the tray in place. Once the under-tray is removed, the intercooler assembly can be accessed. Unplug the OEM BOV plug. Undo the bolts securing the cross member in order to remove the intercooler from the vehicle.
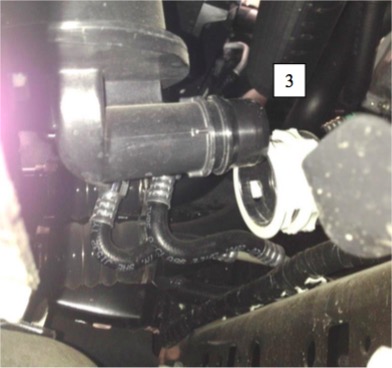
Step 8: Unplug the BOV chamber from the OEM plumb back hose. Install the supplied plumb back hose blanking plug by pressing it into the plumb back hose plug. Please note that the blanking plug will only fit the plumb back hose in one way.
Step 9: Once the intercooler assembly is removed from the vehicle, the OEM BOV can be upgraded. Remove the OEM BOV by undoing the two bolts holding it onto the BOV chamber.
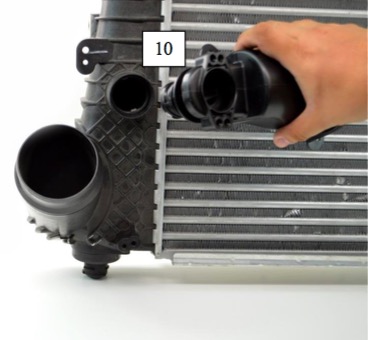
Step 10: Remove the BOV chamber by turning it upwards. The BOV chamber should just unscrew.
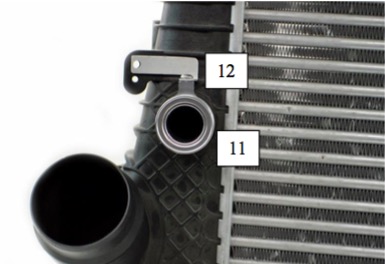
Step 11: Screw the supplied intercooler adapter in place until it reaches home. Ensure that the O-ring (32.92x3.53) is installed on the adapter.
Step 12: Install the supplied L-bracket on the intercooler and the BOV adapter. Use the supplied M6x8 button head bolt to secure the L-bracket onto the BOV adapter and use the supplied M6x16 socket head bolt with M6 spring washer and nut to secure the L-bracket onto the intercooler. Do not over tighten.
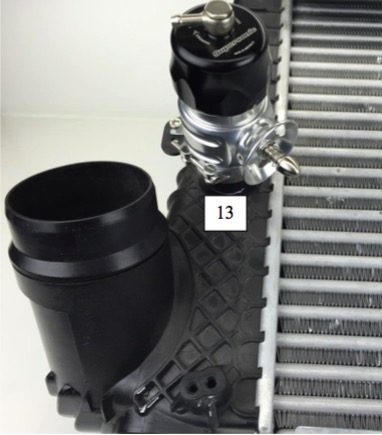
Step 13: Install your new Turbosmart BOV assembly in this orientation. Ensure that O-ring (39.00x2.00) is in place before placing the BOV assembly on the adapter. Secure your new Turbosmart BOV with the V-band clamp. Ensure that the V-band clamp is secured tightly.
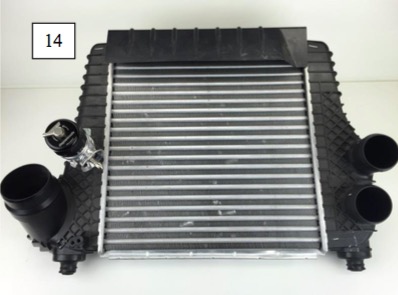
Step 14: The finished intercooler assembly should look as shown on the right. Please ensure that all fasteners are secured prior to reinstalling the intercooler.
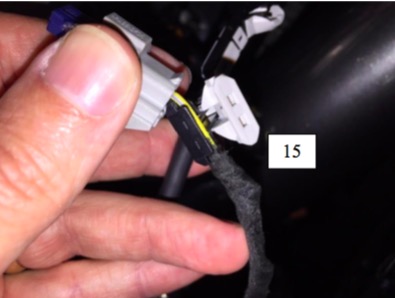
Step 15: Prior to re-installing the intercooler back onto the vehicle. The OEM BOV plug needs to be blanked off. Depending on the purchased kit, you may receive either a direct plug-in plug option or a plug utilising scotch lock connectors. The direct plug-in blanking plug fits only one way. After blanking off the OEM BOV plug, secure it by using the supplied cable ties. If the blanking plug has scotch lock connectors as shown in the picture on the right, Strip back 15mm of mesh covering the wires of the OEM solenoid plug. Clip a scotch lock connector onto each wire, polarity not important. Secure the scotch locks with a pair of pliers ensures that both halves are pressed together.
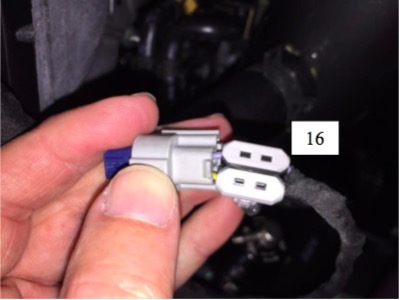
Step 16: The scotch locks should look like this when installed correctly. Scotch locks are removable if the factory BOV is to be re-installed. Secure plug by using the supplied cable ties.
Step 17: Reinstall the intercooler onto the vehicle by doing the reverse of step 7.
Step 18: Install the vacuum hose (routed from the MAP adapter) onto the nipple. Secure the vacuum hose with one of the hose clamps supplied.
Step 19: Reinstall the under-tray.
Step 20: . Start your vehicle and enjoy your new Turbosmart BOV.
ADJUSTING YOUR BOV
Traditionally every BOV needs to be adjusted to suit the vehicle it is being mounted on. The new SP Dual Port BOV technology eliminates the need to adjust the BOV after installation.
ANNUAL MAINTENANCE
Turbosmart recommends that the following maintenance procedure is carried out annually.
Regular maintenance will ensure that your BOV is operating at its peak performance and will extend the working life of the product.
- Remove the cap of the BOV by rotating in an anti-clockwise direction – CAUTION, the cap is under spring force, remove with care!
- Carefully remove the piston and thoroughly clean the piston and the bore of the BOV
- Inspect the surface of the piston and the bore of the BOV for scoring or excessive wear, silver coloured marks on the bore are an indication of excessive wear
- Check the Base O-ring and the Cap O-ring for any damage – replace if necessary
- Lubricate the bore and the piston with Uni-Glide™, hydraulic oil or sewing machine oil – DO NOT use grease or viscous oils
- Re-assemble the BOV in the reverse order
TROUBLE SHOOTING
The following points should be checked if you find that your engine is dipping below normal idle, stalling or if the BOV is functioning poorly. Please note: the following checks will cure 99% of problems experienced with a BOV.
- Check the vacuum hose for splits, cracks, loose connection, kinking or any obstruction – old or fatigued hose may collapse under vacuum causing an obstruction.
- With the engine running remove the vacuum / boost hose from the nipple in the cap of the BOV, there should a loud hissing sound. The engine should idle poorly, double check by covering the end of the hose with your finger – otherwise the hose is blocked.
- Check to see if the BOV is blocked or contaminated with dirt or debris.
- Ensure that the vacuum / boost source is not shared and that the vacuum source is directly from the inlet manifold.
- Check the seal between the compressor cover flange and the BOV. Make sure the supplied O-Rings are installed properly and the BOV Flange is secured on the compressor cover flange with the 3 supplied screws.
- Ensure the spring clamps are secured on silicon hoses and fittings.
- If the valve does not open properly or is slow to react, it could be due to the mapping of the drive by wire system from such things as aftermarket chips and engine tunes. Check with the tuner that the mapping of the throttle is the same as OEM.
- The valve may not open if the engine is just free revved. This is due to the drive by wire system. Check that the valve operates by driving the vehicle.

