FREE 1 to 3-Day Delivery on Orders $149+ Details
How to Install Stainless Works Turbo Chambered Cat-Back Exhaust - Split Rear Exit - Performance Connect (04-08 5.4L) on your Ford F-150

Shop Parts in this Guide
Thanks for purchasing Stainless Works Exhaust System for your 2004-2008 2WD/ 4WD F-150 5.4L SUPERCAB with 6.5’ bed or SUPERCREW with 5.5” or 6.5’ bed. We have gone to great pains to make sure that our exhaust systems fit and sound great. Please follow these steps to ensure that your installation goes as planned.
1. Stainless Works recommends the use of Hi-Temp RTV sensor safe silicon gasket
maker as an option to or in conjunction with the use of factory gaskets. The
recommended Oxygen Sensor Safe RTV is either Valco All-in-One Aluminum or
Permatex Copper P/N 101BR available at NAPA, Autozone and other retailers.
2. Disconnect the battery before starting work on the exhaust system for your
vehicle. Reconnect the battery when the job is completed.
3. Your exhaust system can be installed by a weekend warrior but the use of a lift is
recommended for ease of installation. If using a jack, the vehicle must be placed
on a level hard surface and jack stands are required for safety reasons.
INSTALLATION FOR EXHAUST SYSTEM TO FACTORY CONNECTION PT.
4. Disconnect battery.
5. Raise and support vehicle.
6. Loosen double wide exhaust clamp at back of factory Y-pipe and save clamp for
later use.
7. Remove the hangers from the rubber insulators and remove the exhaust. If using
a lift, the exhaust can be removed in one piece, but if not, the tailpipe may need to
be cut in half for removal.
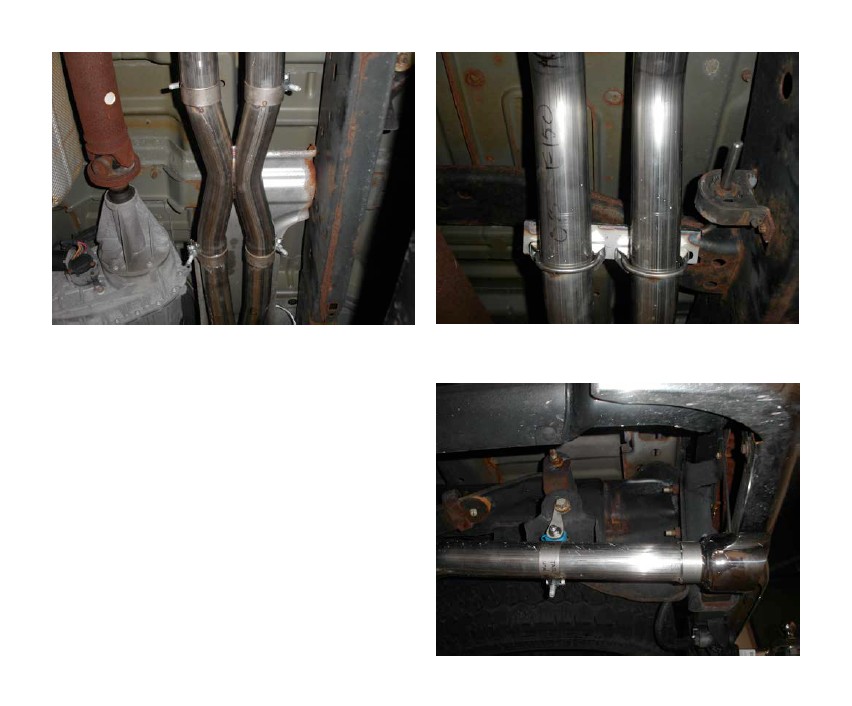
8. The pictures at the end of this document are headers to an under-bumper system,
showing x-pipe and hanger locations before and after the mufflers and at the tips.
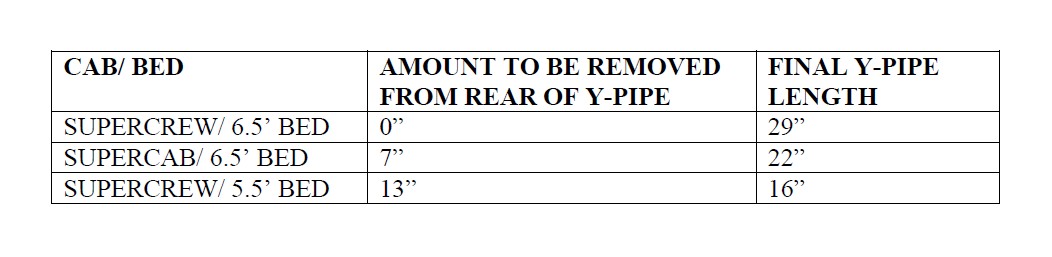
9. The following instructions are utilized to adjust the length of the Y-pipe based on
the Truck cab/ bed configurations:
10. The Y-pipe length in the box is 29” long. This Y-pipe is designed to be cut to fit
the following truck cab/bed configurations. Cut the front ( the single pipe end) of
the Y-pipe and deburr, according to the lengths described in the following table:
11. Using OEM double wide clamp removed above, attach the Y-pipe to the factory
connection point.
12. Install muffler inlets to rear of Y-pipe using (2) 2.5 clamps.
13. Install hanger on muffler inlets using (2) saddle clamps.
14. Install mufflers using (2) 2.5 clamps.
15. Install tail pipes and hanger at mufflers using (2) saddle clamps.
16. Install rear hanger to tail pipes using (2) saddle clamps.
17. Install tips using (2) clamps. Under bumper systems have additional hangers.
18. Starting at front of the system check for alignment, adjust and tighten system.
19. Lower vehicle and reconnect battery.
INSTALLATION FOR EXHAUST SYSTEM TO HEADERS
20. The following are to be completed after the installation instructions for headers
contained in a separate document
21. Remove the exhaust hangers from the rubber insulators and remove the exhaust.
If using a lift, the exhaust can be removed in one piece, but if not, the tailpipe may
need to be cut in half for removal.
22. The pictures at the end of this document are headers to an under-bumper system,
showing x-pipe and hanger locations before and after the mufflers and at the tips.
23. Install muffler inlets to X-pipe using (2) 2.5 clamps. Level the X-pipe.
24. Install hanger on pipes using (2) saddle clamps.
25. Install mufflers using (2) 2.5 clamps
26. Install tail pipes at mufflers.
27. Install rear hanger to tail pipes using (2) saddle clamps.
28. Install tips using (2) clamps. Under bumper systems have additional hangers.
29. Starting at front of the system check for alignment, adjust and tighten system.
30. Lower vehicle and re-connect battery.
31. Be sure to have adequate clearance around all wires, hoses and lines. If anything
is in contact with the exhaust system, it will melt. Make sure to have at least
½” of clearance and wrap any suspect areas with DEI thermal barrier wrap.
32. After double checking for clearance and making sure all lines, wires and hoses are
secured, drive the car for 10-20 miles and re-check all clamps and clearances.
Your system may be tack welded at the joints/ clamps to reduce shifting of the
system during heating and cooling cycles. Make certain to disconnect the battery
before performing any welding.