FREE 1 to 3-Day Delivery on Orders $149+ Details
How to Install Stainless Works 3 in. Off-Road Downpipe - Factory Connect (2017 Raptor) on your Ford F-150

Shop Parts in this Guide
Thanks for purchasing a Stainless Works Downpipe system for your 2017 Ford Raptor. Our team has done our very best to ensure that this product is the premium in performance, quality, and fitment. We are proud to say that this system will unleash the true character of your vehicle. We encourage you to read through the following steps, and check the included Bill of Materials before beginning. Please follow these steps to ensure that your installation goes as planned.

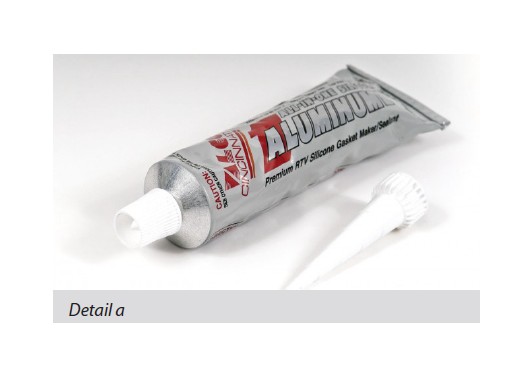
a. Stainless Works recommends the use of Hi-Temp RTV sensor safe silicon gasket maker as an option or in conjunction with the use of factory gaskets. The recommended Oxygen Sensor Safe RTV is either Valco All-in-One Aluminum or Permatex Copper P/N 101BR available at NAPA, Autozone and other retailers.
b. Disconnect the battery before starting to work on the exhaust system for your vehicle. Reconnect the battery when the job is completed.
c. Your exhaust system can be installed by a weekend warrior, but the use of a lift is recommended for ease of installation. If using a jack, the vehicle must be placed on a hard level surface. Jack stands are required for safety.
d. You will assemble the components together as specified below, but only snug the clamps as you move along from front to back. After aligning all the components in the vehicle, you will tighten all the clamps working from front to back of the vehicle.
DISASSEMBLY
1. Disconnect battery.
2. Raise and support vehicle.
3. Remove engine skid plate. Use a 13mm socket to remove the (4) larger bolts and a 10mm socket to remove the (2) smaller bolts.
4. Remove the transmission skid plate from the driver’s side. Use a 13mm socket to remove (4) bolts.
5. Loosen the clamp at the end of the right-side downpipe, in front of the resonator.
6. Remove the bolts from the flange at the end of the left downpipe. (2) bolts (13mm socket). Slide the exhaust back to give yourself room to work.
7. Remove (3) bolts (10mm socket) from right and left heat shields bolted to the transmission crossmember.
8. Remove the (2) bolts (10mm socket) on the right side of the crossmember that hold the wiring harness. Unclip the harness from the crossmember.
9. Remove the transmission mount from the crossmember. (2) nuts (21mm socket).
10. Support the transmission and remove (4) bolts (18mm socket) and (4) nuts (15mm socket). Remove the crossmember.
11. On the right side, remove (2) bolts (10mm socket) from the upper heat shield to allow access to the O2 sensor wires.
12. Unplug and remove the O2 sensors.
13. Remove (4) bolts (15mm socket) from the transmission mount.
14. Remove (1) bolt (10mm socket) remaining in the lower right heat shield and remove the heat shield.
15. Remove (4) nuts (15mm socket) from the 2 bolt flanges at the turbos and remove the factory downpipes.
16. Remove the transmission mount from the factory downpipe and install it on the Stainless Works downpipe.
17. Using the supplied stud removal tool, remove the (4) threaded studs 10mm studs from the turbos. This may require heating the turbo at the studs. Remove the adaptor flanges.
SW DOWNPIPE INSTALLATION
18. Install supplied O2 extension wires to the rear O2 wires on the truck.
19. Assemble the front and rear sections of the left downpipe, using a 3” clamp so it can be installed as a unit. Install the transmission mount to the downpipe hangers.
20. Install the lower right heat shield to the frame before installing the right-side downpipe, (1) bolt (10mm socket). You will not be able to install the heat shield after the downpipe is in.
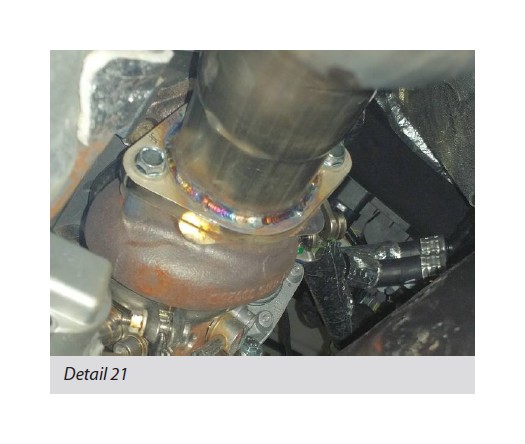
21. Install the right-side downpipe to the turbo using (2) provided bolts (13mm socket). Assemble to your factory or SW performance catback using the factory clamp.
22. Install the left downpipe assembly to the turbo using (2) provided bolts (13mm socket). You can now reassemble the transmission mount using the (4) original bolts (15mm socket). This step may require some assistance to help hold the downpipe in place as the bolts are installed.
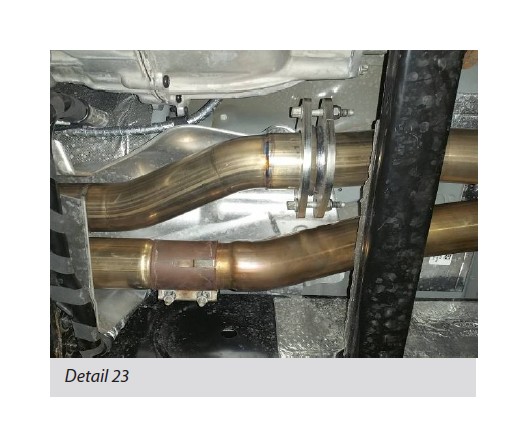
23. Using the (2) provided 55mm long bolts (17mm socket) assemble the left downpipe back to your factory or SW performance catback.
24. Install all O2 sensors.
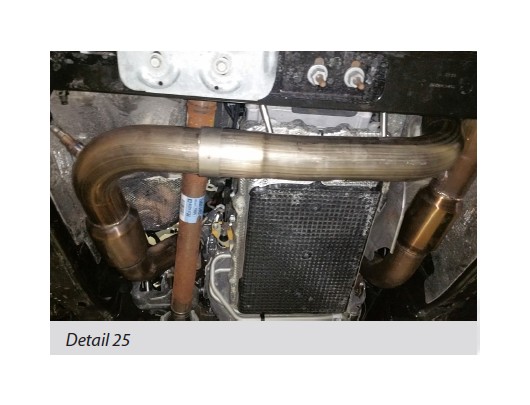
25. Install the transmission crossmember and all heat shields. The wiring harness can also be reassembled now. Lower the transmission back into place and secure.
26. Adjust and tighten the downpipe.
27. Secure all O2 wiring away from heat.
28. Reinstall the engine skid plate.
29. Reconnect the battery.
30. After double checking for clearance and making sure all lines, wires, and hoses are secured, drive the car for 10-20 miles and re-check all clamps and clearances.