 FREE 1 to 3-Day Delivery on Orders $149+ Details
How to Install Sniper Standalone CAN Shift Light w/ Red LED - Black Tube (04-17 All) on your Ford F-150

Shop Parts in this Guide
Kit Contents:
(1) Shift light
(1) Shift Light Adjustable Mounting Bracket
Installation Instructions
Installation Instructions:
1. Plug the OBDII connector into the vehicle's OBDII port.
2. Mount the Sniper shift light for easy viewing and in an area that will allow access to the programming buttons (see Figure 1).
NOTE: Use the included double sided tape to attach shift light bracket. Arrange the shift light cable so that it will not interfere with steering wheel, gear stick, or pedals.

OPTIONAL Direct Wire Instructions: (Hard wire Sniper shift light into a PCM/ECU)
1. Disconnect the negative (-) battery cable.
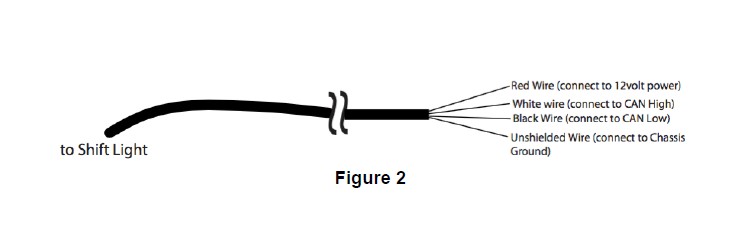
2. Cut off OBDII connector and strip back the insulation to expose the red wire, black wire, white wire, and unshielded wire (see Figure 2).
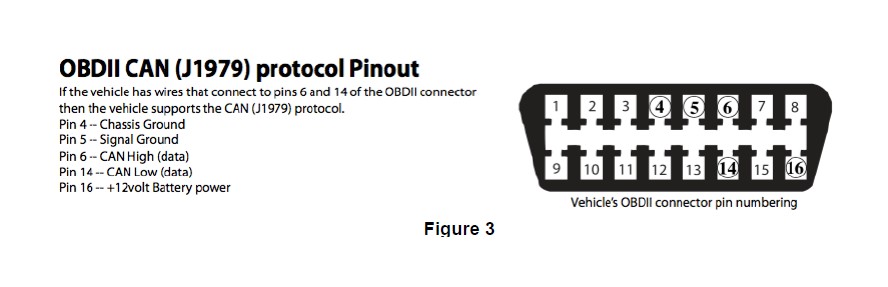
3. Connect wiring to the corresponding wires listed in Figure 3.
4. Mount the Sniper shift light for easy viewing. NOTE: Use the included double sided tape for base mounting.
5. Reconnect the negative (-) battery cable.
Power Note: There is no need to disconnect the shift light when not in use. The Sniper shift light will automatically go into a power saving mode when the vehicle is off. When the engine is started up the shift light will instantly be powered on and ready to use.
The Sniper shift light is equipped with an easy to use LED display menu. The LED display by default will display your engine RPM.
1. Turn on power to the shift light by starting up the vehicle (or plug it into the ODBII port).
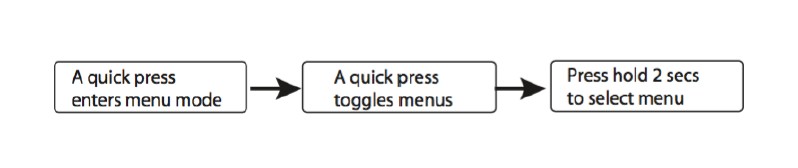
2. To access most menus follow this procedure below.
Initial Shift Light Setup Instructions:
Power Note: There is no need to disconnect the shift light when not in use. The Sniper shift light will automatically go into a power saving mode when the vehicle is off. When the engine is started up the shift light will instantly be powered on and ready to use.
1. Select the number of speeds for your vehicle’s transmission [SPd]
A. Select the [SPd] menu option, press and hold a button for 2 seconds. Current setting will be displayed.
B. Toggle 1 through 6 to select how many speeds your transmission has.
C. To save setting, do not press button for 5 sec. Display will blink indicating that setting has been saved.
2. Program the Sniper CAN shift light to your vehicle’s gear ratios [Prg]
The Sniper shift light can quickly learn your vehicle’s gear ratios, which allows you to setup a different shift point for each individual gear. Please note: Program menu is only available while engine is running.
A. Select the [Prg] menu option, press and hold a button for 2 seconds. [gr.1] is displayed.
B. Drive the vehicle in 1st gear at a steady speed. Quick press a button, LEDs will blink to indicate 1st gear ratio is saved. [gr.2] will automatically be displayed after the 1st gear ratio is set.
C. Drive the vehicle in 2nd gear at a steady speed. Quick press a button, LEDs will blink to indicate 2nd gear ratio is saved. [gr.3] will automatically be displayed after the 2nd gear ratio is set.
D. Repeat procedure for each remaining gears. [gr.4][gr.5][gr.6]
Please note: Driving speed only needs to be steady for each gear and does not need to be close to the red line. For example 5th and 6th gears would be driven at a safe and legal speed (50-70MPH) while corresponding lower gears would be driven at slower steady speeds.
3. Set shift point for each gear [SP.1] to [SP.6]
A. Select the [SP.1] menu option. Press and hold a button for 2 seconds. Current setting will be displayed.
NOTE: Engine RPM will show as this example: 8.35 = 8350 RPM
B. Toggle through to set your desired shift point.
C. To save setting, do not press a button for 5 seconds. Display will blink indicating that the setting has been saved.
D. Repeat procedure to set shift point for each gear.
The Sniper OBDII shift light features an easy to use LED display menu. The LED display can also display your engine RPM.
1. Turn on power to the shift light by starting up the vehicle (or plug it into the ODBII port).
2. To access most menus follow this procedure below.

Additional Features and Operating Instructions
Power Note: There is no need to disconnect the shift light when not in use. The Sniper shift light will automatically go into a power saving mode when the vehicle is off. When the engine is started up the shift light will instantly be powered on and ready to use.
Engine RPM Peak Recall [000]
The shift-light LED display by default will display the current engine RPM while in use.
NOTE: Engine RPM is displayed as this example: 8.35 = 8350 RPM
1. Press and hold a button for 2 seconds while viewing the current RPM*. The Peak Recall menu will be displayed.
2. Toggle through [P. 1] to [P. 6] to select a gear.
3. Press and hold button to show peak RPM for the selected gear, release the button to continue toggling.
Clear all Peak Recall Memory [P.CL]
1. To clear all peak recall memory, press and hold a button for 2 seconds. Display will blink indicating that the memory has been cleared.
*The LED display settings can be changed to display one of these options - Current RPM, Current Gear, or the display can be turned off. Press and hold button for 2 seconds while any of these options are displayed to enter Peak Recall menu.
Shift-Light LED brightness settings [LEd]
You can set the shift light LED brightness. The shift light will retain this setting in memory.
1. Select the [LEd] menu option, press and hold a button for 2 seconds. Current brightness setting will be displayed.
2. Toggle through brightness setting using buttons. OFF = Turn off the shift-light LEDs 1-4 = Indicates a brightness level
3. At desired brightness setting let shift light time out for 5 seconds to save the setting. LEDs will flash 2 times on exit of menu.
LED Display Setting [dSP]
The shift-light will display current engine RPM or current gear on the LED display while in operation. If desired you can turn this feature off.
1. Select the [dSP] menu option, press and hold button for 2 seconds. Current display option will be displayed.
2. Press a button to toggle between [tAc], [SPd], [gr.], [FLP], and [oFF].
[tAc] - LED display will show current engine RPM while in operation
NOTE: Engine RPM will show as this example: 8.35 = 8350 RPM
[SPd] - LED display will show current Speed in MPH
[gr.] - LED display will show current gear number while in operation
[FLP] - LED Display will flip the displayed information upside down.
[oFF] - LED display will be turned off
3. To save the setting, do not press a button for 5 seconds.
Launch RPM Menu [LAU.]
The Sniper shift light "Launch" feature allows you to set an RPM launch point. Once the Launch Point is set, the light will turn on when the vehicle's RPM is within 200 RPM below or 200 RPM above the launch point (this is the Launch RPM Zone). If the RPM exceeds 200 above the launch point the light will blink, this indicates that you have passed the launch point RPM. While in the Launch RPM Zone the shift-light is steady on to indicate that you are on the correct RPM. Launch feature is automatically active when vehicle is not moving and the shift light is powered on.
1. Select the [LAU.] menu option, press and hold a button for 2 seconds. Current setting will be displayed.
2. Toggle through 1.00 to 9.99.
NOTE: Engine RPM will show as this example: 8.35 = 8350 RPM
3. To disable the launch feature - set launch RPM to 9.99
