 FREE 1 to 3-Day Delivery on Orders $149+ Details
How to Install Rugged Ridge Spartacus Heavy Duty 12,500 lb. Winch w/ Steel Cable (97-17 All) on your Ford F-150
Installing Your Winch
WARNING: Read and understand all instructions and related Warnings, Cautions and Notices before attempting to install or use your Rugged Ridge® winch.
CAUTION: Installation requires purchase of a four-point mounting plate or properly equipped bumper unique to your vehicle. Dimensional footprint of your Rugged Ridge® winch is included with parts list at back of these instructions. Verify that the strength of the fasteners, mounting plate and vehicle frame attachment exceeds maximum rated pull of winch. Consult your retail distributor for available mounting plates and bumper options.
1. Align winch so that it sits flush and square on chosen mounting plate. Secure winch to mounting plate using 3/8” x 1-1/4” fasteners and fender washers supplied. You may find it convenient at this time to feed the cable lead through the roller fairlead hole before you secure your winch plate/bumper. Note: Depending on your bumper, you may want to install your roller fairlead before you secure your winch. This will allow easy access to the roller fairlead back bolt.
NOTICE: Winch must be used with Fairlead to avoid damage to cable, spool and gears. Mount fairlead using supplied fasteners
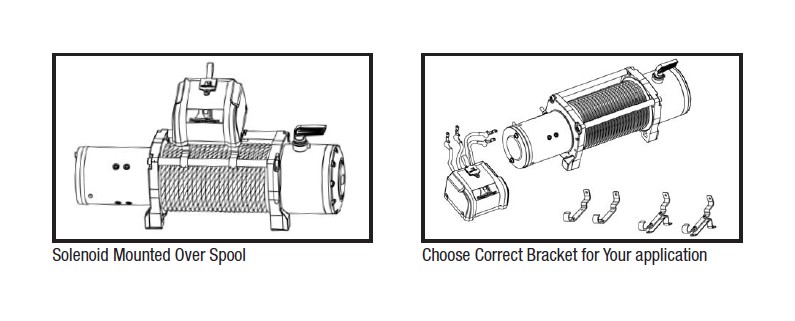
2. Mount solenoid box according to following illustration. Note: control box can be attached either above motor base or on top of spool tie bars. Use brackets and hardware supplied, securing threads with red Loctite®. See following pages.
To mount Solenoid Box over motor:
A. Select Correct Hardware from Hardware Pack
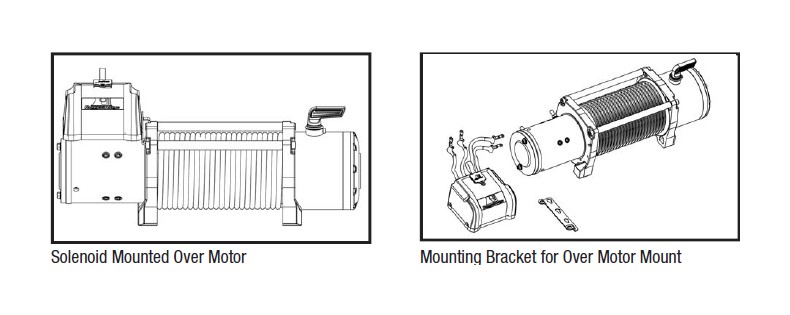
B. Attach black Mounting Bracket to side of spool as shown, using one of the existing socket head screws from rear Tie Bar and socket head screw provided.
C. Loosen the 2 screws on the right side of Solenoid Box and insert into corresponding holes in Mounting Bracket, sliding them over to smaller portion of mounting bracket holes. Tighten screws.
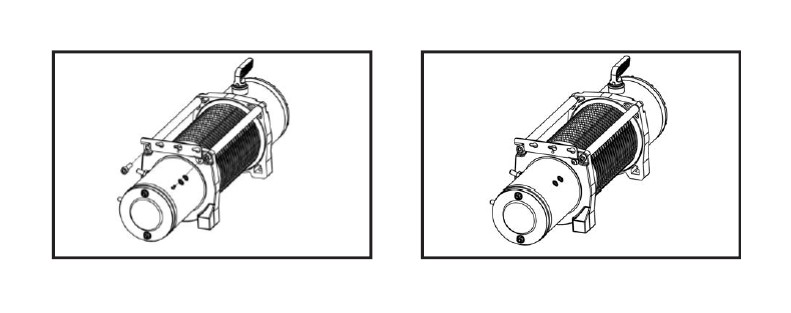
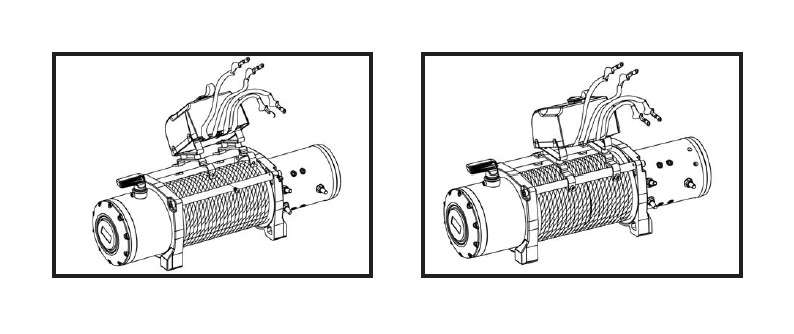
To mount Solenoid Box over spool:
A. Select the appropriate bracket hardware for your installation. Rugged Ridge® supplies two over spool mounting options. Depending on your bumper, winch plate, or application, you will need to determine which bracket choice to use. The angled bracket allows the solenoid to be angled forward to ensure proper clearance of plug for hand controller relative to bumper overriders or stinger applications.
B. Configure & attach brackets as shown for mounting of Solenoid Box over spool.
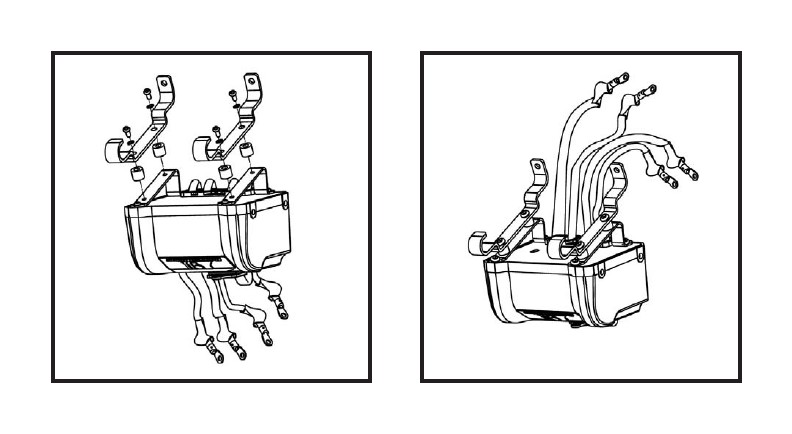
C. Attach Solenoid Box to the tie bars over spool by hooking the Mounting Bracket around front tie bar and securing at the rear with the 2 screws provided, making sure all cables are located between the solenoid box and the tie bar.
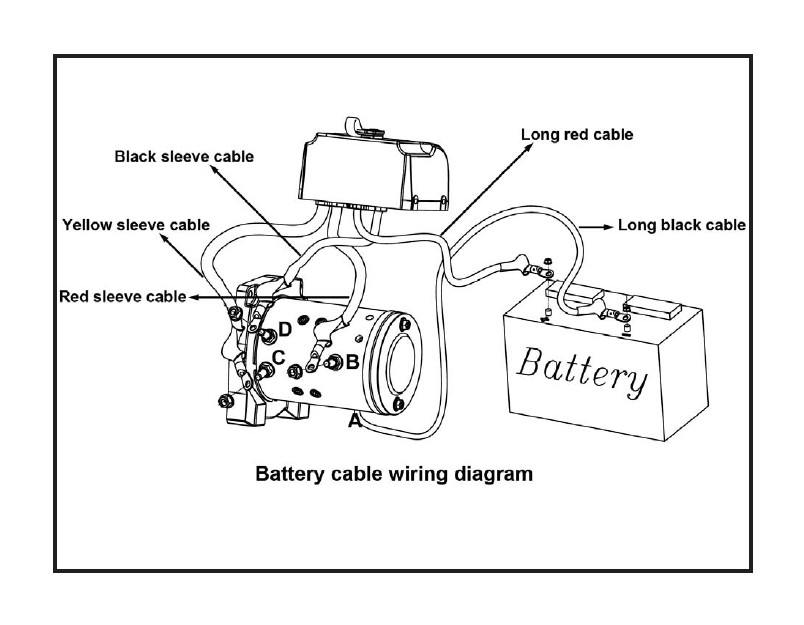
3. Make solenoid box to vehicle battery connections after consulting wiring diagram and instructions.
WARNING:
To avoid risk of severe injury to eyes and body when working around batteries and electrical components:
• Always wear eye protection and remove watches, jewelry.
• Never lean over battery or connection being made.
• Leave remote switch disconnected to prevent inadvertent spool movement and accident.
• Never route electrical cables: across sharp edges or through door jams; through or near moving parts; near parts that become hot.
• If drilling or cable supports required, verify area is clear of fuel lines, brake lines and other electrical cables.
• Install insulating boots on all exposed terminal posts and assure wiring/cables remain insulated and protected from heat, vibration and wear.
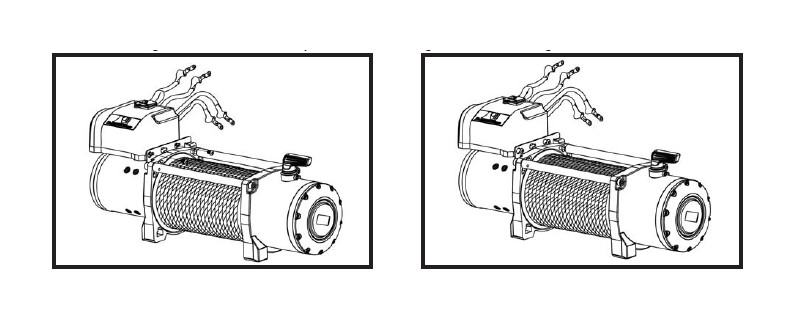
Solenoid Box to Winch Motor Connections
A. Connect short black cable with red sleeve (B) from control box to red terminal (B) of motor.
B. Connect short black cable with yellow sleeve (C) from control box to yellow terminal (C) of motor.
C. Connect short black cable with black sleeve (D) from control box to black terminal (D) of motor.
D. Connect thin black cable (E) from control box to bottom terminal (A) of motor.
Winch Motor to Battery Connections
A. Ground motor by connecting long/thick black cable to bottom terminal (-) of motor and other terminal to Negative (-) post of battery.
B. Power motor by connecting long/thick red cable ( ) from control box to Positive terminal ( ) of battery.
NOTICE: Rating and condition of vehicle battery will affect winch performance. Minimum required battery is 650 CCA, fully charged
CAUTION: Corrosion on electrical connections and battery terminals will reduce power and winch performance. Keep battery
CAUTION: Cable or synthetic rope must be unspooled, stretched and respooled before first use. (See Installation instructions
WARNING: Use supplied hook strap when spooling in or out (no load). Use gloves and keep fingers and body clear of hook, cable and fairlead during installation and all winch operations.
4. Cable or synthetic rope must be stretched and spooled under tension to prevent over-wraps and damage. For initial spooling, disengage clutch and using gloves, keep tension on cable while having assistant evenly wind the first five wraps for cable, or a full layer for synthetic rope, by hand rotating spool in direction of arrow (see spool side plate).
5. Next, secure hook to suitable anchor, connect power switch, engage clutch and slowly power spool while maintaining tension so that cable spools tightly and evenly. Rolling load of vehicle should provide proper initial tension (500 lbs./230 kg. min.) while providing opportunity to practice winch operation and safety procedures. Stop spool when hook is 6 feet/2 meters from fairlead. Attach and secure hook to vehicle frame. Slowly take up any slack.
WARNING: To avoid unintentional starting when winch is not in use: (a) remove & secure remote switch & (b) keep clutch disengaged.
Clutch and Control Handle Operation
A. Clutch Operation
1. Free spool by disengaging clutch. Move clutch lever clockwise to the "OUT" position. Cable may now be pulled off spool using supplied hook strap. DO NOT FORCE CLUTCH HANDLE. Use control handle to rotate drum, aligning gear to free spool.
2. To power spool fully engage clutch. Move clutch lever counterclockwise to the "IN" position. Winch is now ready for vehicle recovery using power switch. Avoid powering spool in reverse as this increases wear on spool brake. Return clutch to "Out" position after completing pull and assuring vehicle is stable.
B. Power Switch Operation
Keep control handle in secure location, attaching before and detaching after each winch operation.
NOTICE: Avoid internal damage by breaking each vehicle recovery into segments and allowing motor to cool. Do not continue power to stalled motor.
Planning and Use of Your Winch
WARNING: Read and understand all instructions and related Warnings, Cautions and Notices before attempting to install or use your Rugged Ridge® winch.
1. Ensure vehicle, slope and conditions do not approach maximum rated pull. Leave a safety margin. Winch provides greater mechanical advantage when cable is fully extended. Plan pull using as much cable as practical. Double line using snatch block is preferred.
WARNING: Secure cable attachment requires at least five (5) wraps on Spool. Do not extend red painted cable. Secure synthetic rope attachment requires a full layer on the spool. DO NOT EXCEED RATED PULL LESS SAFETY MARGIN.
2. Plan and center anchor and snatch blocks or rigging so cable pulls straight to winch. Confirm anchor point will support load with adequate safety margin. Where anchor is tree use trunk protector and shackle rated at least double maximum winch pull. Where anchor is vehicle, (see below) fully engage cable hook through towing eye or shackle rated at least double maximum winch pull. Attach to vehicle frame not bumper or winch mount.
CAUTION: Vehicle to Vehicle winching not recommended as it may exceed capacity of winch, mounting or cable. Do not drive vehicle while winching. Avoid slack cable or shock loads from rolling vehicle to reduce risk of failure. Maintain steady tension through winch and block vehicle at safe intervals. Winch not intended to tow vehicles or secure loads. Never use recovery strap as part of winch operation. Stretch/stored energy in recovery strap may create shock load.
3. Extend cable manually by disengaging clutch to free spool. Confirm cable hook fully engages anchor, strap or shackle. Do not fix hook back around cable to avoid damage. Confirm power switch on Control Handle is "OFF" and attach remote. Fully engage clutch before powering spool. Keep vehicle motor running to avoid battery drain.
4. Plan your pull, recognizing recovery winches are not intended for continuous duty. Heavy load and slow line speed indicate high amperage draw causing heat build-up in motor. (A NOTICE ) Avoid damaging motor by adjusting to shorter pull cycles and longer cool-down periods under heavy load. Do not continue power to stalling motor.
5. Begin pull by gradually taking tension on cable to avoid shock loads. As you power in, cable must wind tightly and evenly on drum to prevent over-wraps and cable damage. Avoid side-pull on spool or cable stacking against spool side plates.
6. Complete pull by securing vehicle in gear with parking brake on. Slowly power cable out to remove tension before securing rigging.
Maintenance
1. Using gloves and observing all WARNINGS and CAUTIONS described above, inspect cable and hook on regular basis and replace as necessary with cable or hook of equal strength. Cable clamp on spool must be secured with red Loctite® when replacing cable. Consult synthetic rope manufacturers load ratings, recommendations and warnings if replacing cable with hi-strength synthetic rope.
2. Using safety glasses, inspect winch, mounting plate and attachment hardware for damage or wear. Carefully trace electrical connections, from winch to control and back to battery, assuring connections are secure and protected, cables are undamaged and battery remains fully charged (minimum 650 CCA, fully charged). Replace or repair as necessary.
3. Winch is lubricated at factory and should not require additional lubrication. As electrical component, winch is not intended to be submerged in water. If submerged, have winch serviced immediately to prevent damage and corrosion. Spare and replacement parts for your Rugged Ridge® vehicle recovery winch are available from your retail distributor. See parts list attached.
