 FREE 1 to 3-Day Delivery on Orders $149+ Details
How to Install Roush Performance Off-Road Cat-Back Exhaust - Split Rear Exit on your F-150
Installation Instructions
Application: 2004-06 - Ford equipped with an extended cab or crew cab, short
bed, 4.6L / 5.4L Triton V-8 engine, two or four-wheel drive and automatic or
manual transmissions
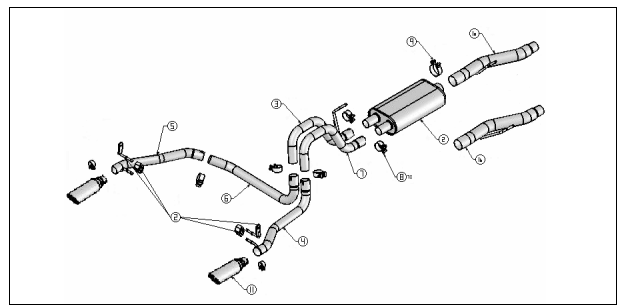
Packaging List for Complete Side Exit Exhaust Kit # R12000006/R12000007
Roush Performance recommends that an exhaust shop or professional after market parts installer, who has all the necessary equipment, tools and experienced personnel needed for proper installation, should perform the installation of this system. However, if you decide to perform the installation, we recommend that someone
should help you. Ensure the installer uses all under car safety precautions including eye protection.
Caution!!! Never work on a hot exhaust system. Serious injury in the form of burns can result If the vehicle has been in use and the exhaust system is hot, allow vehicle to cool for at least 1 hour. Always wear eye protection when working under any vehicle.
Note: It is our recommendation that you use a hoist or hydraulic lift to facilitate the installation of your new Roush Performance Exhaust System.
Taking all under car safety precautions, lift the vehicle using a hoist or hydraulic lift. Once this has been done, you may begin the removal of your old exhaust system from your vehicle.
Note: Before removing the original exhaust system from your vehicle, please compare the parts you have received with the bill of materials provided on the previous page to assure that you have all the parts necessary for the installation of your new Roush Performance Exhaust System.
Original Exhaust System Removal
Note: With a used vehicle, we suggest a penetrating spray lubricant to be applied liberally to all exhaust fasteners and allowing a significant period of time for the chemical to lubricate the threads before attempting to disassemble.
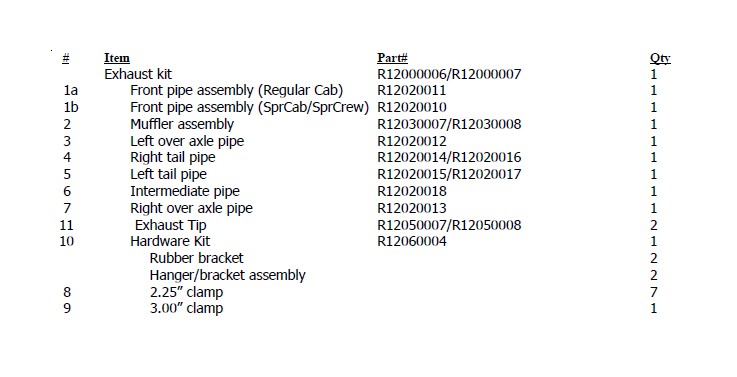
1. Unbolt the clamp shown in figure 1 located in front of the muffler assembly.
2. Lubricate all hangers and rubber brackets.
3. Using a muffler stand or an additional person to hold the exhaust system up in place, remove the hangers from the rubber brackets and remove the exhaust system from the vehicle as shown in figure 2.
Roush Performance Exhaust System Installation
Warning: Use extreme caution during installation. Torque all fasteners according to
manufacturer’s torque values and tightening sequence. DO NOT use air impact tools to tighten fasteners on Roush Performance Exhaust Systems. Use of such tools may result in bent flanges or gasket contact areas leading to exhaust leaks.
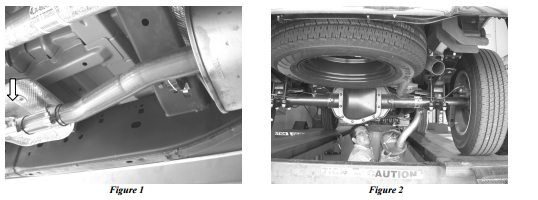
2005-06 Model Years Only:
Remove factory equipped inlet pipe by loosening the dual band clamp shown in figure A. Cut 7 inches from the front (non-clamp side) of the inlet pipe as shown in figure B. Re-install factory equipped inlet pipe on vehicle.
2004-2005 Model Year:
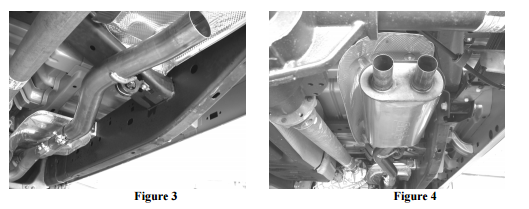
1. Place front pipe in position as shown in figure 3 installing the hanger into the rubber bracket. Use front pipe 1a for regular cab or front pipe 1b for supercab and supercrew model.
2. Place a clamp over the expanded end of the muffler and set it into position as shown in figure 4. DO NOT TIGHTEN the clamp.
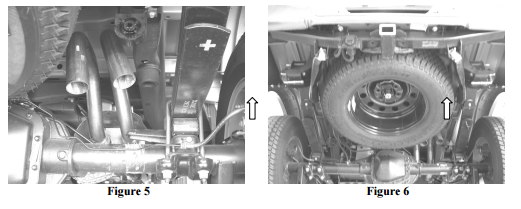
3. Place a clamp over the expanded end of both left and right over axle pipes and set them into position as shown in figure 5 installing the hanger on the left over axle pipe into the rubber hanger. DO NOT tighten the clamps.
4. On both driver’s side and passenger’s side of vehicle, remove the lower bolt from the spring perch and install each hanger/bracket assembly as shown in figure 6. Install the original hardware and tighten to the vehicle manufacturer’s recommended torque value (98 lb-ft). Install rubber brackets supplied with your system onto each hanger/bracket assembly.
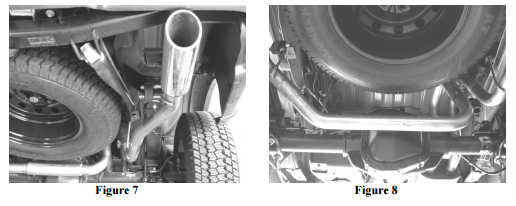
5. Place a clamp over the expanded end of the right tail pipe assembly and set it into position as shown in figure 7 installing the hanger into the rubber bracket. DO NOT tighten the clamp.
6. Place a clamp over the expanded end of the cross over pipe and set it into position as shown in figure 8. DO NOT tighten the clamp.
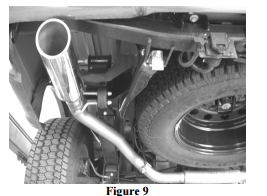
7. Place a clamp over the expanded end of the left tail pipe assembly and set it into position as shown in figure 9 installing the hanger into the rubber bracket. DO NOT tighten the clamp.
8. Check your exhaust system for proper clearance under the vehicle and also for tip alignment.
9. Once position has been determined to be correct, tighten the clamps to 32-35 ft. lbs.
10. Before starting your vehicle, make sure to check all wires, hoses, brake lines, body parts and tires for safe clearance from the exhaust system.
11. Start vehicle and check for any leaks. If any leaks are found, determine cause (such as loose or incorrectly positioned clamp) and repair as necessary.
Note: When you first start your vehicle after the installation of your new Roush Performance Exhaust System, there may be some smoke and fumes coming from the system. This is a protective oil based coating used in the manufacturing of mandrel bent performance exhaust tubing. This is not a problem and will disappear within a very short period of time after the exhaust has reached normal operating temperatures.
Congratulations!!! You have completed the installation of the Roush Performance Exhaust System.
WARRANTY
All retail parts carry a 90-day warranty from the date of purchase. This warranty covers defects in materials or workmanship, and does not include (i) normal wear and tear, environmental conditions, improper installation; (ii) road hazards, misuse, abuse, neglect, accidents, collision, fire, theft, freezing, vandalism, riot, explosion, or
objects striking the vehicle; (iii) misusing the vehicle, such as driving over curbs, overloading, racing, or using the vehicle as a stationary power source; (iv) altering, disassembling or modifying the parts; (v) defects caused or induced by failures, breakdowns, or damage by other parts, components or the vehicle; (vi) subjecting the
parts to excessive moisture or water or any motor vehicle fluids (e.g.: oil, anti-freeze, battery acid, brake fluid, etc.); (vii) acts of God, natural disasters and other similar causes beyond the reasonable control of Roush; or (viii) application of chemicals that affect the parts. This Limited Warranty does not cover surface deterioration
of paint, trim, and appearance items that result from use and/or exposure to the elements, such as stone chips, scratches, bird droppings, lightning, hail, windstorm, dings, dents, earthquake, road salt, tree sap, water or flood.
ROUSH SHALL NOT BE LIABLE TO REIMBURSE CUSTOMER/DEALER FOR INCIDENTAL OR CONSEQUENTIAL DAMAGES RESULTING FROM THE INSTALLATION OR USE OF ANY PRODUCT SOLD THROUGH THIS CATALOG OR ARISING OUT OF ANY BREACH OF WARRANTY. EXCEPT AS MAY BE STATED IN THIS CATALOG, ROUSH DISCLAIMS ALL EXPRESS AND IMPLIED WARRANTIES, INCLUDING THE WARRANTIES OF MERCHANTABILITY AND FITNESS FOR A
PARTICULAR PURPOSE. IN NO EVENT SHALL ROUSH’S LIABILITY EXCEED THE PRICE PAID BY CUSTOMER/DEALER FOR PRODUCTS SOLD REGARDLESS IF ROUSH HAS BEEN ADVISED IN ADVANCE OF ANY POTENTIAL PROBLEM OR IF A CLAIM IS BASED ON CONTRACT, TORT, STRICT LIABILITY, PRODUCT LIABILITY OR OTHERWISE. SOME STATES DO NOT ALLOW THE
EXCLUSION OR LIMITATION OF IMPLIED WARRANTIES OR THEIR DURATION, OR LIABILITY FOR INCIDENTAL OR CONSEQUENTIAL DAMAGES, SO THE ABOVE EXCLUSIONS OR LIMITATIONS MAY NOT APPLY.

