 FREE 1 to 3-Day Delivery on Orders $149+ Details
How to Install Roush Performance Off-Road Cat-Back Exhaust - Split Rear Exit on your F-150
Before installing the ROUSH Performance Product(s) exhaust system, please read
through the entire installation procedure and check to make sure all items are
present.
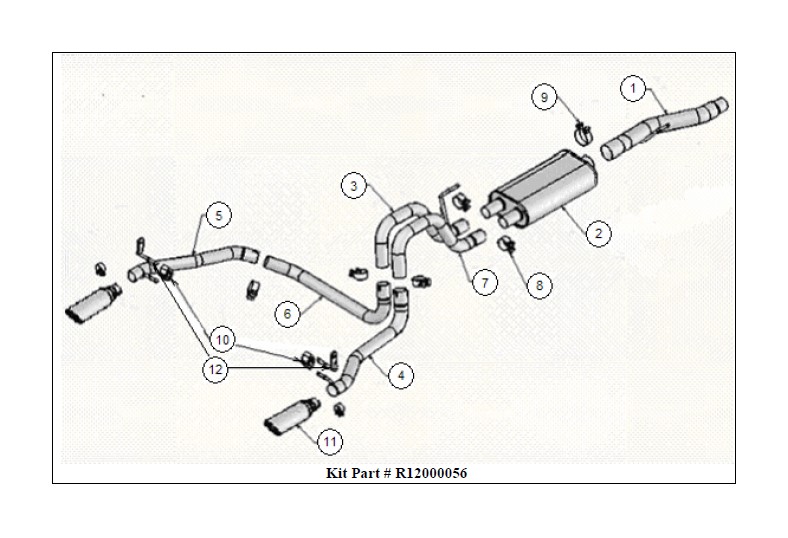
Packaging List for Complete ROUSH Rear Exit Exhaust Kit #R12000056

LIMIT OF LIABILITY STATEMENT
The information contained in this publication was accurate and in effect at the time the
publication was approved for printing and is subject to change without notice or liability.
ROUSH Performance Products (RPP) reserves the right to revise the information
presented herein or to discontinue the production of parts described at any time.
SAFETY REQUIREMENTS
STOP !!! READ IMPORTANT SAFETY CAUTIONS AND WARNINGS BEFORE PROCEEDING.
IMPORTANT SAFETY NOTICE
Appropriate disassembly, assembly methods and procedures are essential to ensure the personal safety of the individual performing the kit installation. Improper installation due to the failure to correctly follow these instructions could cause personal injury or death. Read each step of the installation manual carefully before starting the actual installation.
1. Always wear safety glasses for eye protection.
2. Place ignition switch in the OFF position.
3. Always apply the parking brake when working on a vehicle.
4. Block the front and rear tire surface to prevent unexpected vehicle movement.
5. Operate the engine only in well-ventilated areas to avoid exposure to carbon monoxide.
6. If working without a lift, always consult vehicle manual for correct lifting specifications.
7. Do not smoke or use flammable items near or around the fuel system.
8. Use chemicals and cleaners in well-ventilated areas.
9. Batteries produce explosive gases, which can cause personal injury. Therefore, do not allow flames, sparks or flammable substances to come near the battery.
10. Keeps hands and any other objects away from the radiator fan blades.
11. Keep yourself and your clothing away from moving parts when the engine is running.
12. Do not wear loose clothing or jewelry that can get caught in rotating parts or scratch surface finishes.
13. Allow the engine, cooling system, brakes and exhaust to cool before working on a vehicle.
IMPORTANT PRODUCT NOTES
• ROUSH Performance Products recommends professional installation of this
Exhaust Kit.
• It is recommended that there is at least 3/4” of clearance between the exhaust pipes
and the frame and painted body sheet metal to prevent heat related damage to
painted surfaces or fire.
Section A – Original/Stock Exhaust System Removal
1. Use a muffler stand or an additional person to hold the original exhaust system up
in place.
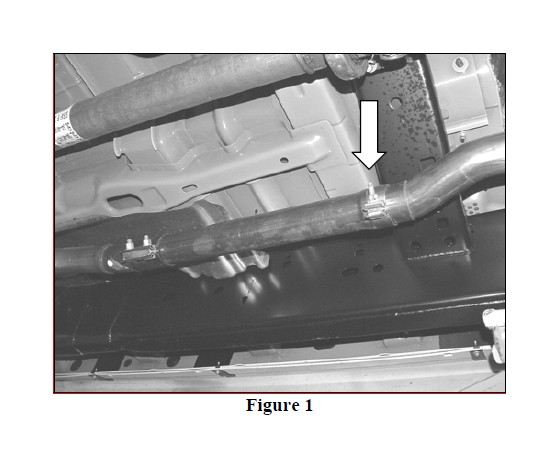
2. Unbolt the clamp, shown in Figure 1, located in front of the muffler assembly.
3. Unbolt the original rubber isolators (3) from the vehicle.
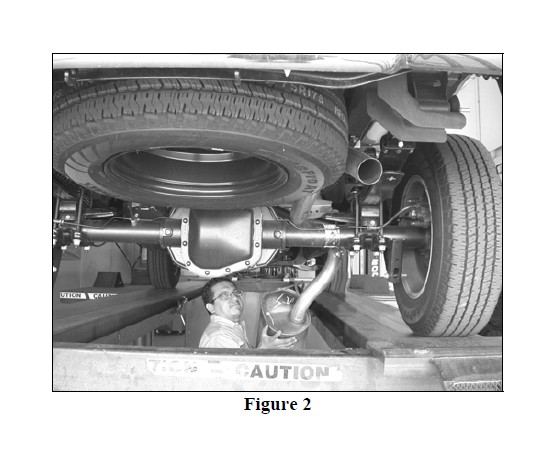
4. Remove the original exhaust system, with rubber isolators attached, as shown in
Figure 2.
5. Once the original exhaust system is removed from the vehicle, remove the original
rubber insulators from the original exhaust system. Only the front and center
original rubber insulators will be re-used on the ROUSH system. Discard the
original rear rubber insulator.
Section B - ROUSH Performance Exhaust System Installation
NOTE: Customers with Regular Cabs w/ 6.5ft beds and Super Cabs w/ 5.5ft beds must modify the Roush-supplied “Front Pipe” (Item #1) prior to installation. The exhaust hanger on the front pipe must be completely removed to allow for proper installation in these vehicles only.
1. Install the factory rubber isolator onto the new Front Pipe’s hanger (#1). Make sure
the isolator is oriented in the correct direction. Refer to note above as this step
may not be applicable to your application.
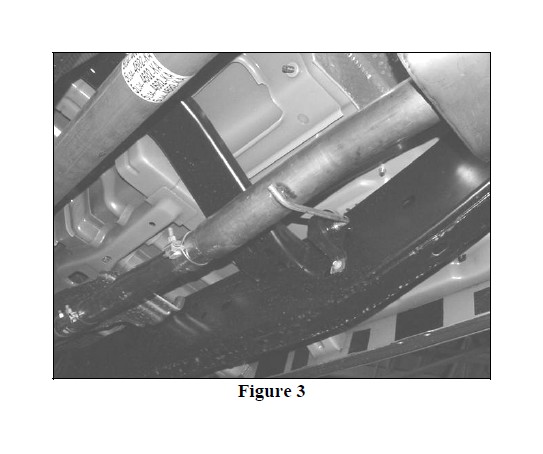
2. Place the Front Pipe in position as shown in Figure 3 and torque the isolator bolt to
15 lb-ft
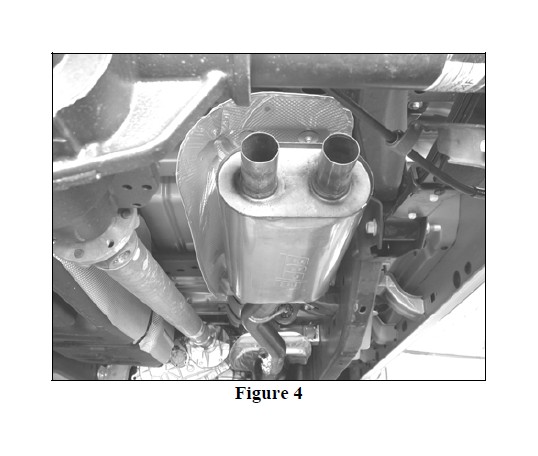
3. Place the 3in Clamp (#9) over the expanded end of the Muffler (#2) and install the
Muffler as shown in Figure 4.
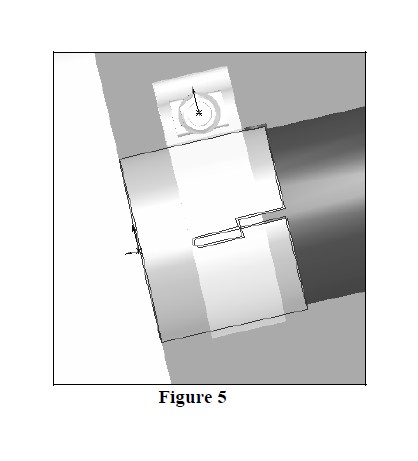
4. Make sure the Clamp opening is rotated 90° from the slot on the Muffler inlet and make sure the Clamp covers the slot on the Muffler inlet, as shown in Figure 5. This will prevent exhaust leaks.
5. Tighten the Clamp so that it doesn’t rotate. DO NOT tighten the Clamp completely at this time. All of the Clamps will be torqued after the system is installed.
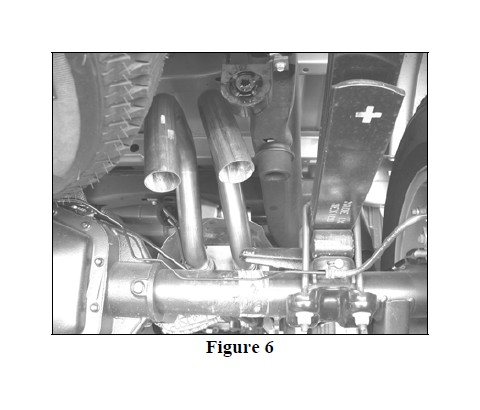
6. Locate the other original rubber isolator and install it on the Left Over-Axle Pipe’s Hanger (#3). Place a 2.25in Clamp (#8) over the expanded ends of the Left and Right Over-Axle Pipes (#7).
7. Connect both Pipes to the Muffler Outlet Pipes as shown in Figure 6 and position the Clamps again as shown in Figure 5.
8. Torque the original rubber insulator bolt on the Left Over-Axle Pipe to 15 lb-ft.
9. Tighten the Clamps so they don’t rotate. DO NOT tighten the Clamps completely at this time. All of the Clamps will be torqued after the system is installed.
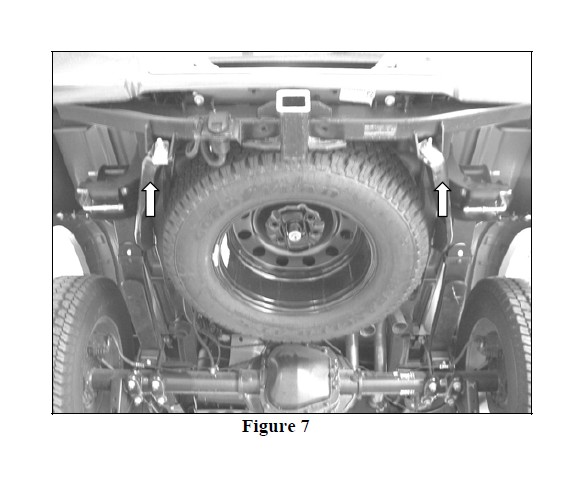
10. On both driver and passenger side of vehicle, remove the nut from the lower bolt on the spring perch. Install each new Exhaust Hanger (#12) as shown in Figure 7. The Exhaust Hanger Ends must point toward the center of the vehicle.
11. Re-torque the nuts on the lower bolts to 98 lb-ft. Install the new Rubber Isolators (#10) onto the new Exhaust Hangers.
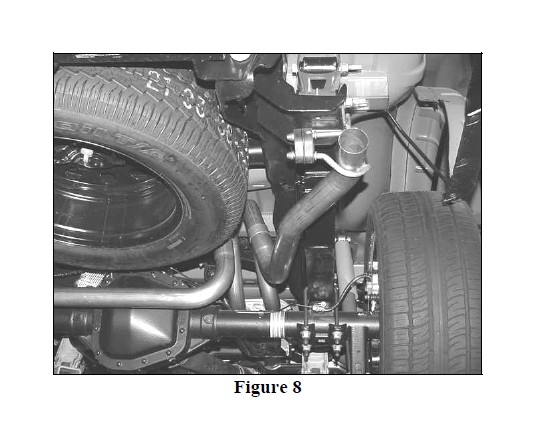
12. Place a 2.25in Clamp (#8) over the expanded end of the Right Tail Pipe (#4) and install the Pipe into the Right Rubber Isolator as shown in Figure 8.
13. Connect the Right Tail Pipe to the Right Over-Axle Pipe and position the Clamp again as shown in Figure 5.
14. Tighten the Clamp so that it doesn’t rotate. DO NOT tighten the Clamp completely at this time. All of the Clamps will be torqued after the system is installed.
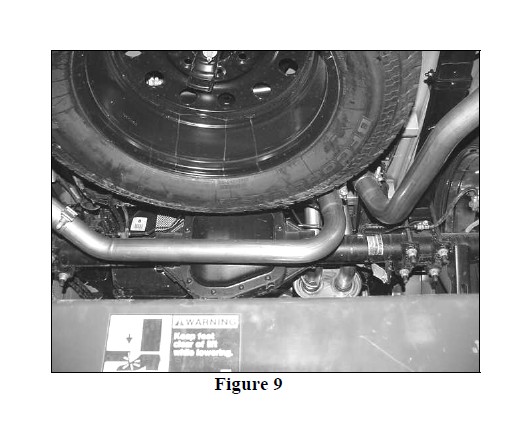
15. Place a 2.25in Clamp (#8) over the expanded end of the Crossover Pipe and connect it to the Left Over-Axle Pipe as shown in Figure 9.
16. Tighten the Clamp so that it doesn’t rotate. DO NOT tighten the Clamp completely at this time. All of the Clamps will be torqued after the system is installed.
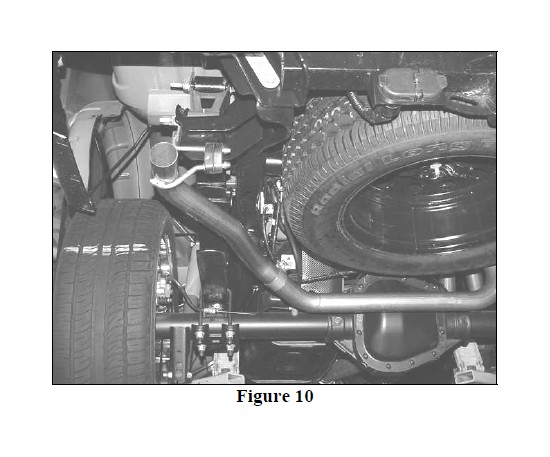
17. Place a 2.25in Clamp (#8) over the expanded end of the Left Tail Pipe (#5) and install the Pipe into the Left Rubber Isolator as shown in Figure 10.
18. Connect the Left Tail Pipe to the Left Over-Axle Pipe and position the Clamp again as shown in Figure 5.
19. Tighten the Clamp so that it doesn’t rotate. DO NOT tighten the Clamp completely at this time. All of the Clamps will be torqued after the system is installed.
20. Place a 2.25in Clamp (#8) over the expanded ends of both the Left and Right Exhaust Tips (#11) and installed the Exhaust Tips onto the Tail Pipes.
21. Position the Clamps again as shown in figure 5 and tighten the Clamps so they don’t rotate. DO NOT tighten the Clamps completely at this time. All of the Clamps will be torqued after the system is installed.
Exhaust System Fitment Check and Final Torque
The exhaust system clamps must be torqued starting at the front of vehicle, then
moving to the rear of the vehicle.
1. Front Pipe – Torque the original Front Pipe Clamp to 40 lb-ft.
2. Muffler – Make sure the Muffler Outlet Pipe body is horizontal and torque the Muffler Inlet Clamp to 40 lb-ft.
3. Left Over-Axle Pipe – Make sure the Hanger is centered in the Rubber Isolator and torque the Clamp to 40 lb-ft
4. Right Over-Axle Pipe – Make sure there is approximately ½” separating this Pipe from the vehicle frame and ½” separating this Pipe and the Left Over-Axle Pipe. Torque the Clamp to 40 lb-ft.
5. Crossover Pipe – Make sure this Pipe and horizontal to the ground and parallel to the axle. Torque the Clamp to 40 lb-ft.
6. Tail-Pipes – Make sure the Hangers on these Pipes are parallel and centered compared to the Hangers on the vehicle. Torque the Clamps to 40 lb-ft.
7. Exhaust Tips – Make sure the Tips are rotated with the longest part of the tip toward the top. Make sure the Tips protrude the same distance from the rear of the bumper/valence. Torque the Clamps to 40 lb-ft.
8. Double check to make sure all wires, hoses, brake lines, body parts and tires have safe clearance from the exhaust system. Make adjustments where necessary.
9. Start the vehicle and check for any leaks. If any leaks are found, determine the cause (such as loose or incorrectly positioned clamps) and repair as necessary.
Note: When the vehicle is first started after installation of the new ROUSH Performance Exhaust System, there may be some smoke and/or fumes coming from the system. This is a protective oil-based coating used in the manufacturing of mandrel bent performance exhaust tubing. This is not a problem and will disappear within a very short period of time after the exhaust has reached normal operating temperatures.
Congratulations!!! You have completed the installation of the ROUSH Performance Products, F-150 Exhaust Kit. It is recommended that you save all parts removed from your vehicle during the installation of this kit.

