FREE 1 to 3-Day Delivery on Orders $149+ Details
How to Install Roush Cat-Back Exhaust - Single Side Exit on your F-150
Installation Time
2 hours
Tools Required
- Jack & Jack Stands or Lift
- 3/8” Ratchet
- 10mm Socket
- 12mm Socket
- 13mm Socket
- 15mm Socket
- 3/8” Ratchet Extension
- 24mm Wrench
- Tape Measure
- Marker
- Sawzall or similar cutting tool
- Metal File
- Penetrating Spray

Shop Parts in this Guide
Factory Exhaust Removal
Step 1: Loosen and remove the front two (2) 13mm bolts connecting the Y-pipe to the factory catback.
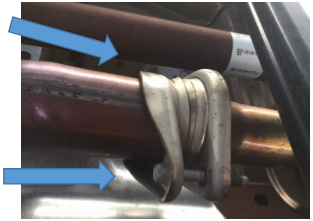
Step 2: Loosen the 15mm bolt clamping the mid pipe to the factory muffler.
Step 3: Rotate the resonator pipe to unlock the pipe from the muffler and pull towards the front of the vehicle to remove. This was easier when removing the exhaust hanger located before the factory muffler on the passenger side frame to provide more room to work.
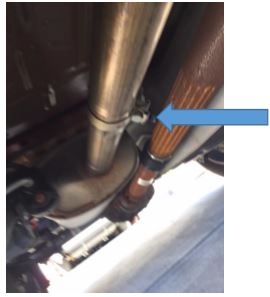
Step 4: Pulling towards the rear of the car, remove the rest of the factory exhaust from the exhaust hangers. If you have difficulty removing the exhaust from the hangers, spray penetrating lube in the hangers to assist, or remove them from the body of the vehicle with a 10mm socket. Once free, slide the muffler and pipe assembly towards the front of the vehicle and over the axle to remove. You will need to rotate the assembly several times to free it over the axle.
Roush Cat-Back Install prep
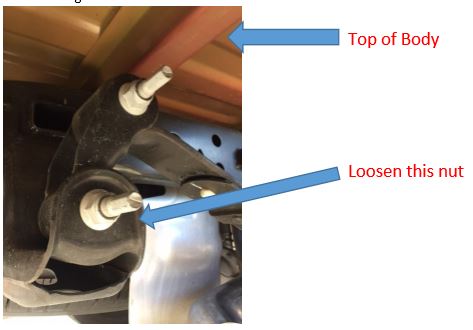
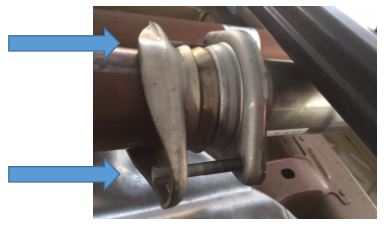
Step 5: Locate and loosen the 24mm nut on the rear leaf spring mount. You will only need to back the nut out a few threads to make room for installing the exhaust tip hanger later in the installation. Loosen the nut using a 24mm wrench and a 12mm socket to hold the inside of the bolt.
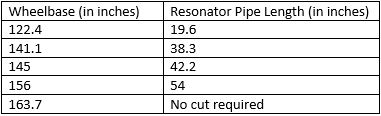
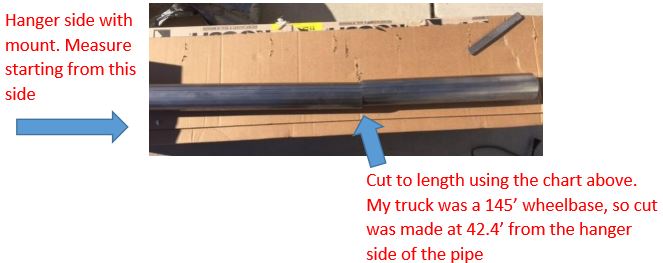
**Before installing your Roush Cat-back, you will need to cut the resonator delete pipe to properly fit your truck’s wheelbase. Use a tape measure to measure between front wheel center to rear wheel center.
Step 6: From the hanger side of the resonator delete pipe (see below), measure and cut to the appropriate length based on your truck’s wheelbase (see chart below) File the cut end smooth of using a metal file
Installing the Roush Cat-Back
Step 7: Loosely install the supplied exhaust flange at the end of the factory y-pipe, reusing the factory 13mm bolts. Slide a supplied 3in exhaust clamp in place over the flange.
Step 8: Install the supplied over-axle pipe into the factory exhaust hangers, starting from the rear of the vehicle. It may be necessary to remove the factory hanger nearest the driveshaft to install the pipe. This can be done with a 10mm socket. Slide a supplied 3in exhaust clamp in place over flanged end.
Step 9: Install the Roush muffler into the over axle pipe. The flanged side of the muffler will be facing the front of the vehicle. Slide a supplied 3in exhaust clamp in place over flanged end of the muffler.
Step 10: Install the resonator delete pipe, now cut to size, between the muffler and the supplied flange at the end of the y pipe. The hanger end will be installed toward the new muffler and will use the factor hanger. Install in place at the front of the vehicle first, then installing into the muffler.
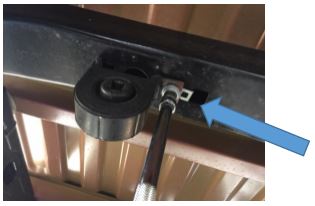
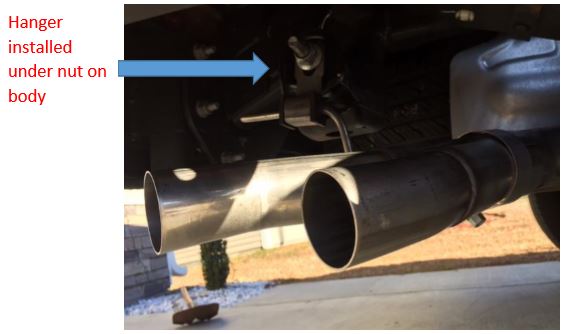
Step 11: Slide the supplied exhaust hanger over the y-pipe for the dual exhaust tips. Slide a supplied 3in exhaust clamp in place over the larger end where it mates to the over axle pipe. Install the larger end on the over axle pipe and then position the hanger so that the open end (looks like a fork) slides onto the rear leaf spring bolt you loosened earlier between the nut and the leaf mount.
Step 12: Tighten all bolts and clamps from the front of the vehicle to rear as follows:
Two (2) 13mm bolts from the y pipe to the supplied exhaust flange
One (1) 3” clamp from the flange to the resonator delete pipe – 15mm
One (1) 3” clamp from the resonator delete pipe to the Roush muffler – 15mm
One (1) 3” clamp from the Roush muffler to the over axle pipe – 15mm
One (1) 3” clamp from the Roush muffler to the over axle pipe – 15mm
One (1) 3” clamp from the over axle pipe to the exhaust tip y-pipe– 15mm
Leaf spring nut and bolt: 24mm outside on nut, 12mm inside on bolt. Ford torque spec is 185 Nm and must be done with the vehicle on the ground under its own weight.
Step 13: Slide a supplied 2.5” clamp over the smaller end of each exhaust tip. Install over each side of the y-pipe for the tips. Tighten down the tips using a 15mm socket, orienting the tips so the Roush logo faces towards the top of the truck bed.
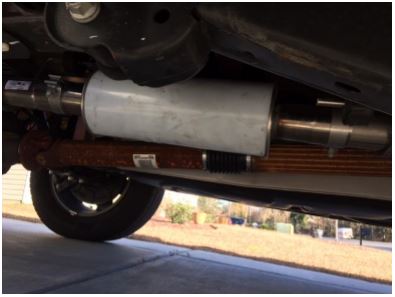
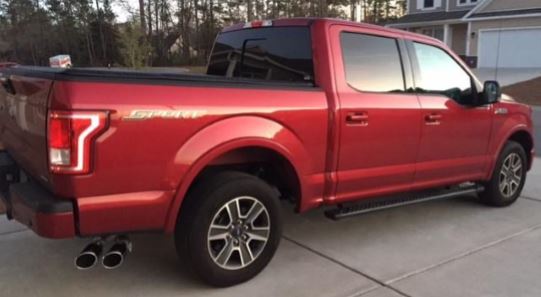
Finished Product:
Instructions provided by American Muscle customer Ryan McCallum 12/22/2016